Laravel 9 Generate Multi Unique Slug On Page Load Tutorial
Apr 15, 2022 . Admin
Hi Dev,
In this example is how to generate multi unique slug on page load in laravel 9?.
We will elaborate how to generate dynamic multiple slug in the Laravel 9 application.
The specific keyword or id denotes the slug. You most probably use it when you want to refer to an item while retaining the ability to see at it.
So let's start following step.
Step 1: Download LaravelLet us begin the tutorial by installing a new laravel application. if you have already created the project, then skip following step.
composer create-project laravel/laravel example-appStep 2: Database Configuration
You can use MAMP or XAMPP as a local web server, insert the database name, username and password in the .env file.
.envDB_CONNECTION=mysql DB_HOST=localhost DB_PORT=3306 DB_DATABASE=laravel_db DB_USERNAME=root DB_PASSWORD=Step 3: Create Model and Migration
In this step, you have to generate model and migration files. It can be done by using a single command, hence execute the following command.
php artisan make:model Post -m
After running the suggested command, new model and migration files have been generated, and you will add values in these files to create a table in the database.
app/Models/Post.php
<?php

namespace App\Models;

use Illuminate\Support\Str;
use Illuminate\Database\Eloquent\Factories\HasFactory;
use Illuminate\Database\Eloquent\Model;

class Post extends Model
{
    use HasFactory;

    /**
     * The attributes that are mass assignable.
     *
     * @var array
     */
    protected $fillable = [
        'name',
        'slug',
        'description'
    ];

    public $timestamps = false;


    /**
     * Write code on Method
     *
     * @return response()
     */
    protected static function boot()
    {
        parent::boot();

        static::created(function ($post) {
            $post->slug = $post->generateSlug($post->name);
            $post->save();
        });
    }

    /**
     * Write code on Method
     *
     * @return response()
     */
    private function generateSlug($name)
    {
        if (static::whereSlug($slug = Str::slug($name))->exists()) {
            $max = static::whereName($name)->latest('id')->skip(1)->value('slug');
            if (isset($max[-1]) && is_numeric($max[-1])) {
                return preg_replace_callback('/(\d+)$/', function($mathces) {
                    return $mathces[1] + 1;
                }, $max);
            }
            return "{$slug}-2";
        }

        return $slug;
    }

}
Now, get into the app/database/migrations/create_posts_table.php, and you have to insert the table values into this migration file.
app/database/migrations/create_posts_table.php
<?php

use Illuminate\Database\Migrations\Migration;
use Illuminate\Database\Schema\Blueprint;
use Illuminate\Support\Facades\Schema;

return new class extends Migration
{
    /**
     * Run the migrations.
     *
     * @return void
     */
    public function up()
    {
        Schema::create('posts', function (Blueprint $table) {
            $table->id();
            $table->string('name', 150);
            $table->string("slug", 150);
            $table->text('description');
            $table->timestamps();
        });
    }

    /**
     * Reverse the migrations.
     *
     * @return void
     */
    public function down()
    {
        Schema::dropIfExists('posts');
    }
}
Step 4: Run Database Migration
All the migration and model files have been updated now, and you have to execute the command to run migrations.
php artisan migrateStep 5: Create Controller
Let us generate a new controller file using the following composer command.
php artisan make:controller PostController
Next, you have to open the app/Http/Controllers/PostController.php and update the file with the given code.
app/Http/Controllers/PostController.php
<?php

namespace App\Http\Controllers;

use Illuminate\Http\Request;
use App\Models\Post;

class PostController extends Controller
{
    /**
     * Write code on Method
     *
     * @return response()
     */
    public function index()
    {
        $post = Post::create([
            "name" => "This is my post",
            "slug" => "laravel-generate-multi-slug-on-load",
            "description" => "This is just the laravel generate multi slug example"
        ]);

        dd('Successfully Slug Store.');
    }

}
Step 6: Create Route
Now, you need to have a route defined in the routes/web.php file, and this route will be the endpoint or url for generating the slug.
routes/web.php
<?php

use Illuminate\Support\Facades\Route;
use App\Http\Controllers\PostController;

/*
|--------------------------------------------------------------------------
| Web Routes
|--------------------------------------------------------------------------
|
| Here is where you can register web routes for your application. These
| routes are loaded by the RouteServiceProvider within a group which
| contains the "web" middleware group. Now create something great!
|
*/

Route::get('/post', [PostController::class, 'index']);
Run Laravel App:
All steps have been done, now you have to type the given command and hit enter to run the laravel app:
php artisan serve
Now, you have to open web browser, type the given URL and view the app output:
http://localhost:8000/postOutput:
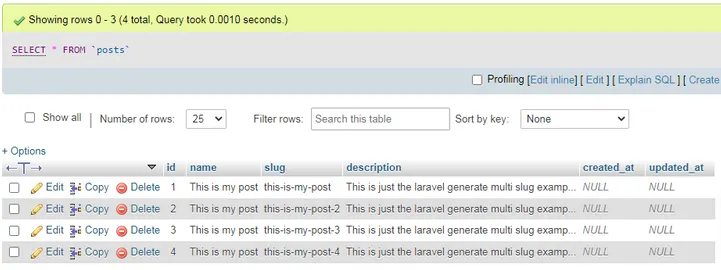
I hope it can help you......