Laravel 9 Send Automatic Email to User Tutorial
May 14, 2022 . Admin
Hi Dev,
In this tutorial we will go over the demonstration of laravel 9 send an automatic email to user tutorial. This article goes in detail on how to send an automatic email in laravel dynamic sender. This tutorial will give you a simple example of how to send an automatic email in laravel example. This article will give you simple example of in laravel 9 send automatic email using cron job.
So, Many times we require to send email automatically to users for update property or products. So at that time you can define some basic logic for each day, hours, etc can run and send email notifications.
We will implement how to send automatic birthday reminders in email using a cron job in laravel app.
Step 1: Download LaravelLet us begin the tutorial by installing a new laravel application. if you have already created the project, then skip the following step.
composer create-project laravel/laravel example-app
So, After creating account you will get mail configuration as mail host, mail port, mail username, mail password. you can see bellow image:
Step 2: .env file Here, now we can add this details in .env file.MAIL_DRIVER=smtp MAIL_HOST=smtp.gmail.com MAIL_PORT=587 MAIL_USERNAME=xyz@gmail.com MAIL_PASSWORD=123456 MAIL_ENCRYPTION=tlsStep 3: Update Migration and Model
In this third step, we require to add new row "date_of_birth" in users table and model. than we need to run migration. so let's change that on both file.
<?php

use Illuminate\Database\Migrations\Migration;
use Illuminate\Database\Schema\Blueprint;
use Illuminate\Support\Facades\Schema;

return new class extends Migration
{
    /**
     * Run the migrations.
     *
     * @return void
     */
    public function up()
    {
        Schema::table('users', function (Blueprint $table) {
            $table->date('date_of_birth')->nullable();
        });
    }

    /**
     * Reverse the migrations.
     *
     * @return void
     */
    public function down()
    {
        Schema::table('users', function (Blueprint $table) {
            $table->dropColumn('date_of_birth');
        });
    }
}
app/Models/User.php
<?php

namespace App\Models;

use Illuminate\Contracts\Auth\MustVerifyEmail;
use Illuminate\Database\Eloquent\Factories\HasFactory;
use Illuminate\Foundation\Auth\User as Authenticatable;
use Illuminate\Notifications\Notifiable;
use Laravel\Sanctum\HasApiTokens;

class User extends Authenticatable
{
    use HasApiTokens, HasFactory, Notifiable;

    /**
     * The attributes that are mass assignable.
     *
     * @var array
     */
    protected $fillable = [
        'name',
        'email',
        'password',
        'date_of_birth'
    ];

    /**
     * The attributes that should be hidden for serialization.
     *
     * @var array
     */
    protected $hidden = [
        'password',
        'remember_token',
    ];

    /**
     * The attributes that should be cast.
     *
     * @var array
     */
    protected $casts = [
        'email_verified_at' => 'datetime',
    ];
}
Now we need to run migration.
so let's run bellow command:
php artisan migrateStep 4: Create Seeder
In this section we need to create a dummy record to the database so create new seeder UserSeeder.php for dummy user data.
database/seeders/UserSeeder.php
<?php

namespace Database\Seeders;

use Illuminate\Database\Console\Seeds\WithoutModelEvents;
use Illuminate\Database\Seeder;
use App\Models\User;

class UserSeeder extends Seeder
{
    /**
     * Run the database seeds.
     *
     * @return void
     */
    public function run()
    {
        $user = [
            [
                'name' => 'Bhavesh Sonagra',
                'email' => 'bhaveshs.aatmaninfo@gmail.com',
                'date_of_birth' => '1997-08-15',
                'password' => bcrypt(123456),
            ],
            [
                'name' => 'Nikhil Patel',
                'email' => 'nikhilt.aatmaninfo@gmail.com',
                'date_of_birth' => '1997-05-14',
                'password' => bcrypt(123456),
            ],
            [
                'name' => 'Vishal Patel',
                'email' => 'vishalp.aatmaninfo@gmail.com',
                'date_of_birth' => '1999-06-25',
                'password' => bcrypt(123456),
            ],
        ];

        foreach($user as $key => $value) {
            $find = User::where('name',$value['name'])->first();

            if (is_null($find)) {
                User::create($value);
            }
        }
    }
}
So, successfully create a user seeder now run the seeder following command..
php artisan db:seed --class=UserSeederStep 5: Create New Command
In this step, we need to create our custom command. custom command will execute with task scheduling scron job. so, let's run bellow command to create new custom command.
php artisan make:command HappyBirthdayCron --command=happybirthdayapp/Console/Commands/HappyBirthdayCron.php
<?php

namespace App\Console\Commands;

use Illuminate\Console\Command;
use App\Models\User;
use Mail;
use \Carbon\Carbon;
use App\Mail\BirthdayMail;

class HappyBirthdayCron extends Command
{
    /**
     * The name and signature of the console command.
     *
     * @var string
     */
    protected $signature = 'happybirthday';

    /**
     * The console command description.
     *
     * @var string
     */
    protected $description = 'Command description';

    /**
     * Execute the console command.
     *
     * @return int
     */
    public function handle()
    {
        $users = User::whereMonth('date_of_birth', '=', date('m'))->whereDay('date_of_birth', '=', date('d'))->get();

        foreach($users as $key => $user)
        {
            $email = $user->email;

            Mail::to($email)->send(new BirthdayMail($user));
        }
    }
}
Step 6 : Create Mail
In this step we will create mail class BirthdayMail for email sending. Here we will write code for which view will call and object of user. So let's run bellow command.
php artisan make:mail BirthdayMailapp/Mail/BirthdayMail.php
<?php

namespace App\Mail;

use Illuminate\Bus\Queueable;
use Illuminate\Contracts\Queue\ShouldQueue;
use Illuminate\Mail\Mailable;
use Illuminate\Queue\SerializesModels;

class BirthdayMail extends Mailable
{
    use Queueable, SerializesModels;

    public $details;

    /**
     * Create a new message instance.
     *
     * @return void
     */
    public function __construct($details)
    {
        $this->details = $details;
    }

    /**
     * Build the message.
     *
     * @return $this
     */
    public function build()
    {
        return $this->subject('Lucky You: It’s Your Birthday Month!')
                    ->view('emails.happyBirthday');
    }
}
Step 7 : Create View Blade
In this step, we will create blade view file and write email that we want to send.
Now we just write some dummy text. create bellow files on "emails" folder.
resources/views/emails/happyBirthday.blade.php
<!DOCTYPE html>
<html>
<head>
    <title>Happy birthday to you!</title>
</head>
<body>
    <p>May all your wishes come true. Happy birthday, <strong>{{ $details['name'] }}</strong>!</p>
</body>
</html>
Step 8: Register as Task Scheduler
So, In this section, we require to define our commands on Kernel.php file with time when you want to run your command like as bellow functions:
| ->everyMinute(); | Run the task every minute |
| ->everyFiveMinutes(); | Run the task every five minutes |
| ->everyTenMinutes(); | Run the task every ten minutes |
| ->everyFifteenMinutes(); | Run the task every fifteen minutes |
| ->everyThirtyMinutes(); | Run the task every thirty minutes |
| ->hourly(); | Run the task every hour |
| ->hourlyAt(17); | Run the task every hour at 17 mins past the hour |
| ->daily(); | Run the task every day at midnight |
| ->dailyAt(’13:00?); | Run the task every day at 13:00 |
| ->twiceDaily(1, 13); | Run the task daily at 1:00 & 13:00 |
| ->weekly(); | Run the task every week |
| ->weeklyOn(1, ‘8:00’); | Run the task every week on Tuesday at 8:00 |
| ->monthly(); | Run the task every month |
| ->monthlyOn(4, ’15:00?); | Run the task every month on the 4th at 15:00 |
| ->quarterly(); | Run the task every quarter |
| ->yearly(); | Run the task every year |
| ->timezone(‘America/New_York’); | Set the timezone |
<?php

namespace App\Console;

use Illuminate\Console\Scheduling\Schedule;
use Illuminate\Foundation\Console\Kernel as ConsoleKernel;

class Kernel extends ConsoleKernel
{
    /**
     * Define the application's command schedule.
     *
     * @param  \Illuminate\Console\Scheduling\Schedule  $schedule
     * @return void
     */
    protected function schedule(Schedule $schedule)
    {
        $schedule->command('happybirthday')->everyMinute();
        // $schedule->command('inspire')->hourly();
    }

    /**
     * Register the commands for the application.
     *
     * @return void
     */
    protected function commands()
    {
        $this->load(__DIR__.'/Commands');

        require base_path('routes/console.php');
    }
}
Step 9: Run Scheduler Command For Test
now we are ready to run our cron, so you can manually check using following command of your cron. so let's run bellow command:
php artisan schedule:runStep 10: Cron Job Setup on Server
Here, i will show you how to setup cron job command on server. you need to install crontab on server. if you are using ubuntu server then it already installed. so let's run bellow command and add new entry for cron job.
crontab -e
Now, add bellow line to crontab file. make sure you need to set your project path correctly on it.
* * * * * cd /path-to-your-project && php artisan schedule:run >> /dev/null 2>&1
Now, you can check on server as well.
Output: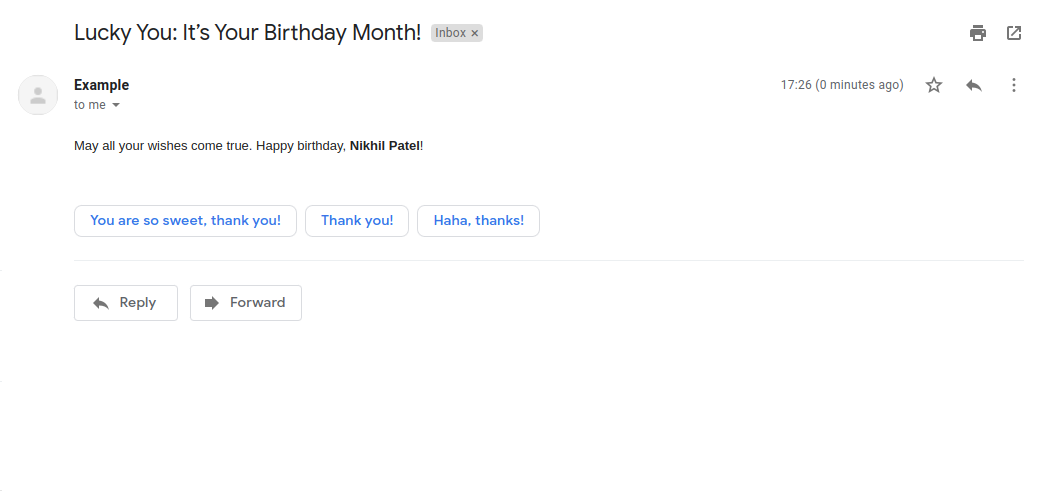
It will help you...