Laravel Datatable Date Range Filter Example
Nov 08, 2022 . Admin
Hello Friends,
This example is focused on the laravel datatable date range filter example. you can understand the concept of the laravel yajra datatables date range filter example. it's a simple example of how to implement a date range filter in yajra datatables in laravel. I’m going to show you about yajra datatables date range filter example in laravel. Alright, let’s dive into the steps.
You can use this example with the versions of laravel 6, laravel 7, laravel 8, and laravel 9.
So I am here to show you an example of a datatables date range filter example in the Laravel application with yajra datatable. So, Here I will discuss how to make the Data range filter in Laravel Datatable with Server-side processing by using the yajra Datatables package by using Ajax request.
We will take requests, one if from_date and the other is to_date, and using those dates, I will filter data.
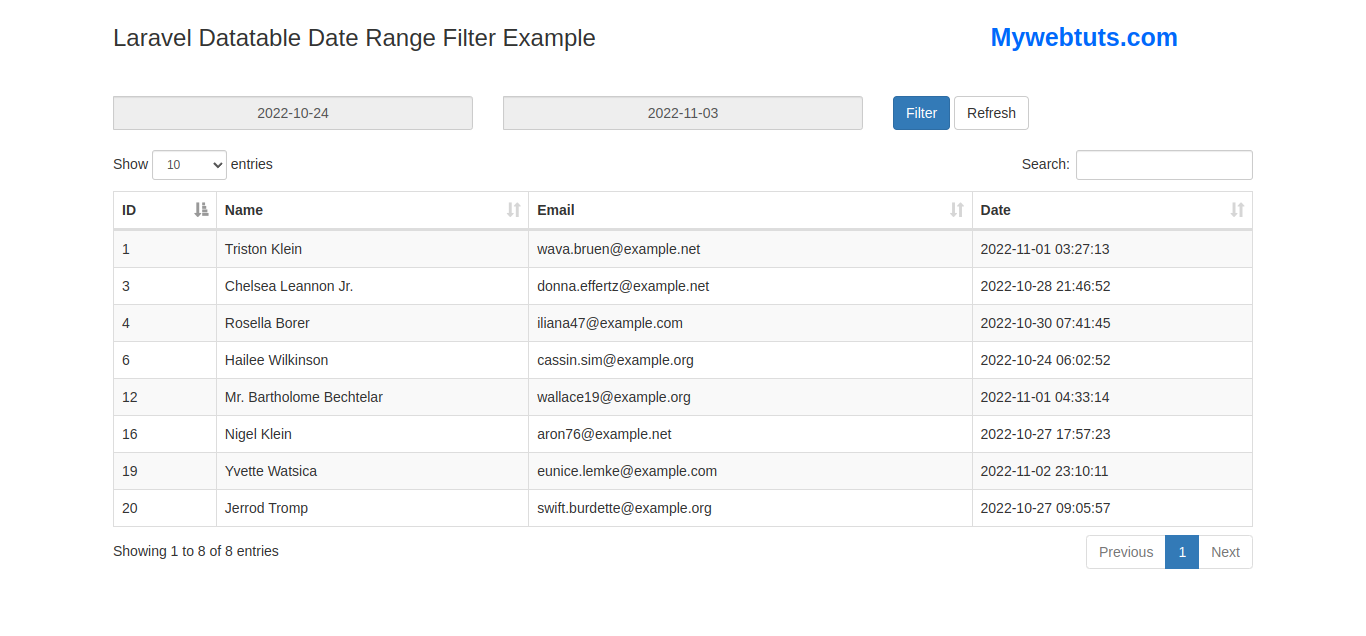
You have just to follow the below step and you will get the layout as below:
Step 1: Install LaravelThis is optional; however, if you have not created the laravel app, then you may go ahead and execute the below command:
composer create-project laravel/laravel example-appStep 2: Install yajra Datatable
In this step, we have to install the yajra datatable package. So run the below command:
composer require yajra/laravel-datatables-oracle
Update config/app.php with the following code:
config/app.php'providers' => [ .... Yajra\DataTables\DataTablesServiceProvider::class, ] 'aliases' => [ .... 'DataTables' => Yajra\DataTables\Facades\DataTables::class, ]Step 3: Create Format Route web.php
<?php

use Illuminate\Support\Facades\Route;
use App\Http\Controllers\DateRangeController;

/*
|--------------------------------------------------------------------------
| Web Routes
|--------------------------------------------------------------------------
|
| Here is where you can register web routes for your application. These
| routes are loaded by the RouteServiceProvider within a group which
| contains the "web" middleware group. Now create something great!
|
*/

Route::resource('daterange', DateRangeController::class);
Step 4: Create DateRangeController
we will create DateRangeController. so you can see the below code with output:
php artisan make:controller DateRangeControllerApp\Http\Controllers\DateRangeController
<?php

namespace App\Http\Controllers;

use Illuminate\Http\Request;
use DB;

class DateRangeController extends Controller
{
    function index(Request $request)
    {
        if(request()->ajax()) {

            if(!empty($request->from_date)) {

                $data = DB::table('users')
                    ->whereBetween('created_at', array($request->from_date, $request->to_date))
                    ->get();

            } else {

                $data = DB::table('users')
                    ->get();

            }

            return datatables()->of($data)->make(true);
        }

        return view('daterange');
    }
}
Step 5: Create View Blade File
Here for the date range filter, we have used the Date picker library for selecting dates. Below you can find the source of the below file.
resources/views/daterange.blade.php
<!DOCTYPE html>
<html lang="en">
<head>
    <meta charset="UTF-8">
    <meta name="viewport" content="width=device-width, initial-scale=1">
    <title>Laravel Datatable Date Range Filter Example : Mywebtuts.com</title>
    <script src="https://ajax.googleapis.com/ajax/libs/jquery/2.2.0/jquery.min.js"></script>
    <link rel="stylesheet" href="https://maxcdn.bootstrapcdn.com/bootstrap/3.3.6/css/bootstrap.min.css" />
    <script src="https://cdn.datatables.net/1.10.12/js/jquery.dataTables.min.js"></script>
    <script src="https://cdn.datatables.net/1.10.12/js/dataTables.bootstrap.min.js"></script>
    <link rel="stylesheet" href="https://cdn.datatables.net/1.10.12/css/dataTables.bootstrap.min.css" />
    <script src="https://maxcdn.bootstrapcdn.com/bootstrap/3.3.6/js/bootstrap.min.js"></script>
    <link rel="stylesheet" href="https://cdnjs.cloudflare.com/ajax/libs/bootstrap-datepicker/1.8.0/css/bootstrap-datepicker.css" />
    <script src="https://cdnjs.cloudflare.com/ajax/libs/bootstrap-datepicker/1.8.0/js/bootstrap-datepicker.js"></script>
</head>
<body>
<div class="container">
    <br />
    <div class="row">
        <h3 class="col-md-9" style="padding: 5px 15px; margin:0px;">Laravel Datatable Date Range Filter Example</h3>
        <strong class="col-md-3" style="font-size: 25px; color:#006AFF">Mywebtuts.com</strong>
    </div>
    <br />
    <br />
    <div class="row input-daterange">
        <div class="col-md-4">
            <input type="text" name="from_date" id="from_date" class="form-control" placeholder="From Date" readonly />
        </div>
        <div class="col-md-4">
            <input type="text" name="to_date" id="to_date" class="form-control" placeholder="To Date" readonly />
        </div>
        <div class="col-md-4">
            <button type="button" name="filter" id="filter" class="btn btn-primary">Filter</button>
            <button type="button" name="refresh" id="refresh" class="btn btn-default">Refresh</button>
        </div>
    </div>
    <br />
    <div class="table-responsive">
        <table class="table table-bordered table-striped" id="order_table">
            <thead>
                <tr>
                    <th>ID</th>
                    <th>Name</th>
                    <th>Email</th>
                    <th>Date</th>
                </tr>
            </thead>
        </table>
    </div>
</div>
<script>
    $(document).ready(function(){
        $('.input-daterange').datepicker({
            todayBtn:'linked',
            format:'yyyy-mm-dd',
            autoclose:true
        });

        load_data();

        function load_data(from_date = '', to_date = ''){
            $('#order_table').DataTable({
                processing: true,
                serverSide: true,
                ajax: {
                    url:'{{ route("daterange.index") }}',
                    data:{from_date:from_date, to_date:to_date}
                },
                columns: [
                    {
                        data:'id',
                        name:'id'
                    },
                    {
                        data:'name',
                        name:'name'
                    },
                    {
                        data:'email',
                        name:'email'
                    },
                    {
                        data:'created_at',
                        name:'created_at'
                    }
                ]
            });
        }

        $('#filter').click(function(){
            var from_date = $('#from_date').val();
            var to_date = $('#to_date').val();

            if(from_date != '' &&  to_date != ''){
                $('#order_table').DataTable().destroy();
                load_data(from_date, to_date);
            } else{
                alert('Both Date is required');
            }

        });

        $('#refresh').click(function(){
            $('#from_date').val('');
            $('#to_date').val('');
            $('#order_table').DataTable().destroy();
            load_data();
        });
    });
</script>
</body>
</html>
Step 6: Start Development Server
Start the development server. Use the PHP artisan serve command and start your server:
php artisan serve
Now you are ready to run our example so run the below command to quick run.
http://localhost:8000/daterangeOutput:
I hope it can help you...