React Native Checkbox OnChange Event Example
Jun 25, 2022 . Admin
Hi Guys,
This article will provide some of the most important example react native checkbox onchange event example. I explained simply about how to use checkbox onchange event in react native. This article will give you simple example of checkbox onchange event example in react native. you will learn how to implement checkbox onchange event in react native. follow bellow step for how to create checkbox onchange event in react native.
React native has removed the checkbox component. So in this example, I've used the checkbox-marked icon and the checkbox-blank-outline icon of MaterialCommunityIcons. Then I made a hook that would get the value and set it. I set the value false in that hook. Then import the MaterialCommunityIcons in the Pressable component. I checked the name props in the MaterialCommunityIcons component that if the value in the check is false then the checkbox-marked icon will be set otherwise checkbox-blank-outline.
In the Pressable component, the value is set to true in the setcheck in the onpress props, so I have a condition in the image that if the value in the check is true, the image will change.
Let's start following example:
Step 1: Download ProjectIn the first step run the following command to create a project.
expo init ExampleAppStep 2: Install Expo Icons
You install expo vector icons to create checkbox:
npm install @expo/vector-iconsimport this:
import { MaterialCommunityIcons } from "@expo/vector-icons";
Step 3: App.js
In this step, You will open the App.js file and put the code.
import React from 'react';
import { StyleSheet, Text, View, Pressable, StatusBar, Image } from 'react-native';
import { MaterialCommunityIcons } from "@expo/vector-icons";
import { Card, Title } from 'react-native-paper';

const App = () => {
    const [check, setcheck] = React.useState(false);

    return (
        <View style={styles.container}>
            <View style={ styles.innerContainer}>
                <Card>
                    <Card.Content>
                        <Title style={styles.title}>React Native Checkbox onChange Event</Title>
                    </Card.Content>
                    {!check ?
                        <Image style={styles.image}  source={{ uri: 'https://picsum.photos/700' }} />
                        :
                        <Image style={styles.image} resizeMode='contain' source={{ uri: 'https://www.mywebtuts.com/image/logo.png' }} />
                    }
                    <Card.Actions style={styles.checkBox}>
                        <Pressable onPress={() => setcheck(!check)}>
                            <MaterialCommunityIcons
                                name={check ? 'checkbox-marked' : 'checkbox-blank-outline'} size={24} color="#000" />
                        </Pressable>
                        <Text style={styles.checkboxTitle}>Do you want to change the photo?</Text>
                    </Card.Actions>
                </Card>
            </View>
            <StatusBar />
        </View>
    );
}


const styles = StyleSheet.create({
    container: {
        flex:1,
        backgroundColor:'#2fd8f6',
    },
    checkBox: {
        justifyContent: "center",
        alignItems: "center",
        flexDirection: "row",
        marginTop: 5,
    },
    innerContainer: {
        padding:9,
        marginTop:125,
    },
    title: {
        fontSize: 18,
        textAlign:'center',
        marginLeft:10,
        marginBottom:20,
    },
    checkboxTitle:{
        fontSize: 18,
        textAlign:'center',
        marginLeft:10,
    },
    image: {
        width:'100%',
        height:300,
    }
});

export default App;
Run Project
In the last step run your project using the below command.
expo start
You can QR code scan in Expo Go Application on mobile.
Output :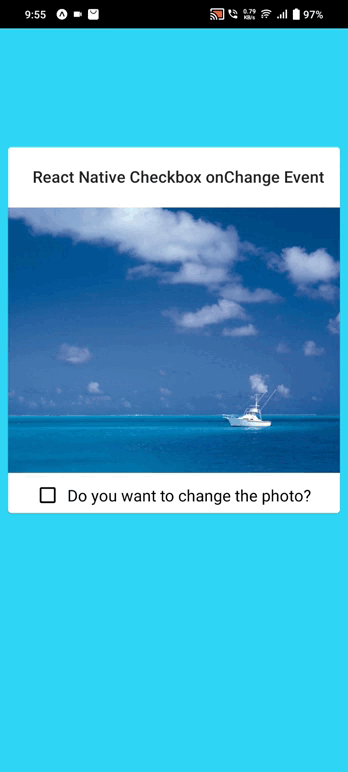
It will help you...