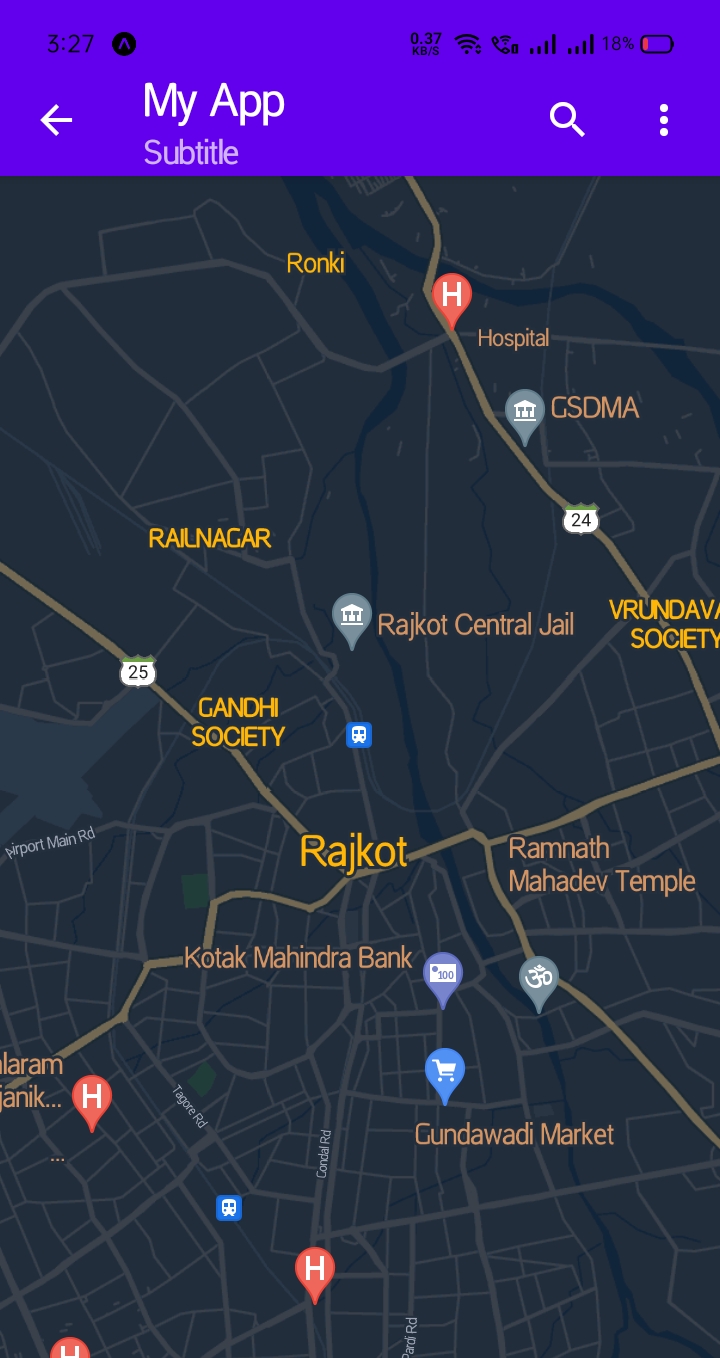
React Native Google Custom Map Style Example
Jun 14, 2021 . Admin
 Hi Guys,
Today,I will learn you how to draw google custom map style in react native.we will show example of react native custom map style .First i will create import namespace MapView and Polyline from npm i react-native-maps, after I will using MapView using for MapView and polyline tag add polyline in react native example.
Here, I will give you full example for simply display google custom map style using react native as bellow.
Step 1 - Create projectIn the first step Run the following command for create project.
expo init MyWebtutsStep 2 - Installation of Dependency
In the step, Run the following command for installation of dependency.
To use MapView and Polyline you need to install react-native-maps package.
To install this open the terminal and jump into your project
cd paper MyWebtutsRun the following command
yarn add react-native-maps
In this step, You will open App.js file and put the code.
import React, { Component } from "react";
import { View,StyleSheet} from 'react-native';
import { Provider ,Appbar,Card} from 'react-native-paper';
import MapView ,{ProviderPropType} from 'react-native-maps';

const MyWebtutsComponent = () => {


 const customStyle = [
    {
      elementType: 'geometry',
      stylers: [
        {
          color: '#242f3e',
        },
      ],
    },
    {
      elementType: 'labels.text.fill',
      stylers: [
        {
          color: '#ffb606',
        },
      ],
    },
    {
      elementType: 'labels.text.stroke',
      stylers: [
        {
          color: '#242f3e',
        },
      ],
    },
    {
      featureType: 'administrative.locality',
      elementType: 'labels.text.fill',
      stylers: [
        {
          color: '#ffb606',
        },
      ],
    },
    {
      featureType: 'poi',
      elementType: 'labels.text.fill',
      stylers: [
        {
          color: '#d59563',
        },
      ],
    },
    {
      featureType: 'poi.park',
      elementType: 'geometry',
      stylers: [
        {
          color: '#263c3f',
        },
      ],
    },
    {
      featureType: 'poi.park',
      elementType: 'labels.text.fill',
      stylers: [
        {
          color: '#00ff00',
        },
      ],
    },
    {
      featureType: 'road',
      elementType: 'geometry',
      stylers: [
        {
          color: '#38414e',
        },
      ],
    },
    {
      featureType: 'road',
      elementType: 'geometry.stroke',
      stylers: [
        {
          color: '#212a37',
        },
      ],
    },
    {
      featureType: 'road',
      elementType: 'labels.text.fill',
      stylers: [
        {
          color: '#9ca5b3',
        },
      ],
    },
    {
      featureType: 'road.highway',
      elementType: 'geometry',
      stylers: [
        {
          color: '#746855',
        },
      ],
    },
    {
      featureType: 'road.highway',
      elementType: 'geometry.stroke',
      stylers: [
        {
          color: '#1f2835',
        },
      ],
    },
    {
      featureType: 'road.highway',
      elementType: 'labels.text.fill',
      stylers: [
        {
          color: '#f3d19c',
        },
      ],
    },
    {
      featureType: 'transit',
      elementType: 'geometry',
      stylers: [
        {
          color: '#2f3948',
        },
      ],
    },
    {
      featureType: 'transit.station',
      elementType: 'labels.text.fill',
      stylers: [
        {
          color: '#d59563',
        },
      ],
    },
    {
      featureType: 'water',
      elementType: 'geometry',
      stylers: [
        {
          color: '#17263c',
        },
      ],
    },
    {
      featureType: 'water',
      elementType: 'labels.text.fill',
      stylers: [
        {
          color: '#515c6d',
        },
      ],
    },
    {
      featureType: 'water',
      elementType: 'labels.text.stroke',
      stylers: [
        {
          color: '#17263c',
        },
      ],
    },
  ];

  const _goBack = () => console.log('Went back');

  const _handleSearch = () => console.log('Searching');

  const _handleMore = () => console.log('Shown more');

  return (
    <Provider>
    <Appbar.Header style={styles.header}>
      <Appbar.BackAction onPress={_goBack} />
      <Appbar.Content title="My App" subtitle="Subtitle" />
      <Appbar.Action icon="magnify" onPress={_handleSearch} />
      <Appbar.Action icon="dots-vertical" onPress={_handleMore} />
    </Appbar.Header>
      <View style={styles.mainbox}>
          <MapView
            style={styles.mapView}
            customMapStyle={customStyle}
            userLocationCalloutEnabled={true}
            initialRegion={{
            latitude: 22.310617,
            longitude: 70.789841,
            latitudeDelta: 0.0522,
            longitudeDelta: 0.0521,
          }}
          >

          </MapView>
      </View>
    </Provider>
  );
};


const styles = StyleSheet.create({
  mainbox:{
    textAlign:'center',
    margin: 0,
    flex: 5,
    justifyContent: 'space-between',
  },
  mapView:{
    flex: 25,
  }
});
export default MyWebtutsComponent;
Step 3 - Run project
In the last step run your project using bellow command.
expo startOutput

It will help you...
