Laravel 8 Import Export Excel to database Example Tutorial
Jun 08, 2021 . Admin
Hi Guys,
In this article, I am going to show you how to import/export excel and csv file in laravel 8 application.so We will learn how to import and export excel file in laravel 8 application. I written simple example for laravel 8 maatwebsite/excel package. I will justify you import export excel and csv file using maatwebsite/excel package in laravel 8.
In this post i will give simple and facile example for import/export excel & csv file in laravel 8 and how to export excel file from database in laravel 8. you can easily download excel & csv file from database in laravel 8.
So, We will easy to implement and create import data from excel to database in laravel 8. i will use maatwebsite/excel composer package for import and export task. maatwebsite/excel provide simple way to import and export using database model.
Here i will show you full example of import and export excel file to database in laravel 8. So let's started first of follow few step to get example.
Step 1 : Install Laravel 8In the first step, we need to go from scratch , get fresh laravel 8 version application So let's open terminal and run bellow command to install fresh laravel project.
composer create-project --prefer-dist laravel/laravel blogStep 2 : Database Configuration
In this second step, we will crate database Configuration for example database name, username, password etc for our crud application of laravel 8 So lets open .env file and fill all deatils like as bellow:
Path : .envDB_CONNECTION=mysql DB_HOST=127.0.0.1 DB_PORT=3306 DB_DATABASE=here your database name(blog) DB_USERNAME=here database username(root) DB_PASSWORD=here database password(root)
After complete configuration and migrate all the tabel so let's open terminal run bellow artisan command:
php artisan migrateStep 3 : Install maatwebsite/excel Package
In this third step, we will can install maatwebsite/excel package using bellow composer command so let's open terinal and run bellow command:
composer require maatwebsite/excel
Now open config/app.php file and add service provider and aliase.
Path : config/app.php.... 'providers' => [ .... Maatwebsite\Excel\ExcelServiceProvider::class, ], 'aliases' => [ .... 'Excel' => Maatwebsite\Excel\Facades\Excel::class, ], .....Step 4: Create Dummy Records
First of all we need to some insert record in our daabase so basically we will insert In this step, you can create some dummy record in "users" table so let's run bellow factory command:
php artisan tinker
User::factory()->count(50)->create()
Step 5 : Add Route
In this step, We need to create three route for export file and add form for import file.
Path : routes/web.php
<?php
use App\Http\Controllers\ImportexportController;
use Illuminate\Support\Facades\Route;

/*
|--------------------------------------------------------------------------
| Web Routes
|--------------------------------------------------------------------------
|
| Here is where you can register web routes for your application. These
| routes are loaded by the RouteServiceProvider within a group which
| contains the "web" middleware group. Now create something great!
|
*/

// Export Import Controller
Route::get('export', [ImportexportController::class,'export'])->name('export');
Route::get('import-export-view', [ImportexportController::class,'index']);
Route::post('import', [ImportexportController::class,'import'])->name('import');
Step 6: Create Import Class
in this step we will provide maatwebsite package way to built import class and we have to use in controller. So it would be great way to engender new Import class. So you have to run following command and change following code on that file:
php artisan make:import UsersImport --model=Models/UserPath : app/Imports/UsersImport.php
<?php

namespace App\Imports;

use App\Models\User;
use Maatwebsite\Excel\Concerns\ToModel;

class UsersImport implements ToModel
{
    /**
    * @param array $row
    *
    * @return \Illuminate\Database\Eloquent\Model|null
    */
    public function model(array $row)
    {
        return new User([
            'name' => $row[0],
            'email' => $row[1],
            'password' => \Hash::make('123456'),
        ]);
    }
}
You can downpload demo csv file from here: Demo CSV File
Step 7: Create Export ClassIn this step maatwebsite package provide way to built export class and we have to use in controller. So it would be great way to create new Export class. So you have to run following command and change following code on that file:
php artisan make:export UsersExport --model=Models/UserPath : app/Imports/UsersExport.php
<?php

namespace App\Exports;

use App\Models\User;
use Maatwebsite\Excel\Concerns\FromCollection;

class UsersExport implements FromCollection
{
    /**
    * @return \Illuminate\Support\Collection
    */
    public function collection()
    {
        return User::all();
    }
}
Step 8: Create Controller
In this step, we require an new controller as ImportexportController. this controller will manage all importExportView, export and import request and return replication. you can engender ImportexportController So let's run bellow artisan command to engender controller:
php artisan make:controller ImportexportControllerPath : app/Http/Controllers/ImportexportController.php
<?php

namespace App\Http\Controllers;

use Illuminate\Http\Request;
use App\Exports\UsersExport;
use App\Imports\UsersImport;
use Maatwebsite\Excel\Facades\Excel;

class ImportexportController extends Controller
{
    /**
     * Write code on Method
     *
     * @return response()
     */
    public function index()
    {
        return view('importView');
    }

    /**
     * Write code on Method
     *
     * @return response()
     */
    public function export()
    {
        return Excel::download(new UsersExport, 'test.xlsx');
    }

    /**
     * Write code on Method
     *
     * @return response()
     */
    public function import()
    {
        Excel::import(new UsersImport,request()->file('file'));

        return back();
    }

}
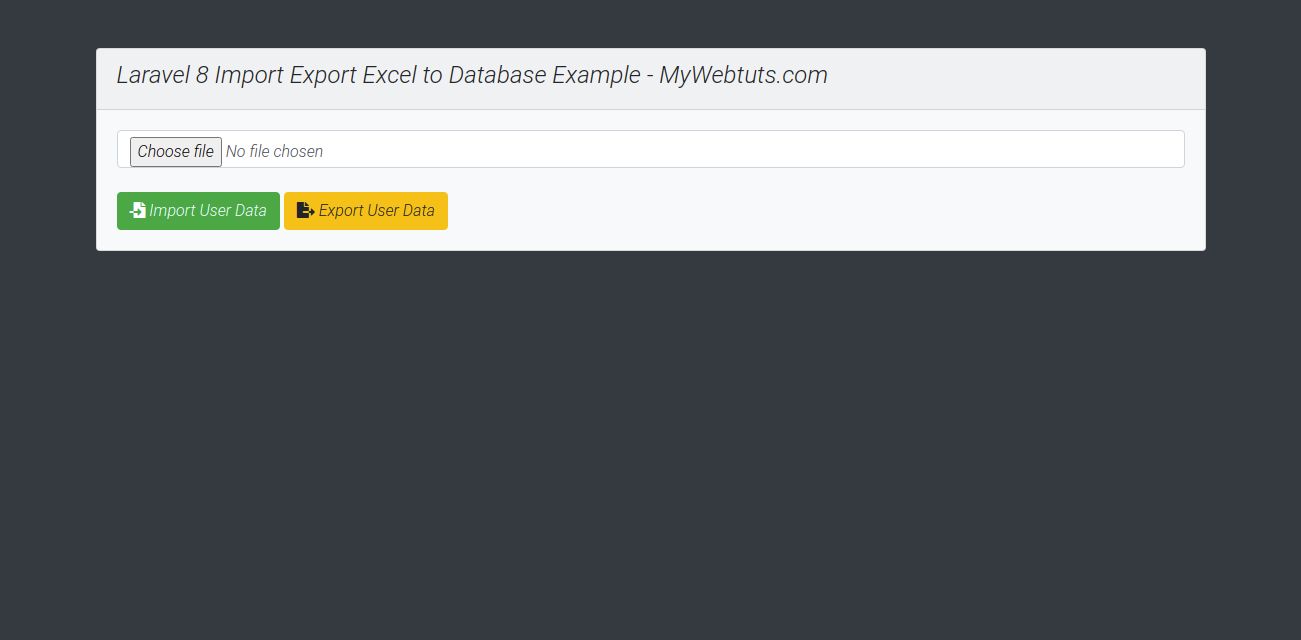
Step 9: Create Blade File
Path : resources/views/importView.blade.php
<!DOCTYPE html>
<html>
<head>
    <title>Laravel 8 Import Export Excel to Database Example - MyWebtuts.com</title>
    <link rel="stylesheet" href="https://cdnjs.cloudflare.com/ajax/libs/twitter-bootstrap/4.1.3/css/bootstrap.min.css" />
    <link rel="stylesheet" href="https://cdnjs.cloudflare.com/ajax/libs/font-awesome/5.15.3/css/all.min.css">
</head>
<body class="bg-dark">

<div class="container mt-5">
    <div class="card bg-light mt-3">
        <div class="card-header">
            <h4>Laravel 8 Import Export Excel to Database Example - MyWebtuts.com</h4>
        </div>
        <div class="card-body">
            <form action="{{ route('import') }}" method="POST" enctype="multipart/form-data">
                @csrf
                <input type="file" name="file" class="form-control">
                <br>
                <button class="btn btn-success"><i class="fas fa-file-import"></i> Import User Data</button>
                <a class="btn btn-warning" href="{{ route('export') }}"><i class="fas fa-file-export"></i> Export User Data</a>
            </form>
        </div>
    </div>
</div>

</body>
</html>
So, Let's get run our laravel 8 application Now we are ready to run our crud application example with laravel 8 so run bellow command for quick run:
php artisan serve
Now you can open bellow URL on your browser:
localhost:8000/import-export-viewPreview
It will help you...