Laravel Add/remove and Update Multiple Input Fields Dynamically with Jquery
Dec 29, 2022 . Admin
Hello Friends,
Here, I'll show you how to use jQuery to dynamically add, remove, and update input fields in a Laravel application and submit them to the database. Thanks to jQuery and Laravel, adding more input fields is trivial. To dynamically add, remove, and update groups of input fields in Laravel, utilise JQuery.
Using bootstrap and jQuery, we will add/remove and update dynamic form fields in laravel. Laravel validation may also be used to add new input fields.
Given that there are times when we must enter the same information many times into a form, add more input fields. As a result, we'll create a table row with input fields and add an add more button; when you click on that button, a new row with input fields will be added..
Now let's start.
Step 1: Install LaravelThis is optional; however, if you have not created the laravel app, then you may go ahead and execute the below command:
composer create-project laravel/laravel example-appStep 2: Database Configuration .env
DB_CONNECTION=mysql
DB_HOST=127.0.0.1
DB_PORT=3306
DB_DATABASE=here your database name(blog)
DB_USERNAME=here database username(root)
DB_PASSWORD=here database password(root)
Step 3: Create product_stocks Table and Model
we are going to create add more dynamic field application for product_stocks. so we have to create migration for product_stocks table using Laravel 5.8 php artisan command, so first fire bellow command:
php artisan make:migration create_product_stocks_tabledatabase/migrations/create_product_stocks_table.php
<?php

use Illuminate\Support\Facades\Schema;
use Illuminate\Database\Schema\Blueprint;
use Illuminate\Database\Migrations\Migration;

class CreateProductStocksTable extends Migration
{
    /**
     * Run the migrations.
     *
     * @return void
     */
    public function up()
    {
        Schema::create('product_stocks', function (Blueprint $table) {
            $table->bigIncrements('id');
            $table->string('name');
            $table->integer('qty');
            $table->integer('price');
            $table->timestamps();
        });
    }

    /**
     * Reverse the migrations.
     *
     * @return void
     */
    public function down()
    {
        Schema::dropIfExists('product_stocks');
    }
}
Now run migration following command:
php artisan migrate
After creating table we have to create model for "product_stocks" table so just run bellow command and create new model:
php artisan make:model ProductStockApp/Models/ProductStock.php
<?php

namespace App;

use Illuminate\Database\Eloquent\Model;

class ProductStock extends Model
{
    /**
     * The attributes that are mass assignable.
     *
     * @var array
     */
    public $table = "product_stocks";

    public $fillable = ['name', 'qty', 'price'];

}
Step 4: Add Routes
In this is step we need to add two route for add more fields example. so open your routes/web.php file and add following route.
routes/web.php
<?php

use Illuminate\Support\Facades\Route;
use App\Http\Controllers\ProductAddMoreController;
/*
|--------------------------------------------------------------------------
| Web Routes
|--------------------------------------------------------------------------
|
| Here is where you can register web routes for your application. These
| routes are loaded by the RouteServiceProvider within a group which
| contains the "web" middleware group. Now create something great!
|
*/

Route::get('/', function () {
    return view('welcome');
});

Route::get("addmore",[ProductAddMoreController::class, "addMore"]);
Route::post("addmore",[ProductAddMoreController::class, "addMorePost"])->name('addmorePost');
Step 5: Create ProductAddMoreController
If you haven't already, create a new controller named ProductAddMoreController. Run the command below to create a new controller. resource controller created using the controller below.
php artisan make:controller ProductAddMoreControllerapp/Http/Controllers/ProductAddMoreController.php.
<?php

namespace App\Http\Controllers;

use Illuminate\Http\Request;
use App\Models\ProductStock;
use Illuminate\Support\Facades\DB;

class ProductAddMoreController extends Controller
{
    /**
     * Display a listing of the resource.
     *
     * @return \Illuminate\Http\Response
     */
    public function addMore()
    {
        $ProductStocks = ProductStock::get();
        return view("addMore",compact('ProductStocks') );
    }

    /**
     * Display a listing of the resource.
     *
     * @return \Illuminate\Http\Response
     */
    public function addMorePost(Request $request)
    {
        $request->validate([
            'addmore.*.name' => 'required',
            'addmore.*.qty' => 'required',
            'addmore.*.price' => 'required',
        ]);
        $ProductStocks = ProductStock::pluck('id')->all();

        // Create and Update Record Datatable
        foreach ($request->addMore as $key => $value) {

            if(!is_null($value['id'])){
                DB::table('product_stocks')->where('id', $value['id'])->update($value);
            }else{
                ProductStock::create($value);
            }
        }

        // Remove Record for Datatable
        foreach($ProductStocks as $key => $value){

            if (!in_array($value, array_keys($request->addMore))) {
                DB::table('product_stocks')->where('id', $value)-> delete($value);
            }
        }

        $ProductStocks = ProductStock::pluck('id')->all();

        return back()->with('success', 'Record Created Successfully.', compact('ProductStocks'));
    }


}
Step 6: Create Blade File
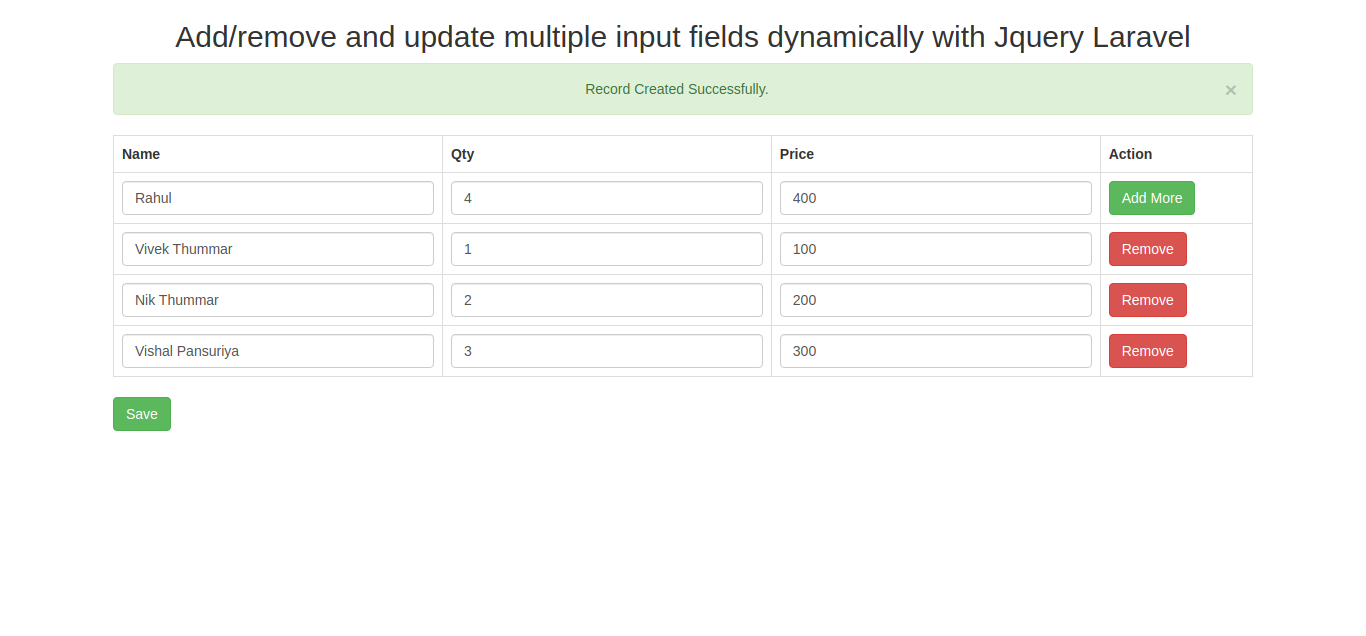
We are presently in the final step. The only blade file we need to generate in this stage is addMore.blade.php.
resources/views/addMore.blade.php
<!DOCTYPE html>
<html>
<head>
    <title>Add/remove and update multiple input fields dynamically with Jquery Laravel</title>
    <link rel="stylesheet" href="https://maxcdn.bootstrapcdn.com/bootstrap/3.3.6/css/bootstrap.min.css" />
    <script src="//ajax.googleapis.com/ajax/libs/jquery/1.12.4/jquery.min.js"></script>
</head>
<body>

<div class="container">
    <h2 align="center">Add/remove multiple input fields dynamically with Jquery Laravel 5.8</h2>

    <form action="{{ route('addmorePost') }}" method="POST">
        @csrf

        @if ($errors->any())
            <div class="alert alert-danger">
                <ul>
                    @foreach ($errors->all() as $error)
                        <li>{{ $error }}</li>
                    @endforeach
                </ul>
            </div>
        @endif

        @if (Session::has('success'))
            <div class="alert alert-success text-center">
                <a href="#" class="close" data-dismiss="alert" aria-label="close">×</a>
                <p>{{ Session::get('success') }}</p>
            </div>
        @endif

        <table class="table table-bordered" id="dynamicTable">
            <tr>
                <th>Name</th>
                <th>Qty</th>
                <th>Price</th>
                <th>Action</th>
            </tr>
            <tr>
                <td><input type="text" name="addmore[0][name]" placeholder="Enter your Name" class="form-control" /></td>
                <td><input type="text" name="addmore[0][qty]" placeholder="Enter your Qty" class="form-control" /></td>
                <td><input type="text" name="addmore[0][price]" placeholder="Enter your Price" class="form-control" /></td>
                <td><button type="button" name="add" id="add" class="btn btn-success">Add More</button></td>
            </tr>

            @foreach($ProductStocks as $key => $value)
                <tr>
                    {{-- {{ dd($ProductStocks) }} --}}
                    <td><input type="text" value="{{ $value['name'] }}" name="addMore[{{ $value['id'] }}][name]" placeholder="Enter your Name" class="form-control" /><input type="hidden" value="{{ $value['id'] }}" name="addMore[{{ $value['id'] }}][id]" placeholder="Enter your Name" class="form-control" /></td>
                    <td><input type="text" value="{{ $value['qty'] }}" name="addMore[{{ $value['id'] }}][qty]" placeholder="Enter your Qty" class="form-control" /></td>
                    <td><input type="text" value="{{ $value['price'] }}" name="addMore[{{ $value['id'] }}][price]" placeholder="Enter your Price" class="form-control" /></td>
                    <td><button type="button" class="btn btn-danger remove-tr">Remove</button></td>
                </tr>
            @endforeach
        </table>

        <button type="submit" class="btn btn-success">Save</button>
    </form>
</div>

<script type="text/javascript">

    var i = 0;

    $("#add").click(function(){
        ++i;
        $("#dynamicTable").append('<tr><td><input type="text" name="addMore['+i+'][name]" placeholder="Enter your Name" class="form-control" /></td><td><input type="text" name="addMore['+i+'][qty]" placeholder="Enter your Qty" class="form-control" /></td><td><input type="text" name="addMore['+i+'][price]" placeholder="Enter your Price" class="form-control" /></td><td><button type="button" class="btn btn-danger remove-tr">Remove</button></td></tr>');
    });

    $(document).on('click', '.remove-tr', function(){
         $(this).parents('tr').remove();
    });

</script>

</body>
</html>
Now you can run this full example using quick run command of laravel like as bellow:
php artisan serve
Now you can open bellow URL on your browser:
http://localhost:8000/addmoreOutput
I hope it can help you...