Codeigniter 4 - Google ReCaptcha V2 Tutorial Example
Apr 19, 2022 . Admin
Hi Guys,
Here, I will show you how to works google recaptcha in codeigniter. We will look at example of how to implement google recaptcha in codeigniter 4. I would like to share with you how to use google recaptcha in codeigniter 4. you can understand a concept of codeigniter 4 google recaptcha tutorial.
If you need to see example of The Google ReCaptcha is an open service that assures a computer user is a human. you will learn Google ReCaptcha is one of the most popular captcha systems that defends your site from bots spam and abuse. This post will give you simple example of In order to integrate the reCaptcha.
So let's start to the example.
Step 1: Install Codeigniter 4In this first step if you have not created the codeigniter app, then you may go ahead and execute the below command:
composer create-project codeigniter4/appstarter ci-news
After Download successfully, extract clean new Codeigniter 4 application.
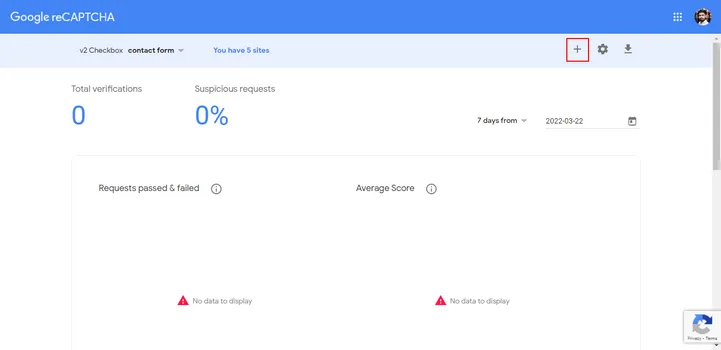
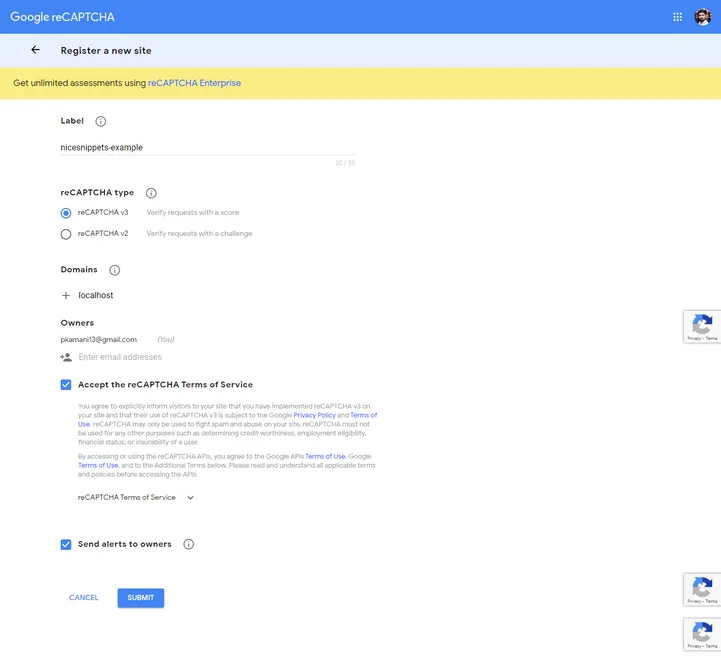
Step 2: Create AccountIn this step second we need to set google site key and secret key. If you don't have site key and secret key then you can create from here. First click on this link : Recaptcha Admin.
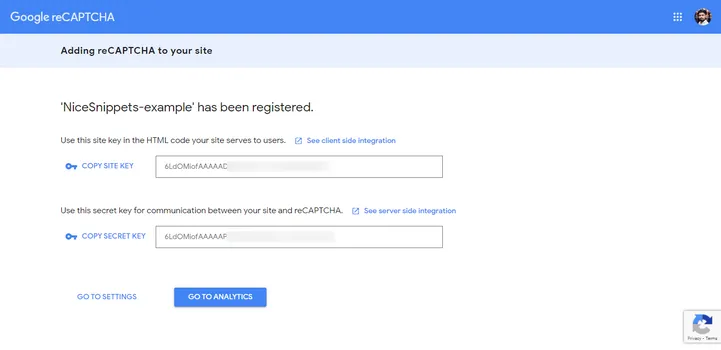
Now, copy this important key and secret. Step 3 : Basic Configurations
So, we will now set basic configuration on the app/config/app.php file, so let’s implement to application/config/config.php and open this file on text editor.
app/config/app.phppublic $baseURL = 'http://localhost:8080'; To public $baseURL = 'http://localhost/example/';Step 4 : Create Table in Database
CREATE TABLE users (
    id int(11) NOT NULL AUTO_INCREMENT COMMENT 'Primary Key',
    name varchar(100) NOT NULL COMMENT 'Name',
    email varchar(255) NOT NULL COMMENT 'Email Address',
    contact_no varchar(50) NOT NULL COMMENT 'Contact No',
    created_at varchar(20) NOT NULL COMMENT 'Created date',
    PRIMARY KEY (id)
  ) ENGINE=InnoDB DEFAULT CHARSET=latin1 COMMENT='datatable demo table' AUTO_INCREMENT=1;
Step 5 : Database Configurations
application/config/database.php
public $default = [
    'DSN'      => '',
    'hostname' => 'localhost',
    'username' => 'root',
    'password' => '',
    'database' => 'demo',
    'DBDriver' => 'MySQLi',
    'DBPrefix' => '',
    'pConnect' => false,
    'DBDebug'  => (ENVIRONMENT !== 'production'),
    'cacheOn'  => false,
    'cacheDir' => '',
    'charset'  => 'utf8',
    'DBCollat' => 'utf8_general_ci',
    'swapPre'  => '',
    'encrypt'  => false,
    'compress' => false,
    'strictOn' => false,
    'failover' => [],
    'port'     => 3306,
];
Step 6 : Set Up Controller
Further, you need to generate a new controller that manages the online stripe transaction, hence create a GoogleReCaptcha file and append the example code in..
app/Controllers/GoogleReCaptcha.php
<?php
namespace App\Controllers;
use CodeIgniter\Controller;
use CodeIgniter\HTTP\RequestInterface;
use App\Models\UserModel;

class GoogleReCaptcha extends Controller
{

    /**
     * Write code on Method
     *
     * @return response()
     */
    public function index(){
        return view('home');
    }

    /**
     * Write code on Method
     *
     * @return response()
     */
    public function googleCaptachStore() {

        $model = new UserModel();
        $data = array('name' => $this->request->getVar('name'),
                    'email' => $this->request->getVar('email'),
                    'contact_no' => $this->request->getVar('mobile_number'),
                   );

        $recaptchaResponse = trim($this->request->getVar('g-recaptcha-response'));

        $userIp=$this->request->ip_address();

        $secret='ENTER_YOUR_SECRET_KEY';

        $credential = array(
            'secret' => $secret,
            'response' => $this->request->getVar('g-recaptcha-response')
        );

        $verify = curl_init();
        curl_setopt($verify, CURLOPT_URL, "https://www.google.com/recaptcha/api/siteverify");
        curl_setopt($verify, CURLOPT_POST, true);
        curl_setopt($verify, CURLOPT_POSTFIELDS, http_build_query($credential));
        curl_setopt($verify, CURLOPT_SSL_VERIFYPEER, false);
        curl_setopt($verify, CURLOPT_RETURNTRANSFER, true);
        $response = curl_exec($verify);

        $status= json_decode($response, true);

        if($status['success']){
            $model->save($data);
            $session->setFlashdata('msg', 'Form has been successfully submitted');
        }else{
            $session->setFlashdata('msg', 'Something goes to wrong');
        }

        return redirect()->to('/');
    }

}
Step 7 : Set Up View
Head over to application/views/ folder, create a new home file. Likewise, open and add the suggested code example in application/views/home.php file:
application/views/home.php
<!doctype html>
<html lang="en">
    <head>
        <meta charset="utf-8">
        <meta name="viewport" content="width=device-width, initial-scale=1, shrink-to-fit=no">
        <title>Codeigniter 4 Google Recaptcha Form Validation Example - Mywebtuts.com</title>
        <link rel="stylesheet" href="https://maxcdn.bootstrapcdn.com/bootstrap/4.0.0/css/bootstrap.min.css" integrity="sha384-Gn5384xqQ1aoWXA+058RXPxPg6fy4IWvTNh0E263XmFcJlSAwiGgFAW/dAiS6JXm" crossorigin="anonymous">
        <script src="https://code.jquery.com/jquery-3.2.1.slim.min.js" integrity="sha384-KJ3o2DKtIkvYIK3UENzmM7KCkRr/rE9/Qpg6aAZGJwFDMVNA/GpGFF93hXpG5KkN" crossorigin="anonymous"></script>
        <script src="https://cdnjs.cloudflare.com/ajax/libs/popper.js/1.12.9/umd/popper.min.js" integrity="sha384-ApNbgh9B+Y1QKtv3Rn7W3mgPxhU9K/ScQsAP7hUibX39j7fakFPskvXusvfa0b4Q" crossorigin="anonymous"></script>
        <script src="https://maxcdn.bootstrapcdn.com/bootstrap/4.0.0/js/bootstrap.min.js" integrity="sha384-JZR6Spejh4U02d8jOt6vLEHfe/JQGiRRSQQxSfFWpi1MquVdAyjUar5+76PVCmYl" crossorigin="anonymous"></script>
        <script src='https://www.google.com/recaptcha/api.js'></script>
        <style>
            .error{ color:red; }
        </style>
    </head>
<body>
<div class="container">
    <div class="error"><strong><?=$this->session->flashdata('msg')?></strong></div>
    <br>
    <br>
    <div class="row">
        <div class="col-md-9">
            <form  method="post" action="<?php echo base_url('google/googleCaptachStore') ?>">
            <div class="form-group">
                <label for="formGroupExampleInput">Name</label>
                <input type="text" name="name" class="form-control" id="formGroupExampleInput" placeholder="Please enter name">
            </div>
            <div class="form-group">
                <label for="email">Email Id</label>
                <input type="text" name="email" class="form-control" id="email" placeholder="Please enter email id">
            </div>
            <div class="form-group">
                <label for="mobile_number">Mobile Number</label>
                <input type="text" name="mobile_number" class="form-control" id="mobile_number" placeholder="Please enter mobile number" maxlength="10">
            </div>
            <div class="g-recaptcha" data-sitekey="YOUR_SITE_KEY"></div>
            <div class="form-group">
                <button type="submit" id="send_form" class="btn btn-success">Submit</button>
            </div>
            </form>
        </div>
    </div>
</div>
</body>
</html>
Step 8 : Add Routes
app/Config/Routes.php
$routes->get('/', 'GoogleReCaptcha::index');
Step 9 : Run Codeigniter App:
All the required steps have been done, now you have to type the given below command and hit enter to run the Codeigniter app:
php spark serve
Now, Go to your web browser, type the given URL and view the app output:
http://localhost:8080/
I hope it can help you...