How to implement Flash Message in Laravel 9?
Feb 25, 2022 . Admin
Hi Friends,
Today I am going to share with you how to implement flash message in laravel 9?. In this example of show flash messages without any packages installed. we will learn to how to integrate and use without any package flash message in laravel 9. This tutorial is designed to give you Laravel 9 Flash Message example. In this section, we are going to use Laravel 9 so that we can use a custom bootstrap 5 alert flash message. Our bootstrap Laravel 9 project will show some messages like an alert warning, alert danger, alert info, alert-success, etc. We can easily perform it without using any composer package.
If we use the laravel 9 application, it will require the flash message because the flash message is used to provide an alert with the detail of complete progress, warning, error, etc. The flash message can be provided in several ways like redirecting with info message, error message, success message, and warning message.
In our example, we will make a good layout by using the bootstrap flash alert layout. In the laravel application, we can integrate flash message by using a step by step process, which is as follows:
Step 1: Download LaravelLet us begin the tutorial by installing a new laravel application. if you have already created the project, then skip following step.
composer create-project laravel/laravel example-appStep 2 : Create Global File For Flash Message
In the first step we will create a new blade file flashMessage.blade.php. In this file, we will write the code of the bootstrap 5 alert and check which messages come.
There are following alert will added:
1) success
2) error
3) warning
4) info
5) validation error
So, let's create flash-message.blade.php file and put bellow code on that file.
resources/views/flashMessage.blade.php
@if ($message = Session::get('success'))
    <div class="alert alert-success alert-dismissible fade show" role="alert">
        <strong>{{ $message }}</strong>
        <button type="button" class="btn-close" data-bs-dismiss="alert" aria-label="Close"></button>
    </div>
@endif

@if ($message = Session::get('error'))
    <div class="alert alert-danger alert-dismissible fade show" role="alert">
        <strong>{{ $message }}</strong>
        <button type="button" class="btn-close" data-bs-dismiss="alert" aria-label="Close"></button>
    </div>
@endif

@if ($message = Session::get('warning'))
    <div class="alert alert-warning alert-dismissible fade show" role="alert">
        <strong>{{ $message }}</strong>
        <button type="button" class="btn-close" data-bs-dismiss="alert" aria-label="Close"></button>
    </div>
@endif

@if ($message = Session::get('info'))
    <div class="alert alert-info alert-dismissible fade show" role="alert">
        <strong>{{ $message }}</strong>
        <button type="button" class="btn-close" data-bs-dismiss="alert" aria-label="Close"></button>
    </div>
@endif

@if ($errors->any())
    <div class="alert alert-danger alert-dismissible fade show" role="alert">
        <strong>Please check the form below for errors</strong>
        <button type="button" class="btn-close" data-bs-dismiss="alert" aria-label="Close"></button>
    </div>
@endif
Step 3 : Use Flash Message in Theme
In this step we have to just include flashMessage.blade.php file in your theme default file. You have to just include this flash file in your default theme blade file like as bellow:
resources/views/layouts/app.blade.php
<!DOCTYPE html>
<html lang="en">
<head>
    <meta charset="utf-8">
    <meta http-equiv="X-UA-Compatible" content="IE=edge">
    <meta name="viewport" content="width=device-width, initial-scale=1">
    <!-- Styles -->
    <link href="https://cdn.jsdelivr.net/npm/bootstrap@5.0.2/dist/css/bootstrap.min.css" rel="stylesheet">
    <script src="https://cdn.jsdelivr.net/npm/bootstrap@5.0.2/dist/js/bootstrap.bundle.min.js" ></script>
</head>
<body>

<div class="container">

    <div class="row">
        <div class="col-md-12 mt-5">
            @include('flashMessage')
        </div>
        <div class="col-md-12">
            @yield('content')
        </div>
    </div>

</div>

</body>
</html>
Step 4 : Create and Add Routes
Open routes/web.php file and add the routes to manage GET and POST requests.
routes/web.php
<?php

use Illuminate\Support\Facades\Route;

use App\Http\Controllers\FlashMsgController;

/*
|--------------------------------------------------------------------------
| Web Routes
|--------------------------------------------------------------------------
|
| Here is where you can register web routes for your application. These
| routes are loaded by the RouteServiceProvider within a group which
| contains the "web" middleware group. Now create something great!
|
*/

Route::get('flash-msg',[FlashMsgController::class,'index']);
Route::get('flash-msg-success',[FlashMsgController::class,'success'])->name('success');
Route::get('flash-msg-info',[FlashMsgController::class,'info'])->name('info');
Route::get('flash-msg-warning',[FlashMsgController::class,'warning'])->name('warning');
Route::get('flash-msg-error',[FlashMsgController::class,'error'])->name('error');
Step 5 : Create Controller
In this step, we will create a new FlashMsgController.
Let's create FlashMsgController by following command:
php artisan make:controller FlashMsgControllerapp/Http/Controller/FlashMsgController
<?php
namespace App\Http\Controllers;
use Illuminate\Http\Request;
class FlashMsgController extends Controller
{
/**
* Display a listing of the resource.
*
* @return \Illuminate\Http\Response
*/
public function index()
{
return view('flashMessageList');
}
/**
* Display a listing of the resource.
*
* @return \Illuminate\Http\Response
*/
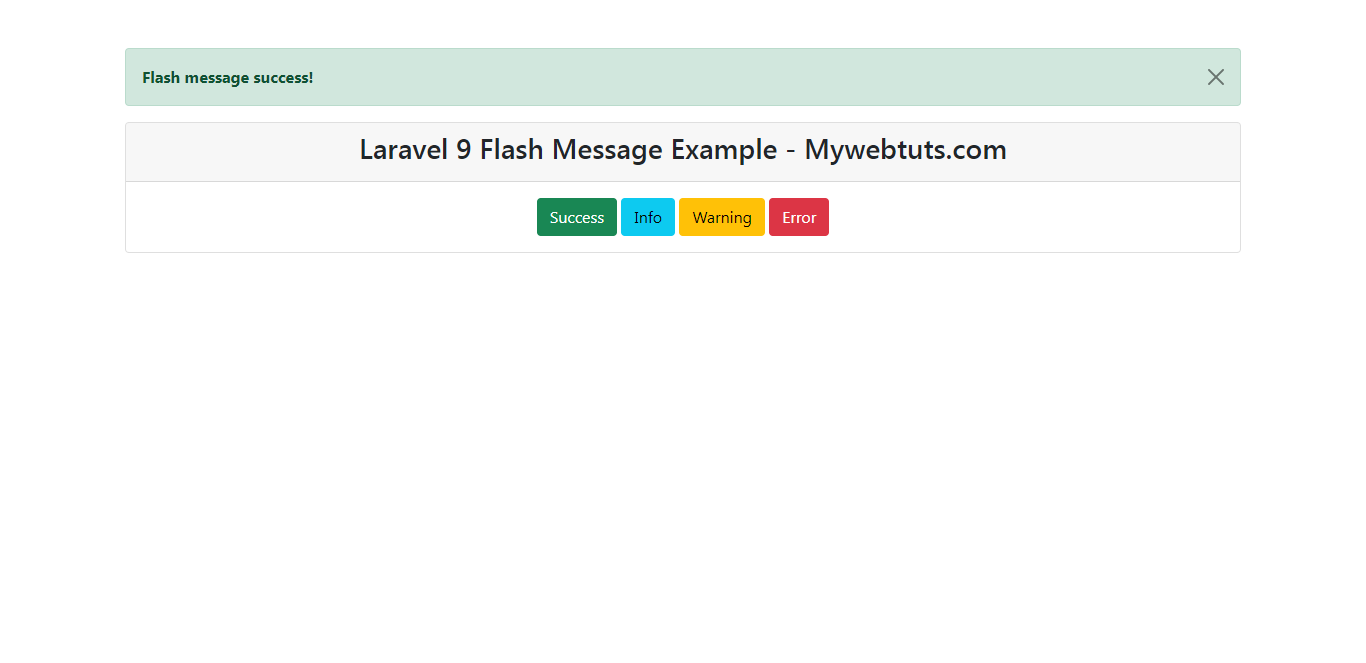
public function success()
{
return back()->with('success','Flash message success!');
}
/**
* Display a listing of the resource.
*
* @return \Illuminate\Http\Response
*/
public function info()
{
return back()->with('info','Flash message info!');
}
/**
* Display a listing of the resource.
*
* @return \Illuminate\Http\Response
*/
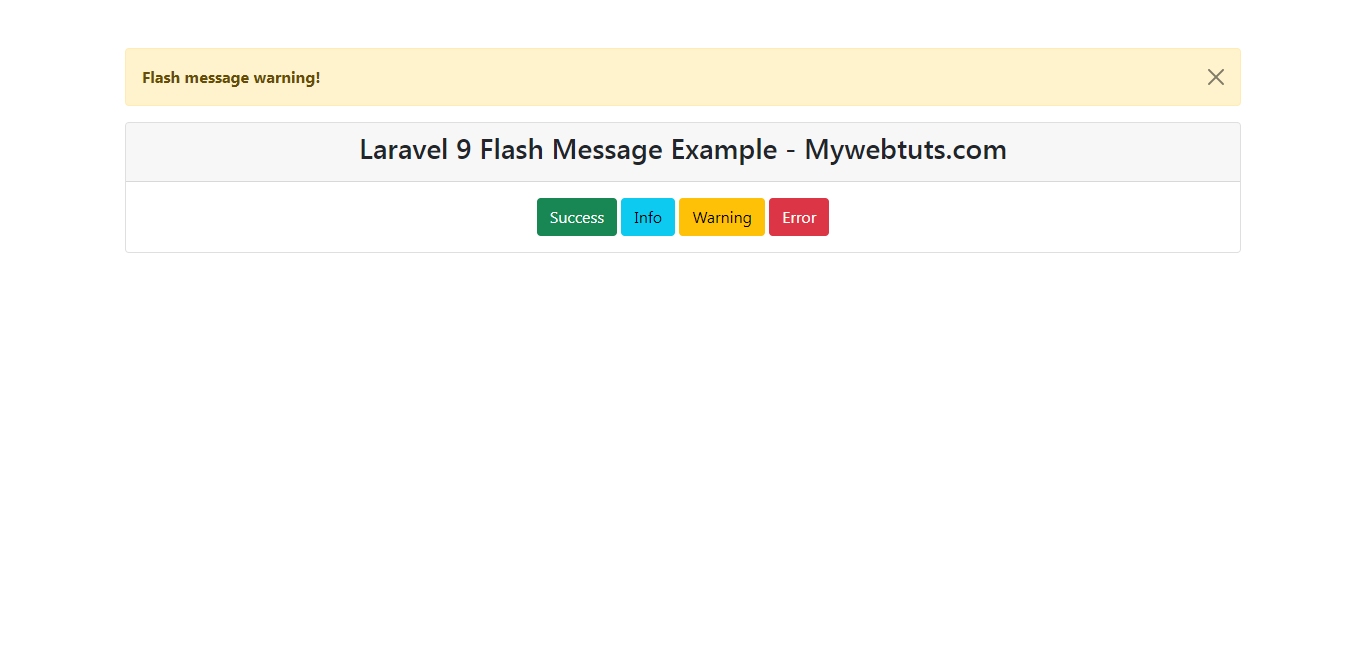
public function warning()
{
return back()->with('warning','Flash message warning!');
}
/**
* Display a listing of the resource.
*
* @return \Illuminate\Http\Response
*/
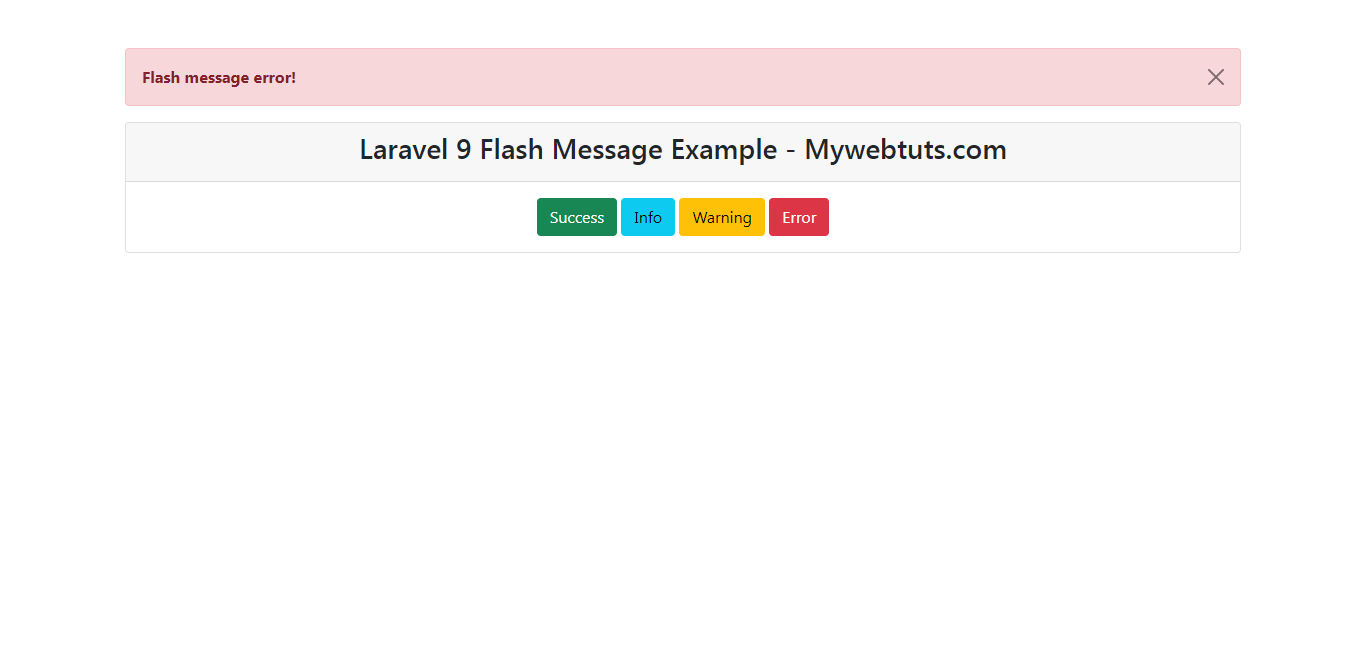
public function error()
{
return back()->with('error','Flash message error!');
}
}
Step 6 : Create Blade File
In this step, we need to create flashMessageList.php file this file we will show alert button to flash message.
resources/views/flashMessageList.blade.php
@extends('layouts.app')

@section('content')
    <div class="col-md-12 text-center">
        <div class="card">
            <div class="card-header">
                <h3>Laravel 9 Flash Message Example - Mywebtuts.com</h3>
            </div>
            <div class="card-body">
                <a href="{{ route('success') }}" class="btn btn-success">Success</a>
                <a href="{{ route('info') }}" class="btn btn-info">Info</a>
                <a href="{{ route('warning') }}" class="btn btn-warning">Warning</a>
                <a href="{{ route('error') }}" class="btn btn-danger">Error</a>
            </div>
        </div>
    </div>
@endsection
Run Laravel App:
All steps have been done, now you have to type the given command and hit enter to run the laravel app:
php artisan serve
Now, you have to open web browser, type the given URL and view the app output:
http://localhost:8000/flash-msgOutput:
Success Message
Info Message

Warning Message
Error Message
I hope it can help you...