How to Login with Magic Link in Laravel?
Nov 24, 2022 . Admin
Hello Friends,
This tutorial is focused on how to login with a magic link in laravel. We will use laravel passwordless login with a magic link tutorial. if you want to see an example of a laravel passwordless magic login link generator then you are in the right place. step by step explain laravel passwordless magic login links.
If you want to add a new feature for the authentication system with login with a magic link, so users don't need to remember the password for authentication. Users can easily add their email or username and they will receive an email with a magic link. Using the magic link they will be able to log in to the website. We will use the grosv/laravel-passwordless-login composer package to add a password-less system. so, let's follow the below steps:
You can add a laravel password-less login with laravel 6, laravel 7, laravel 8, and laravel 9 versions.
Here are the all steps.
Step 1: Install LaravelThis is optional; however, if you have not created the laravel app, then you may go ahead and execute the below command:
composer create-project laravel/laravel example-appStep 2: Setup Database Configuration
After successfully installing the laravel app then configuring the database setup. We will open the ".env" file and change the database name, username and password in the env file.
.envDB_CONNECTION=mysql DB_HOST=127.0.0.1 DB_PORT=3306 DB_DATABASE=Enter_Your_Database_Name DB_USERNAME=Enter_Your_Database_Username DB_PASSWORD=Enter_Your_Database_PasswordStep 3: Install Auth Scaffold
Laravel's laravel/ui package provides a quick way to scaffold all of the routes and views you need for authentication using a few simple commands:
composer require laravel/ui
Next, we need to generate auth scaffold with bootstrap, so let's run the below command:
php artisan ui bootstrap --auth
Then, install npm packages using the below command:
npm install
At last, built bootstrap CSS using the below command:
npm run buildStep 4: Install grosv/laravel-passwordless-login Package
In this step, we will install grosv/laravel-passwordless-login to generate the login url. so let's run the below command:
composer require grosv/laravel-passwordless-loginStep 5: Update Login Blade File
In this step, we will update auth login blade file. in this file we will add a new Password Less Login link. so let's update the following file:
resources/views/auth/login.blade.php
@extends('layouts.app')

@section('content')
<div class="container">
    <div class="row justify-content-center">
        <div class="col-md-8">
            <div class="card">
                <div class="card-header">{{ __('Login') }}</div>

                <div class="card-body">
                    <form method="POST" action="{{ route('login') }}">
                        @csrf

                        @if (session('message'))
                            <div class="alert alert-success">{{ session('message') }}</div>
                        @endif

                        <div class="row mb-3">
                            <label for="email" class="col-md-4 col-form-label text-md-end">{{ __('Email Address') }}</label>

                            <div class="col-md-6">
                                <input id="email" type="email" class="form-control @error('email') is-invalid @enderror" name="email" value="{{ old('email') }}" required autocomplete="email" autofocus>

                                @error('email')
                                    <span class="invalid-feedback" role="alert">
                                        <strong>{{ $message }}</strong>
                                    </span>
                                @enderror
                            </div>
                        </div>

                        <div class="row mb-3">
                            <label for="password" class="col-md-4 col-form-label text-md-end">{{ __('Password') }}</label>

                            <div class="col-md-6">
                                <input id="password" type="password" class="form-control @error('password') is-invalid @enderror" name="password" autocomplete="current-password">

                                @error('password')
                                    <span class="invalid-feedback" role="alert">
                                        <strong>{{ $message }}</strong>
                                    </span>
                                @enderror
                            </div>
                        </div>

                        <div class="row mb-3">
                            <div class="col-md-6 offset-md-4">
                                <div class="form-check">
                                    <input class="form-check-input" type="checkbox" name="remember" id="remember" {{ old('remember') ? 'checked' : '' }}>

                                    <label class="form-check-label" for="remember">
                                        {{ __('Remember Me') }}
                                    </label>
                                </div>
                            </div>
                        </div>

                        <div class="row mb-0">
                            <div class="col-md-8 offset-md-4">
                                <button type="submit" class="btn btn-primary">
                                    {{ __('Login') }}
                                </button>

                                OR

                                <button type="submit" class="btn btn-success" name="submit" value="password-less">
                                    Password Less Login
                                </button>

                                <br/>

                                @if (Route::has('password.request'))
                                    <a class="btn btn-link" href="{{ route('password.request') }}">
                                        {{ __('Forgot Your Password?') }}
                                    </a>
                                @endif
                            </div>
                        </div>
                    </form>
                </div>
            </div>
        </div>
    </div>
</div>
@endsection
Step 6: Update LoginController
In this step, we will update the LoginController.php file. in this file, we will add a new Password Less Login. so let's update the following file:
app/Http/Controllers/Auth/LoginController.php
<?php

namespace App\Http\Controllers\Auth;

use App\Http\Controllers\Controller;
use App\Providers\RouteServiceProvider;
use Illuminate\Foundation\Auth\AuthenticatesUsers;
use Illuminate\Http\Request;
use App\Models\User;
use App\Notifications\SendPasswordLessLinkNotification;

class LoginController extends Controller
{
    /*
    |--------------------------------------------------------------------------
    | Login Controller
    |--------------------------------------------------------------------------
    |
    | This controller handles authenticating users for the application and
    | redirecting them to your home screen. The controller uses a trait
    | to conveniently provide the functionality to your applications.
    |
    */

    use AuthenticatesUsers;

    /**
     * Where to redirect users after login.
     *
     * @var string
     */
    protected $redirectTo = RouteServiceProvider::HOME;

    /**
     * Create a new controller instance.
     *
     * @return void
     */
    public function __construct()
    {
        $this->middleware('guest')->except('logout');
    }

    /**
     * Write code on Method
     *
     * @return response()
     */
    public function login(Request $request)
    {

        if($request->input('submit') == 'password-less'){
            $user = $this->loginViaPasswordLessLink($request);

            if(!$user){
                return redirect()->route('login')
                ->withErrors(['email' => 'User with this email does not exist.'])
                ->withInput();
            }

            return redirect()->route('login')
                    ->withMessage('Password Less Link Sent to the registered email ID.');
        }

        $this->validateLogin($request);

        if (method_exists($this, 'hasTooManyLoginAttempts') &&
            $this->hasTooManyLoginAttempts($request)) {
            $this->fireLockoutEvent($request);

            return $this->sendLockoutResponse($request);
        }

        if ($this->attemptLogin($request)) {
            if ($request->hasSession()) {
                $request->session()->put('auth.password_confirmed_at', time());
            }
            return $this->sendLoginResponse($request);
        }

        $this->incrementLoginAttempts($request);

        return $this->sendFailedLoginResponse($request);
    }
    /**
     * Write code on Method
     *
     * @return response()
     */
    public function loginViaPasswordLessLink(Request $request)
    {
        $user = User::where('email', $request->input('email'))->first();

        if ($user) {
            $user->notify(new SendPasswordLessLinkNotification());
        }

        return $user;
    }
}
Step 7: Create Notification Class
In this step, we will update the SendPasswordLessLinkNotification.php notification for sending emails with a magic link. let's create a notification by following the command:
php artisan make:notification SendPasswordLessLinkNotification
Next, update the following file with code.
app/Notifications/SendPasswordLessLinkNotification.php
<?php

namespace App\Notifications;

use Illuminate\Bus\Queueable;
use Illuminate\Contracts\Queue\ShouldQueue;
use Illuminate\Notifications\Messages\MailMessage;
use Illuminate\Notifications\Notification;
use Grosv\LaravelPasswordlessLogin\LoginUrl;

class SendPasswordLessLinkNotification extends Notification
{
    use Queueable;

    /**
     * Create a new notification instance.
     *
     * @return void
     */
    public function __construct()
    {

    }

    /**
     * Get the notification's delivery channels.
     *
     * @param  mixed  $notifiable
     * @return array
     */
    public function via($notifiable)
    {
        return ['mail'];
    }

    /**
     * Get the mail representation of the notification.
     *
     * @param  mixed  $notifiable
     * @return \Illuminate\Notifications\Messages\MailMessage
     */
    public function toMail($notifiable)
    {

        $generator = new LoginUrl($notifiable);
        $generator->setRedirectUrl('/home');
        $url = $generator->generate();

        return (new MailMessage)
                    ->subject('Your Password Less Link!')
                    ->line('Click this link to log in!')
                    ->action('Login', $url)
                    ->line('Thank you for using our application!');
    }

    /**
     * Get the array representation of the notification.
     *
     * @param  mixed  $notifiable
     * @return array
     */
    public function toArray($notifiable)
    {
        return [

        ];
    }
}
Run Laravel App:
All the required steps have been done, now you have to type the given below command and hit enter to run the Laravel app:
php artisan serve
Now, Go to your web browser, type the given URL and view the app output:
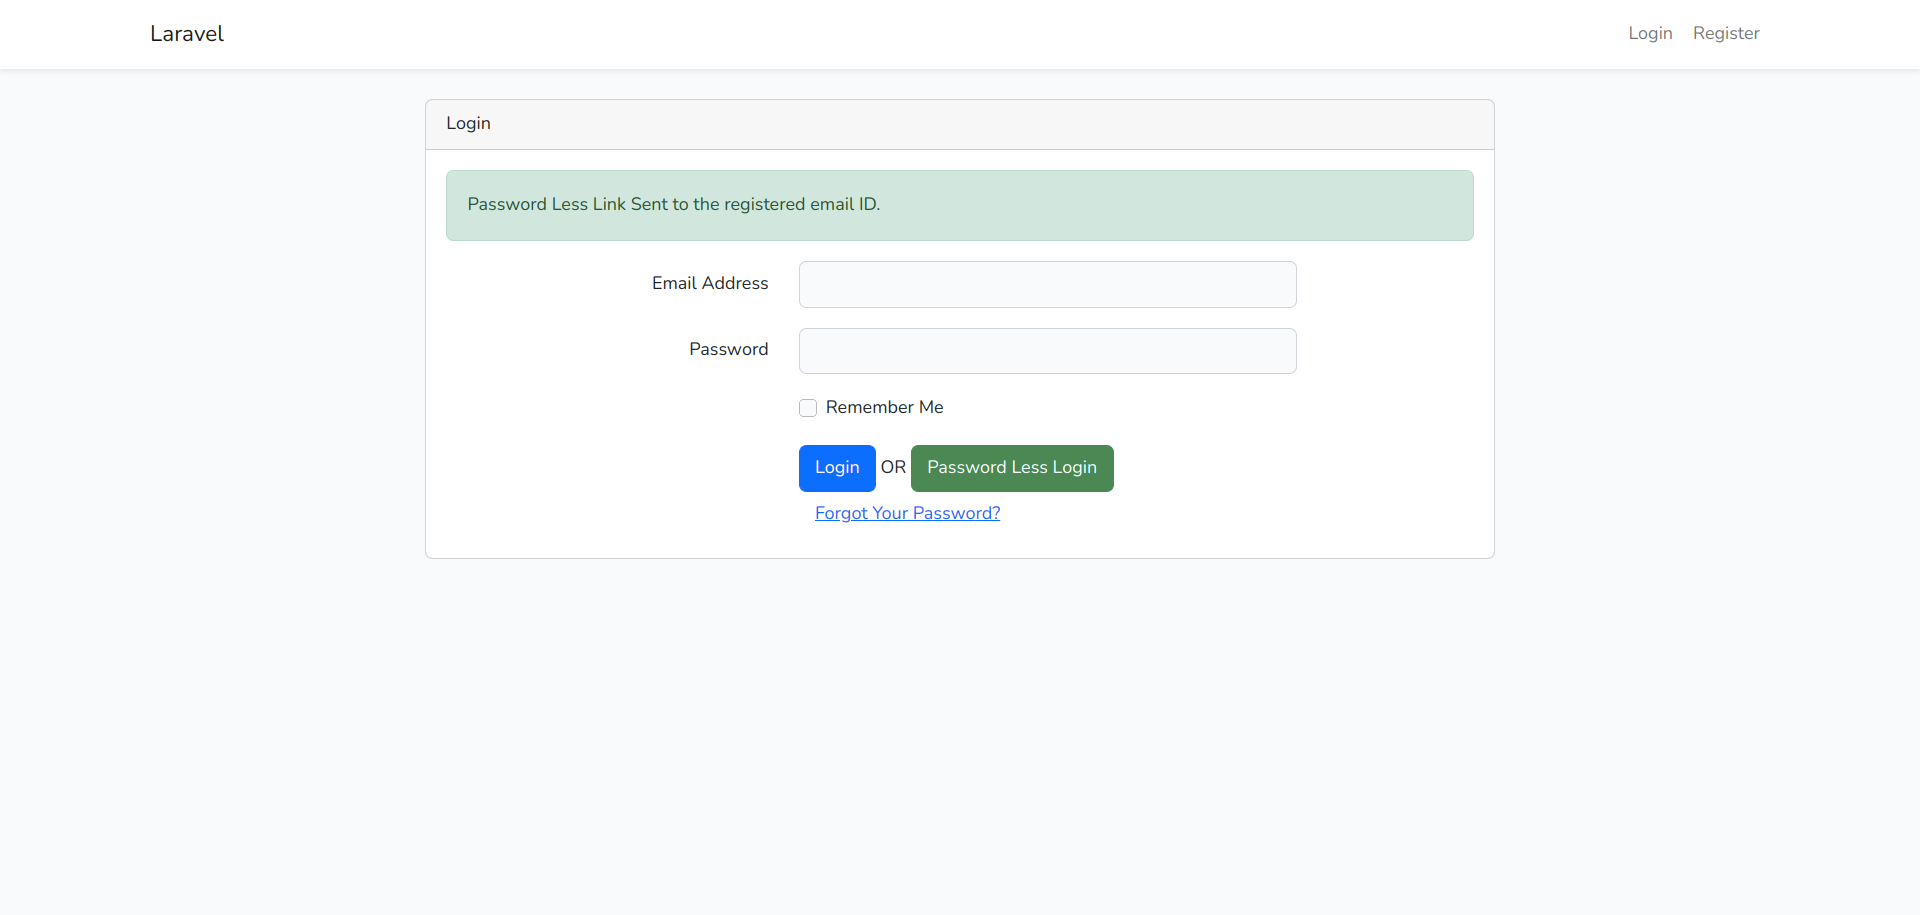
http://localhost:8000/Login Page:
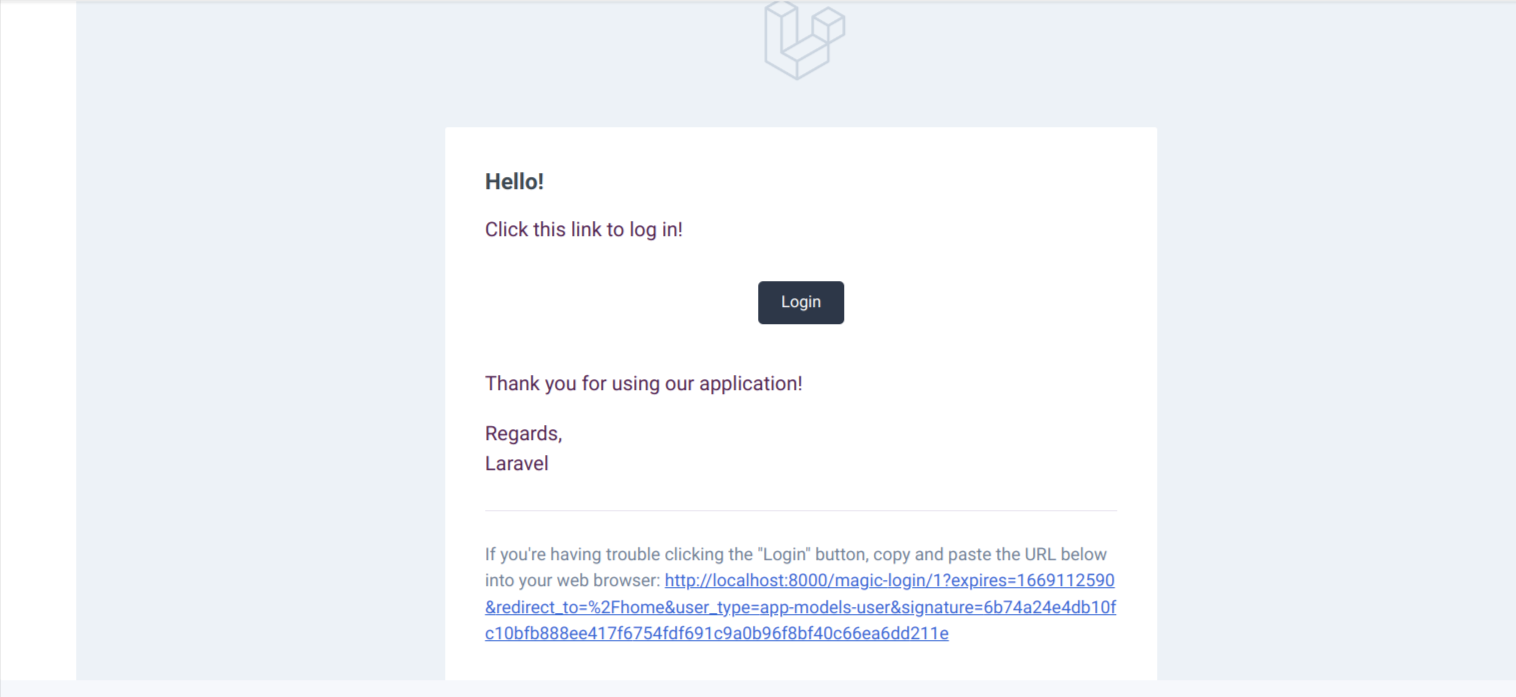
Email Preview:
I hope it can help you...