Laravel 8 Multi Auth (Authentication) Example Tutorial
Sep 17, 2021 . Admin

Hi Artisan,
In this Article I will share something new about how actually work multi auth (authentication)integrate with laravel 8.I will create multiple authentications using middleware.
First of all i will exaplain previous example how to create simple authentication using laravel-ui you will learn this first follow this article
So, in this example i will create two simple authentication one for main admin and another is all user.
Here, laravel 8 multi auth tutorial, multiple authentication in laravel 8, implement multiple authentication in laravel 8, laravel 8 multiple authentication using middleware.
Here,i will give you a simple and easy example how to use implement multiple authentication in laravel 8 in laravel simply follow my all steps.
Step 1: Download LaravelLet us begin the tutorial by installing a new laravel application. if you have already created the project, then skip following step.
composer create-project laravel/laravel example-appStep 2 : Setup Database Configuration
After successfully install laravel app next we configure databse setup. We will open ".env" file and change the database name, username and password in the env file.
DB_CONNECTION=mysql
DB_HOST=127.0.0.1
DB_PORT=3306
DB_DATABASE=Enter_Your_Database_Name
DB_USERNAME=Enter_Your_Database_Username
DB_PASSWORD=Enter_Your_Database_Password
Step 3 : Create Table Migration and Model
In this step we have to integrate one column for is_admin create migration for users table.
/database/migrations/2014_10_12_000000_create_users_table.php
<?php

use Illuminate\Database\Migrations\Migration;
use Illuminate\Database\Schema\Blueprint;
use Illuminate\Support\Facades\Schema;

class CreateUsersTable extends Migration
{
    /**
     * Run the migrations.
     *
     * @return void
     */
    public function up()
    {
        Schema::create('users', function (Blueprint $table) {
            $table->id();
            $table->string('name');
            $table->string('email')->unique();
            $table->timestamp('email_verified_at')->nullable();
            $table->boolean('is_admin')->nullable();
            $table->string('password');
            $table->rememberToken();
            $table->timestamps();
        });
    }

    /**
     * Reverse the migrations.
     *
     * @return void
     */
    public function down()
    {
        Schema::dropIfExists('users');
    }
}
Now we need to run migration be bellow command:
php artisan migrate
After you have to put bellow code in your User model file to create users table.
app/Models/User.php
<?php

namespace App\Models;

use Illuminate\Contracts\Auth\MustVerifyEmail;
use Illuminate\Database\Eloquent\Factories\HasFactory;
use Illuminate\Foundation\Auth\User as Authenticatable;
use Illuminate\Notifications\Notifiable;

class User extends Authenticatable
{
    use HasFactory, Notifiable;

    /**
     * The attributes that are mass assignable.
     *
     * @var string[]
     */
    protected $fillable = [
        'name',
        'email',
        'password',
        'is_admin'
    ];

    /**
     * The attributes that should be hidden for serialization.
     *
     * @var array
     */
    protected $hidden = [
        'password',
        'remember_token',
    ];

    /**
     * The attributes that should be cast.
     *
     * @var array
     */
    protected $casts = [
        'email_verified_at' => 'datetime',
    ];
}
Step 4 : Create Auth using scaffold
Now, in this step, we will create auth scaffold command to create login, register and dashboard. so run following commands:
composer require laravel/ui
After, that you can run following command and check ui commands info.
php artisan ui --help
Next, You can use the following commands for creating auth:
Using Bootstrap:
php artisan ui bootstrap --auth
npm install
npm run devStep 5: Create IsAdmin Middleware
In this step we will needed to create a IsAdmin Middleware for allow access only admin and users thats to route.so follow bellow code.
app/Http/middleware/IsAdmin.php
<?php

namespace App\Http\Middleware;

use Closure;
use Illuminate\Http\Request;

class IsAdmin
{
    /**
     * Handle an incoming request.
     *
     * @param  \Illuminate\Http\Request  $request
     * @param  \Closure  $next
     * @return mixed
     */
    public function handle(Request $request, Closure $next)
    {
        if (auth()->user()->is_admin == 1) {
            return $next($request);
        }
        return redirect('home')->with('error',"You don't have admin access.");
    }
}
app/Http/Kernel.php
/**
 * The application's route middleware.
 *
 * These middleware may be assigned to groups or used individually.
 *
 * @var array
 */
protected $routeMiddleware = [
    'auth' => \App\Http\Middleware\Authenticate::class,
    'auth.basic' => \Illuminate\Auth\Middleware\AuthenticateWithBasicAuth::class,
    'cache.headers' => \Illuminate\Http\Middleware\SetCacheHeaders::class,
    'can' => \Illuminate\Auth\Middleware\Authorize::class,
    'guest' => \App\Http\Middleware\RedirectIfAuthenticated::class,
    'password.confirm' => \Illuminate\Auth\Middleware\RequirePassword::class,
    'signed' => \Illuminate\Routing\Middleware\ValidateSignature::class,
    'throttle' => \Illuminate\Routing\Middleware\ThrottleRequests::class,
    'verified' => \Illuminate\Auth\Middleware\EnsureEmailIsVerified::class,
    'is_admin' => \App\Http\Middleware\IsAdmin::class,
];
Step 6 : Create Route
now, we require to create a route for HomeController in laravel application. so open your "routes/web.php" file and add the following route.
/routes/web.php
<?php

use Illuminate\Support\Facades\Route;
use App\Http\Controllers\HomeController;
/*
|--------------------------------------------------------------------------
| Web Routes
|--------------------------------------------------------------------------
|
| Here is where you can register web routes for your application. These
| routes are loaded by the RouteServiceProvider within a group which
| contains the "web" middleware group. Now create something great!
|
*/

Route::get('admin/home', [HomeController::class, 'adminHome'])->name('admin.home')->middleware('is_admin');
Step 7 : Create Controller
Here, in this step now we should create a new controller as HomeController. So run the below command and create a new controller.
php artisan make:controller HomeController
After successfully run the above command. add adminHome() method in Homecontroller So, let's copy the below code and put it on the HomeController.php file.
app/http/controller/HomeController.php
<?php

namespace App\Http\Controllers;

use Illuminate\Http\Request;

class HomeController extends Controller
{
    /**
     * Create a new controller instance.
     *
     * @return void
     */
    public function __construct()
    {
        $this->middleware('auth');
    }

    /**
     * Show the application dashboard.
     *
     * @return \Illuminate\Contracts\Support\Renderable
     */
    public function index()
    {
        return view('home');
    }

    /**
     * Write Your Code..
     *
     * @return string
    */
    public function adminHome(Request $request)
    {
        return view('adminHome');
    }
}
Step 8 : Create Blade File
In this step we have to engender a two-blade file. So finally you have to create the following file and put bellow code:
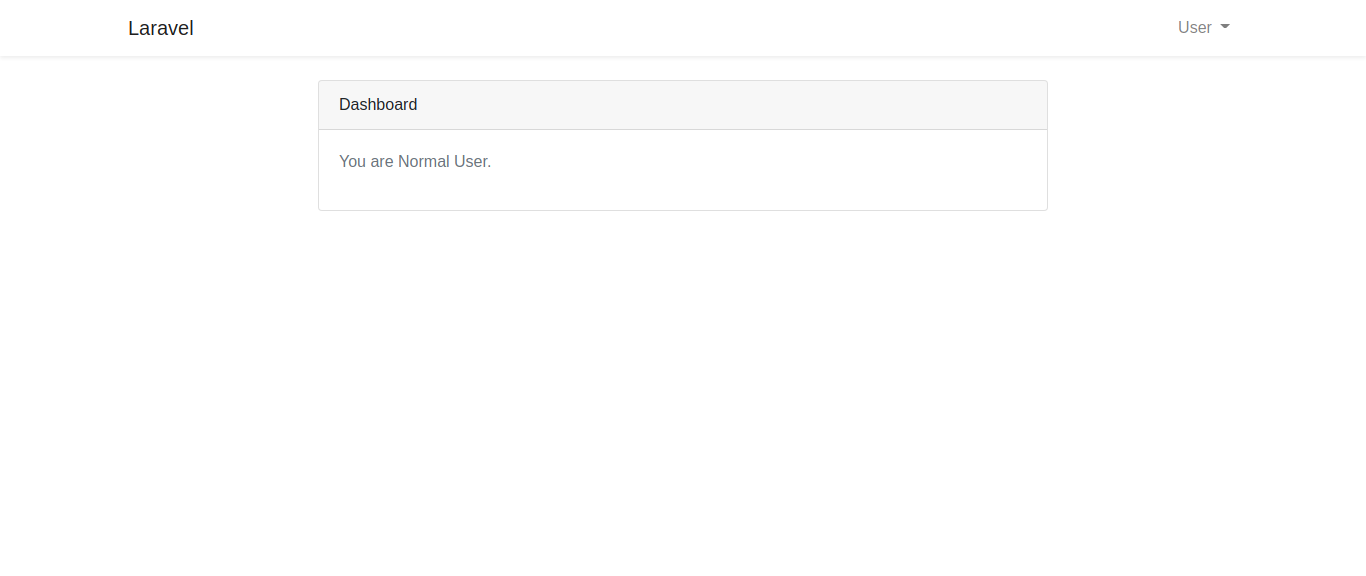
/resources/views/home.blade.php
@extends('layouts.app')

@section('content')
<div class="container">
    <div class="row justify-content-center">
        <div class="col-md-8">
            <div class="card">
                <div class="card-header">Dashboard</div>
                <div class="card-body">
                    <p class="text-secondary">You are Normal User.</p>
                </div>
            </div>
        </div>
    </div>
</div>
@endsection
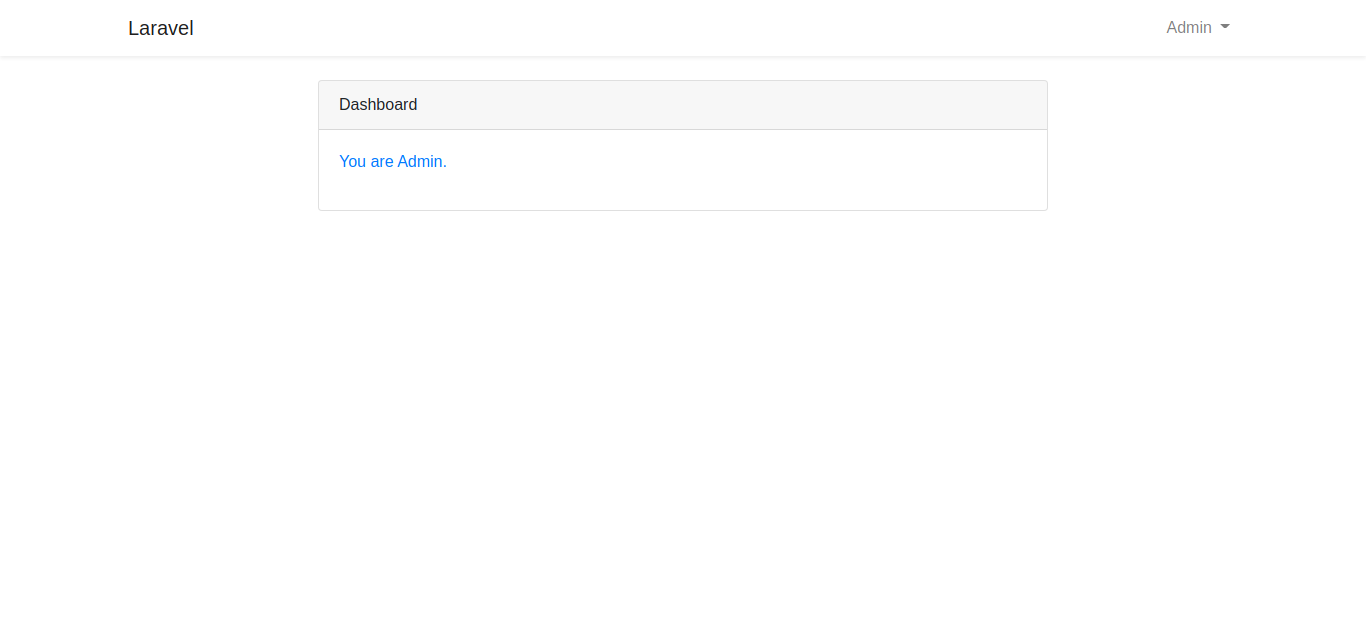
/resources/views/adminHome.blade.php
@extends('layouts.app')

@section('content')
<div class="container">
    <div class="row justify-content-center">
        <div class="col-md-8">
            <div class="card">
                <div class="card-header">Dashboard</div>
                <div class="card-body">
                    <p class="text-primary">You are Admin.</p>
                </div>
            </div>
        </div>
    </div>
</div>
@endsection
Step 9: Update on LoginController
So, In this step, we will few changes on LoginController, while the user will log in then we redirect according to user access. if the normal user then we will redirect to the home route and if admin user then we redirect to the admin route. so let's change.
<?php

namespace App\Http\Controllers\Auth;

use App\Http\Controllers\Controller;
use App\Providers\RouteServiceProvider;
use Illuminate\Foundation\Auth\AuthenticatesUsers;
use Illuminate\Http\Request;

class LoginController extends Controller
{
    /*
    |--------------------------------------------------------------------------
    | Login Controller
    |--------------------------------------------------------------------------
    |
    | This controller handles authenticating users for the application and
    | redirecting them to your home screen. The controller uses a trait
    | to conveniently provide its functionality to your applications.
    |
    */

    use AuthenticatesUsers;

    /**
     * Where to redirect users after login.
     *
     * @var string
     */
    protected $redirectTo = '/home';

    /**
     * Create a new controller instance.
     *
     * @return void
     */
    public function __construct()
    {
        $this->middleware('guest')->except('logout');
    }

    /**
     * Write Your Code..
     *
     * @return string
    */
    public function login(Request $request)
    {
        $input = $request->all();

        $this->validate($request, [
            'email' => 'required|email',
            'password' => 'required',
        ]);

        if (auth()->attempt(array('email' => $input['email'], 'password' => $input['password']))) {
            if (auth()->user()->is_admin == 1) {
                return redirect()->route('admin.home');
            }else{
                return redirect()->route('home');
            }
        }else{
            return redirect()->route('login')
                ->with('error','Email-Address And Password Are Wrong.');
        }
    }
}
Step 10: Create Seeder
In this step i will create a new admin and normal users.so let's create a seeder using following throug below command.
php artisan make:seeder CreateUsersSeederdatabase/seeders/CreateUsersSeeder.php
<?php

namespace Database\Seeders;

use Illuminate\Database\Seeder;
use App\Models\User;

class CreateUsersSeeder extends Seeder
{
    /**
     * Run the database seeds.
     *
     * @return void
     */
    public function run()
    {
        $user = [
            [
               'name'=>'Admin',
               'email'=>'admin@mywebtuts.com',
                'is_admin'=>'1',
               'password'=> bcrypt('123456'),
            ],
            [
               'name'=>'User',
               'email'=>'user@mywebtuts.com',
                'is_admin'=>'0',
               'password'=> bcrypt('123456'),
            ],
        ];

        foreach ($user as $key => $value) {
            User::create($value);
        }
    }
}
Run seeder:
php artisan db:seed --class=CreateUsersSeeder
Now we are ready to run our example so run bellow command for quick run:
php artisan serve
Admin User
Email: admin@mywebtuts.com
Password: 123456
Normal User
Email: user@mywebtuts.com
Password: 123456
It will help you...