Laravel 9 Form Validation With Error Messages
Feb 09, 2022 . Admin
Hi Friends,
This article goes in detailed on laravel 9 form validation with error messages. We will look at example of laravel 9 form validation with error message text. if you have question about form validation laravel 9 then i will give simple example with solution.
You can also define laravel 9 form validation custom error messages. we will display error message with each field. we will use laravel 9 form request custom validation.
Here, i am going to show you very simple example of form validation so, you can simply use in your laravel 9 project.
Step 1: Download LaravelLet us begin the tutorial by installing a new laravel application. if you have already created the project, then skip following step.
composer create-project laravel/laravel example-appStep 2: Create Routes routes/web.php
<?php

use Illuminate\Support\Facades\Route;
use App\Http\Controllers\StudentController;

/*
|--------------------------------------------------------------------------
| Web Routes
|--------------------------------------------------------------------------
|
| Here is where you can register web routes for your application. These
| routes are loaded by the RouteServiceProvider within a group which
| contains the "web" middleware group. Now create something great!
|
*/

Route::get('student/create',[StudentController::class,'create']);
Route::post('student/store',[StudentController::class,'store'])->name('student.store');
Step 3: Create Controller
Now we will add two controller method, one will just display blade file with get request, and another for post request, i write validation for that, so simply add both following method on it.
app/Http/Controllers/StudentController.php
<?php

namespace App\Http\Controllers;

use Illuminate\Http\Request;
use App\Models\Student;

class StudentController extends Controller
{
    /**
     * Show the application dashboard.
     *
     * @return \Illuminate\Http\Response
     */
    public function create()
    {
        return view('createStudent');
    }

    /**
     * Show the application dashboard.
     *
     * @return \Illuminate\Http\Response
     */
    public function store(Request $request)
    {
        $validatedData = $request->validate([
                'name' => 'required',
                'password' => 'required|min:5',
                'email' => 'required|email|unique:users'
            ], [
                'name.required' => 'Name is required',
                'password.required' => 'Password is required'
            ]);

        $validatedData['password'] = bcrypt($validatedData['password']);

        $user = Student::create($validatedData);

        return back()->with('success', 'Student created successfully.');
    }
}
Step 4: Create Blade File
now here we will create createUser.blade.php file and here we will create bootstrap simple form with error validation message. So, let's create following file:
resources/views/createStudent.blade.php
<!DOCTYPE html>
<html>
<head>
    <title>Laravel 9 Form Validation With Error Messages - Mywebtuts.com</title>
    <meta charset="utf-8">
    <meta http-equiv="X-UA-Compatible" content="IE=edge">
    <meta name="viewport" content="width=device-width, initial-scale=1">
    <link href="https://cdn.jsdelivr.net/npm/bootstrap@5.1.3/dist/css/bootstrap.min.css" rel="stylesheet">
</head>
<body>
    <div class="container">
        <div class="row justify-content-center mt-5">
            <div class="col-md-8 mt-5">

                <h3>Laravel 9 Form Validation With Error Messages - Mywebtuts.com</h3>

                @if(Session::has('success'))
                    <div class="alert alert-success">
                        {{ Session::get('success') }}
                        @php
                            Session::forget('success');
                        @endphp
                    </div>
                @endif

                <form method="post" action="{{ route('student.store') }}" class="mt-4">

                    {{ csrf_field() }}

                    <div class="form-group mb-3">
                        <label>Name:</label>
                        <input type="text" name="name" class="form-control" placeholder="Name">
                        @if ($errors->has('name'))
                            <span class="text-danger">{{ $errors->first('name') }}</span>
                        @endif
                    </div>

                    <div class="form-group mb-3">
                        <label>Email:</label>
                        <input type="text" name="email" class="form-control" placeholder="Email">
                        @if ($errors->has('email'))
                            <span class="text-danger">{{ $errors->first('email') }}</span>
                        @endif
                    </div>

                    <div class="form-group mb-3">
                        <label>Password:</label>
                        <input type="password" name="password" class="form-control" placeholder="Password">
                        @if ($errors->has('password'))
                            <span class="text-danger">{{ $errors->first('password') }}</span>
                        @endif
                    </div>

                    <div class="form-group">
                        <button class="btn btn-success btn-submit btn-sm">Submit</button>
                    </div>

                </form>
            </div>
        </div>
    </div>
</body>
</html>
Run Laravel App:
All steps have been done, now you have to type the given command and hit enter to run the laravel app:
php artisan serve
Now, you have to open web browser, type the given URL and view the app output:
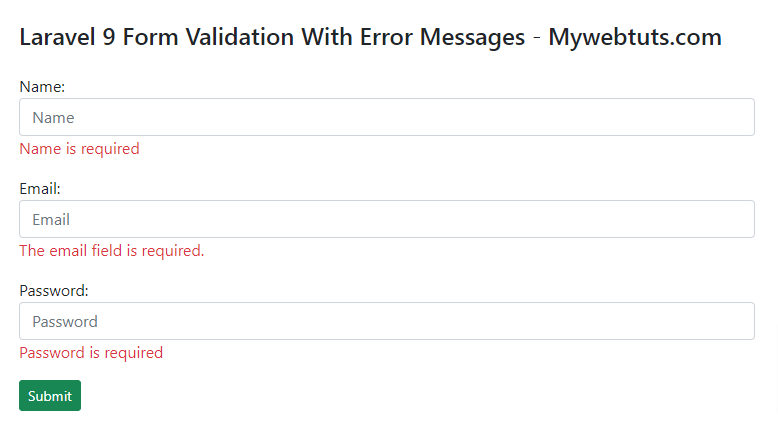
http://localhost:8000/student/createOutput :
I hope it can help you...