Laravel 9 Send Mail using Mailgun Example
May 12, 2022 . Admin
Hi Guys,
Today,I will learn you how to send mail using mailgun in laravel 9.we will show setp by step send mail using mailgun example in laravel 9.Mailgun is very popular API to send email from website. It is very fast to send mail and also it track the mail. Tracking email is very important feature of mailgun api and you can also see how much user open your mail, click on your mail too. Mailgun send mail like work gun.
In this post i would like to show you how to setting of mailgun in our laravel 9 application. In this example you can learn to send simple mail using mailgun api. If you are use mailgun for sending email then you can save loading time and you can get mail fast.
Step 1: Download LaravelLet us begin the tutorial by installing a new laravel application. if you have already created the project, then skip following step.
composer create-project laravel/laravel example-appStep 2: Create Mail Configaration
First we will add configration on mail. i added my gmail account configration. so first open .env file and bellow code:
.envMAIL_DRIVER=mailgun MAIL_HOST=smtp.mailgun.org MAIL_PORT=587 MAIL_USERNAME=yourUserName MAIL_PASSWORD=yourPassword MAIL_ENCRYPTION=tlsStep 3: Get Domain and Secret
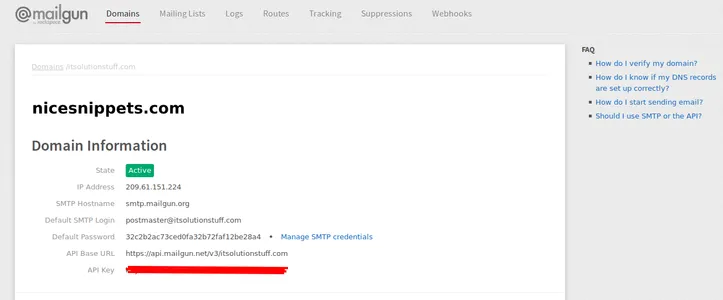
Now, I need to add secret and domain of mailgun api configration. So first create new account in mailgun.com SignUp if you don't have before. After registeration active your mailgun account and click on Domails and click on Add New Domail button. then you can see bellow screen.
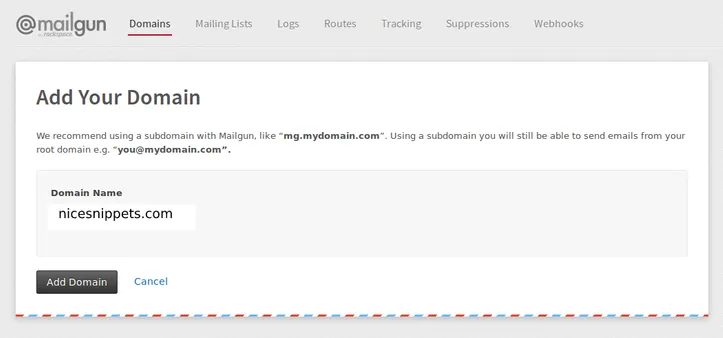
Next add name you can see bellow screen and copy domain name and API Key from like bellow image.
 Step 4: Add Services
Now you have to open services.php and add mailgun configration this way :
config/services.php
'mailgun' => array(
    'domain' => 'your_domain',
    'secret' => 'your_secret',
),
Step 5: Create Route
Here we are ready to send mail for test so first create test route for email sending.
routes/web.php
<?php

use App\Http\Controllers\MailGunController;

/*
|--------------------------------------------------------------------------
| Web Routes
|--------------------------------------------------------------------------
|
| Here is where you can register web routes for your application. These
| routes are loaded by the RouteServiceProvider within a group which
| contains the "web" middleware group. Now create something great!
|
*/

Route::get('/send-mail-using-mailgun', [MailGunController::class, 'index'])->name('send.mail.using.mailgun.index');
Step 6: Create Controller
php artisan make:controller MailGunController
Next,We are add mail function in MailGunController.php file so add this way :
app/Http/Controllers/MailGunController.php
<?php

namespace App\Http\Controllers;

use Illuminate\Http\Request;
use App\Models\User;
use Mail;

class MailGunController extends Controller
{
    /**
     * Write code on Method
     *
     * @return response()
     */
    public function index()
    {
        $user = User::find(1)->toArray();

        Mail::send('mailView', $user, function($message) use ($user) {
            $message->to($user['email']);
            $message->subject('Testing Mailgun');
        });

        dd('Mail Send Successfully');
    }
}
At last create email template file for send mail so let's create mailEvent.blade.php file in emials folder.
Step 7: Create Blade File resources/views/emails/mailEvent.blade.phpHi, I am from Mywebtuts.com from mailgun testing.Run Laravel App:
All steps have been done, now you have to type the given command and hit enter to run the laravel app:
php artisan serve
Now, you have to open web browser, type the given URL and view the app output:
http://localhost:8000/send-mail-using-mailgun
It will help you...