Eloquent Mutators and Accessors in Laravel 9 Example
Feb 12, 2022 . Admin
Hi Dev,
In this example i will learn you laravel 9 accessor and mutator example. I explained simply step-by-step laravel 9 accessor and mutator example. Here, we will implement a laravel 9 accessor and mutator. In this article, we'll go through mutators and accessors of the eloquent orm in the laravel 9 web framework.
So, mutators and accessors sanction you to alter data afore it's preserved to and fetched from a database. To be categorical, the mutator sanctions you to alter data afore it's preserved to a database. On the other hand, the accessor sanctions you to alter data after it's fetched from a database.
The Laravel model is the central place where you can engender mutator and accessor methods. And of course, it's nice to have all your modifications in a single place rather than scattered over different places.
So let's start following example.
Step 1: Download LaravelLet us begin the tutorial by installing a new laravel application. if you have already created the project, then skip following step.
composer create-project laravel/laravel example-appStep 2 : Create Migration and Model
Here, we will update migration with adding new column publish_date for "posts" table, let's update code on following file.
database/migrations/2014_10_12_000000_create_posts_table.php
<?php

use Illuminate\Database\Migrations\Migration;
use Illuminate\Database\Schema\Blueprint;
use Illuminate\Support\Facades\Schema;

return new class extends Migration
{
    /**
     * Run the migrations.
     *
     * @return void
     */
    public function up()
    {
        Schema::create('posts', function (Blueprint $table) {
            $table->bigIncrements('id');
            $table->string('title');
            $table->text('body');
            $table->date('publish_date');
            $table->timestamps();
        });
    }

    /**
     * Reverse the migrations.
     *
     * @return void
     */
    public function down()
    {
        Schema::dropIfExists('posts');
    }
};
Next, run create new migration using laravel migration command as bellow:
php artisan migrate
Now we will update Post model by using following command:
app/Models/Post.php
<?php

namespace App\Models;

use Illuminate\Database\Eloquent\Model;
use Illuminate\Database\Eloquent\Casts\Attribute;
use Carbon\Carbon;

class Post extends Model
{
    /**
     * The attributes that are mass assignable.
     *
     * @var array

     */
    protected $fillable = [
        'title',
        'body',
        'publish_date'
    ];

    /**
     * Interact with the user's first name.
     *
     * @param  string  $value
     * @return \Illuminate\Database\Eloquent\Casts\Attribute
     */
    protected function publishDate(): Attribute
    {
        return new Attribute(
            get: fn ($value) =>  Carbon::parse($value)->format('m/d/Y'),
            set: fn ($value) =>  Carbon::parse($value)->format('Y-m-d'),
        );
    }
}
Step 3 : Create Controller
Let's create PostController by following command:
php artisan make:controller PostControllerapp/Http/Controllers/PostController.php
<?php

namespace App\Http\Controllers;

use App\Models\Post;
use Illuminate\Http\Request;

class PostController extends Controller
{
    /**
     * Write code on Method
     *
     * @return response()
     */
    public function create()
    {
        $input = [
            'title' => 'PHP',
            'body' => 'This is a Nice Language.',
            'publish_date' => '02/12/2022'
        ];

        $post = Post::create($input);

        dd($post);
    }

    /**
     * Write code on Method
     *
     * @return response()
     */
    public function show()
    {
        $post = Post::first();

        dd($post->toArray());
    }
}
Step 4: Create and Add Routes
Next, You have to open and update the following routes in the routes/web.php file.
routes/web.php
<?php

use Illuminate\Support\Facades\Route;
use App\Http\Controllers\PostController;

/*
|--------------------------------------------------------------------------
| Web Routes
|--------------------------------------------------------------------------
|
| Here is where you can register web routes for your application. These
| routes are loaded by the RouteServiceProvider within a group that
| contains the "web" middleware group. Now create something great!
|
*/

Route::controller(PostController::class)->group(function(){
    Route::get('create-post', 'create');
    Route::get('get-post', 'show');
});
Run Laravel App:
All steps have been done, now you have to type the given command and hit enter to run the laravel app:
php artisan serve
Now, you have to open web browser, type the given URL and view the app output:
http://localhost:8000/create-post
It will create post as like bellow screen shot:
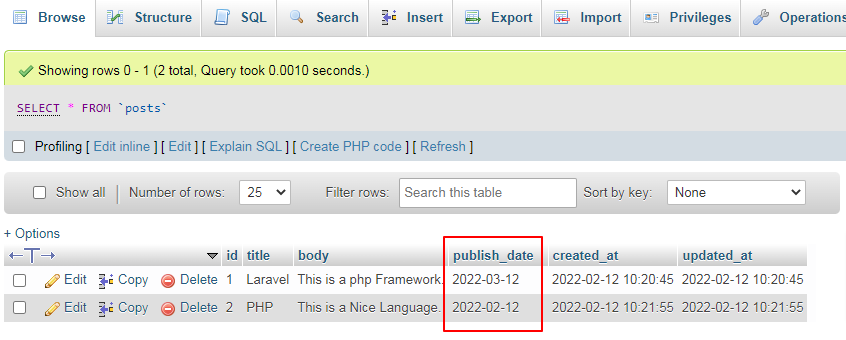 Output for Accessor:
Now, Go to your web browser, type the given URL and view the app output:
http://localhost:8000/get-post
It will create post as like bellow screen shot:
array:6 [
    "id" => 1
    "title" => "Laravel"
    "body" => "This is a php Framework."
    "publish_date" => "03/12/2022"
    "created_at" => "2022-02-12T10:20:45.000000Z"
    "updated_at" => "2022-02-12T10:20:45.000000Z"
]
I hope it can help you...