How to Force User to Use Strong Password in Laravel App?
Aug 30, 2022 . Admin
Hello Friends,
In this tutorial, I will show you How to Force User to Use Strong Password in Laravel App?. if you want to see example of prevent dumb password laravel then you are a right place. Here you will learn laravel password security. I’m going to show you about restrictions common password to enter laravel. Let's get started with password best practices laravel.
As we know, security is a key of website or software, If you are creating new account and you create very familiar or regular password like "123456", "123123", "abcd" etc. So this type of ordinary password can know or gases your password and login in to your account. So we have to use something like package or plugin for prevent this type of common password enter to user.
In this example, we are going to learn how we can prevent common password using laravel custom validation rule. laravel framework not provide by default any validation for this, so we will use "unicodeveloper/laravel-password" package that will help us.
So, let's follow bellow few step to done this example. As you see bellow preview of error message, after done this example you can see on your project too.
Preview: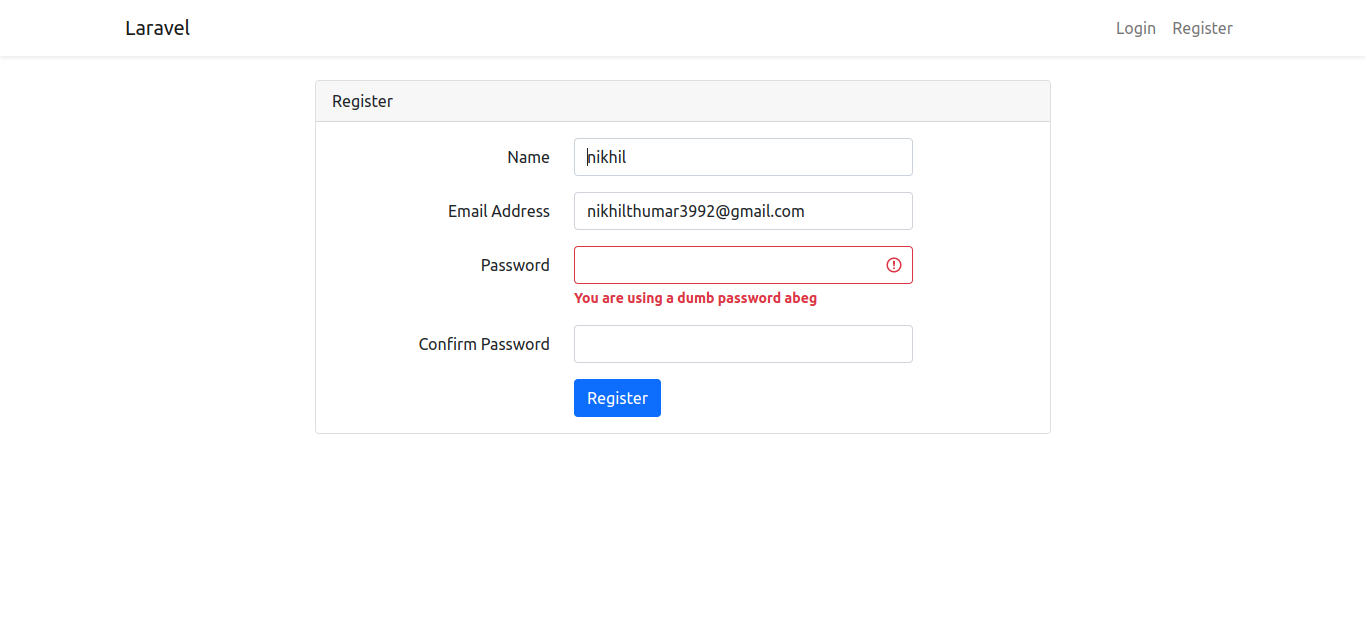
This is optional; however, if you have not created the laravel app, then you may go ahead and execute the below command:
composer create-project laravel/laravel example-appStep 2: Install Auth
Laravel's laravel/ui package provides a quick way to scaffold all of the routes and views you need for authentication using a few simple commands:
composer require laravel/ui
Next, we need to generate auth scaffold with bootstrap, so let's run the below command:
php artisan ui bootstrap --auth
Then, install npm packages using the below command:
npm install
At last, built bootstrap CSS using the below command:
npm run buildStep 3: Install Laravel Password Package
In this step we have to unicodeveloper/laravel-password package for access custom validation rule method so one your cmd or terminal and fire bellow command:
composer require unicodeveloper/laravel-password
After successfully install package, open config/app.php file and add service provider and alias.
config/app.php
<?php

return [

 /*
|--------------------------------------------------------------------------
| Autoloaded Service Providers
|--------------------------------------------------------------------------
|
| The service providers listed here will be automatically loaded on the
| request to your application. Feel free to add your own services to
| this array to grant expanded functionality to your applications.
|
*/

'providers' => [
    ....
    Unicodeveloper\DumbPassword\DumbPasswordServiceProvider::class
],
.....
Step 4: Add Validation Message
After install package successfully, we have to add custom message for package validation. So let's add as like bellow file:
resources/lang/en/validation.php
<?php

return [

    /*
    |--------------------------------------------------------------------------
    | Validation Language Lines
    |--------------------------------------------------------------------------
    |
    | The following language lines contain the default error messages used by
    | the validator class. Some of these rules have multiple versions such
    | as the size rules. Feel free to tweak each of these messages here.
    |
    */

    'dumbpwd' => 'You are using a dumb password abeg',
    ....
Step 5: Use Validation Rule
Now, we are ready to use "dumbpwd" validation rule on register page, so let's use like as bellow file:
app/Http/Controllers/Auth/RegisterController.php
<?php

namespace App\Http\Controllers\Auth;

use App\Http\Controllers\Controller;
use App\Providers\RouteServiceProvider;
use App\Models\User;
use Illuminate\Foundation\Auth\RegistersUsers;
use Illuminate\Support\Facades\Hash;
use Illuminate\Support\Facades\Validator;

class RegisterController extends Controller
{
    /*
    |--------------------------------------------------------------------------
    | Register Controller
    |--------------------------------------------------------------------------
    |
    | This controller handles the registration of new users as well as their
    | validation and creation. By default this controller uses a trait to
    | provide this functionality without requiring any additional code.
    |
    */

    use RegistersUsers;

    /**
     * Where to redirect users after registration.
     *
     * @var string
     */
    protected $redirectTo = RouteServiceProvider::HOME;

    /**
     * Create a new controller instance.
     *
     * @return void
     */
    public function __construct()
    {
        $this->middleware('guest');
    }

    /**
     * Get a validator for an incoming registration request.
     *
     * @param  array  $data
     * @return \Illuminate\Contracts\Validation\Validator
     */
    protected function validator(array $data)
    {
        return Validator::make($data, [
            'name' => ['required', 'string', 'max:255'],
            'email' => ['required', 'string', 'email', 'max:255', 'unique:users'],
            'password' => ['required', 'string', 'min:8', 'confirmed', 'dumbpwd'],
        ]);
    }

    /**
     * Create a new user instance after a valid registration.
     *
     * @param  array  $data
     * @return \App\Models\User
     */
    protected function create(array $data)
    {
        return User::create([
            'name' => $data['name'],
            'email' => $data['email'],
            'password' => Hash::make($data['password']),
        ]);
    }
}
Run Laravel App:
All steps have been done, now you have to type the given command and hit enter to run the laravel app:
php artisan serveNow, you have to open web browser, type the given URL and view the app output:
http://localhost:8000/
now it works...
I hope it can help you...