Laravel 9 Contact Form with Send Mail Example
May 05, 2022 . Admin
Hi Dev,
In this blog, I will show you how to create a contact form in laravel 9 application. we will learn to create and store contact form with email in laravel 9 application. This tutorial will give you a simple and easy example of how to create a contact form with mail in the laravel 9 app. you want to create a contact us form page in laravel 9 with sending mail with a bootstrap example.
In this tutorial, you will see how to create and store a contact form in laravel 9. I create a simple and easy example of creating a contact form with sending mail in laravel 9.
Here I will give you a full example of how to create a contact form in laravel 9. So let's see the bellow example and follow step by step.
Step 1: Download LaravelLet us begin the tutorial by installing a new laravel application. if you have already created the project, then skip following step.
composer create-project laravel/laravel example-appStep 2: Setup Database
After successfully install laravel 9 Application, Go to your project .env file and set up database credential and move next step :
.envDB_CONNECTION=mysql DB_HOST=127.0.0.1 DB_PORT=3306 DB_DATABASE=here your database name DB_USERNAME=here database username DB_PASSWORD=here database passwordStep 3: Create Migration
we are going to create a file upload application for students. so we have to create migration for "contacts" table and create model using Laravel 9 php artisan command, so first fire bellow command:
php artisan make:migration Contacts
After this command you will find one file in the following path "database/migrations" and you have to put the bellow code in your migration file for create student's table.
database/migrations
<?php

use Illuminate\Database\Migrations\Migration;
use Illuminate\Database\Schema\Blueprint;
use Illuminate\Support\Facades\Schema;

class CreateContactsTable extends Migration
{
    /**
     * Run the migrations.
     *
     * @return void
     */
    public function up()
    {
        Schema::create('contacts', function (Blueprint $table) {
            $table->id();
            $table->string('name');
            $table->string('email');
            $table->string('phone');
            $table->string('subject');
            $table->text('message');
            $table->timestamps();
        });
    }

    /**
     * Reverse the migrations.
     *
     * @return void
     */
    public function down()
    {
        Schema::dropIfExists('contacts');
    }
}
Now you have to run this migration by following command:
php artisan migrateStep 4: Create Model
php artisan make:model Contact
Now you can add table field in Contact model :
App/Models/Contact.php
<?php

namespace App\Models;

use Illuminate\Database\Eloquent\Factories\HasFactory;
use Illuminate\Database\Eloquent\Model;

class Contact extends Model
{
    use HasFactory;

    /**
     * The attributes that are mass assignable.
     *
     * @var array
    */
    public $fillable = [
        'name', 'email', 'phone', 'subject', 'message'
    ];
}
Step 5: Create Route
Here, we need to add a route for the ajax form submit. so open your "routes/web.php" file and add the following route.
routes/web.php
<?php

use App\Http\Controllers\ContactController;

/*
|--------------------------------------------------------------------------
| Web Routes
|--------------------------------------------------------------------------
|
| Here is where you can register web routes for your application. These
| routes are loaded by the RouteServiceProvider within a group which
| contains the "web" middleware group. Now create something great!
|
*/

Route::get('/contact-form', [App\Http\Controllers\ContactController::class, 'contactForm'])->name('contact-form');
Route::post('/contact-form', [App\Http\Controllers\ContactController::class, 'storeContactForm'])->name('contact-form.store');
Step 6: Create Controller
In this step, now we should create a new controller as ContactController. So run the below command and create a new controller. bellow controller for create ContactController.
php artisan make:controller ContactController
After the bellow command, you will find a new file in this path "app/Http/Controllers/ContactController.php".
In this controller will create two methods as bellow:
1)contactForm()
2)storeContactForm()
So, let's copy bellow code and put it on the ContactController.php file.
app/Http/Controllers/ContactController.php
<?php

namespace App\Http\Controllers;

use Illuminate\Http\Request;
use App\Models\Contact;
use Mail;

class ContactController extends Controller
{
    /**
     * Write code on Method
     *
     * @return response()
     */
    public function contactForm()
    {
        return view('contactForm');
    }

    /**
     * Write code on Method
     *
     * @return response()
     */
    public function storeContactForm(Request $request)
    {
        $request->validate([
            'name' => 'required',
            'email' => 'required|email',
            'phone' => 'required|digits:10|numeric',
            'subject' => 'required',
            'message' => 'required',
        ]);

        $input = $request->all();

        Contact::create($input);

        //  Send mail to admin
        \Mail::send('contactMail', array(
            'name' => $input['name'],
            'email' => $input['email'],
            'phone' => $input['phone'],
            'subject' => $input['subject'],
            'message' => $input['message'],
        ), function($message) use ($request){
            $message->from($request->email);
            $message->to('admin@admin.com', 'Admin')->subject($request->get('subject'));
        });

        return redirect()->back()->with(['success' => 'Contact Form Submit Successfully']);
    }
}
Step 7: Create Blade File
In the last step. In this step we have to create two blade file contactForm and second is mail file. So mainly we have to create contactForm file and contactMail file. So finally you have to create two following bellow blade file:
1) contactForm.blade.php
2) contactMail.blade.php
So let's just create following file and put bellow code.
resources/views/contactForm.blade.php
<!DOCTYPE html>
<html>
<head>
    <title>Laravel 9 Contact Form Example - Mywebtuts.com</title>
    <meta charset="utf-8">
    <meta http-equiv="X-UA-Compatible" content="IE=edge">
    <meta name="viewport" content="width=device-width, initial-scale=1">
    <link rel="stylesheet" href="https://cdnjs.cloudflare.com/ajax/libs/twitter-bootstrap/4.5.2/css/bootstrap.min.css" integrity="sha512-MoRNloxbStBcD8z3M/2BmnT+rg4IsMxPkXaGh2zD6LGNNFE80W3onsAhRcMAMrSoyWL9xD7Ert0men7vR8LUZg==" crossorigin="anonymous" />
</head>
<body>
    <div class="container">
        <div class="row mt-5 mb-5">
            <div class="col-8 offset-2 mt-5">
                <div class="card">
                    <div class="card-header bg-info">
                        <h3 class="text-white">Laravel 9 Contact Form Example - Mywebtuts.com</h3>
                    </div>
                    <div class="card-body">

                        @if(Session::has('success'))
                        <div class="alert alert-success">
                            {{ Session::get('success') }}
                            @php
                                Session::forget('success');
                            @endphp
                        </div>
                        @endif

                        <form method="POST" action="{{ route('contact-form.store') }}">

                            {{ csrf_field() }}
                            <div class="row">
                                <div class="col-md-6">
                                    <div class="form-group">
                                        <strong>Name:</strong>
                                        <input type="text" name="name" class="form-control" placeholder="Name" value="{{ old('name') }}">
                                        @if ($errors->has('name'))
                                            <span class="text-danger">{{ $errors->first('name') }}</span>
                                        @endif
                                    </div>
                                </div>
                                <div class="col-md-6">
                                    <div class="form-group">
                                        <strong>Email:</strong>
                                        <input type="text" name="email" class="form-control" placeholder="Email" value="{{ old('email') }}">
                                        @if ($errors->has('email'))
                                            <span class="text-danger">{{ $errors->first('email') }}</span>
                                        @endif
                                    </div>
                                </div>
                            </div>
                            <div class="row">
                                <div class="col-md-6">
                                    <div class="form-group">
                                        <strong>Phone:</strong>
                                        <input type="text" name="phone" class="form-control" placeholder="Phone" value="{{ old('phone') }}">
                                        @if ($errors->has('phone'))
                                            <span class="text-danger">{{ $errors->first('phone') }}</span>
                                        @endif
                                    </div>
                                </div>
                                <div class="col-md-6">
                                    <div class="form-group">
                                        <strong>Subject:</strong>
                                        <input type="text" name="subject" class="form-control" placeholder="Subject" value="{{ old('subject') }}">
                                        @if ($errors->has('subject'))
                                            <span class="text-danger">{{ $errors->first('subject') }}</span>
                                        @endif
                                    </div>
                                </div>
                            </div>
                            <div class="row">
                                <div class="col-md-12">
                                    <div class="form-group">
                                        <strong>Message:</strong>
                                        <textarea name="message" rows="3" class="form-control">{{ old('message') }}</textarea>
                                        @if ($errors->has('message'))
                                            <span class="text-danger">{{ $errors->first('message') }}</span>
                                        @endif
                                    </div>
                                </div>
                            </div>

                            <div class="form-group text-center">
                                <button class="btn btn-success btn-submit">Save</button>
                            </div>
                        </form>
                    </div>
                </div>
            </div>
        </div>
    </div>
</body>
</html>
resources/views/contactMail.blade.php
<h2>Hey !</h2> <br><br>

You received an email from : {{ $name }} <br><br>

User details: <br><br>

Name:  {{ $name }}<br>
Email:  {{ $email }}<br>
Phone:  {{ $phone }}<br>
Subject:  {{ $subject }}<br>
Message:  {!! $subject !!}<br><br>

Thanks
Run Laravel App:
All steps have been done, now you have to type the given command and hit enter to run the laravel app:
php artisan serve
Now, you have to open web browser, type the given URL and view the app output:
http://localhost:8000/contact-form
Output:
Form with Validation: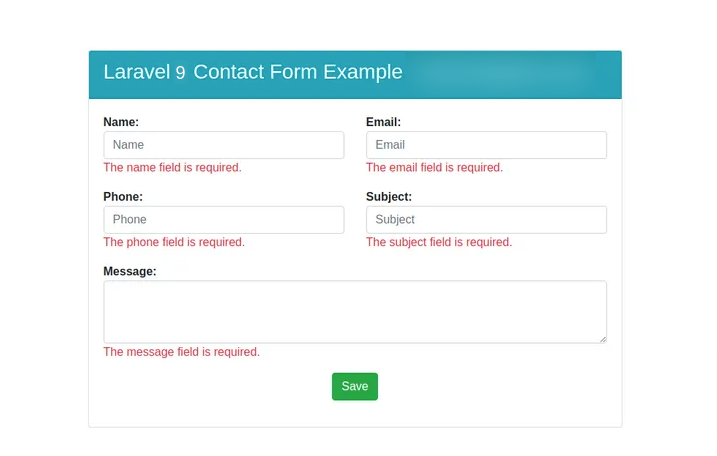
Store Data Success and Send Mail:

It will help you...