Laravel 9 JetStream Livewire CRUD Operations Tutorial
Feb 26, 2022 . Admin
Hi friends,
Laravel 9 JetStream Livewire CRUD Operations Tutorial. And how to validate add & update form data on server-side in laravel 9 crud app. Laravel 9 jetstream and livewire package have made it very simple to create crud (create, read, update, delete) applications. This tutorial will give you simple example of laravel 9 livewire crud with jetstream & tailwind css with validation. i would like to show you laravel 9 livewire crud modal with validation. In this tutorial, you find a complete guide on how to make a simple crud operation app in laravel 9 using jetstream with livewire.
Using this simple example of laravel 9 jetstream livewire crud app example, you can learn how to insert, read, update and delete data from the database in laravel 9. This laravel 9 livewire crud application using jetstream tutorial will implement a simple crud app in laravel 9 using jetstream with livewire and validation.
Step 1: Download LaravelLet us begin the tutorial by installing a new laravel application. if you have already created the project, then skip following step.
composer create-project laravel/laravel example-appStep 2 : Create Auth with Jetstream Livewire
Now, in this step, we need to use composer command to install jetstream, so let's run bellow command and install bellow library.
composer require laravel/jetstream
now, we need to create authentication using the bellow command. you can create basic login, register, and email verification. if you want to create team management then you have to pass the addition parameter. you can see bellow commands:
php artisan jetstream:install livewire
Now, let's node js package:
npm install
let's run package:
npm run dev
now, we need to run migration command to create database table:
php artisan migrateStep 3 : Create Migration and Model
Here, we need create database migration for products table and also we will create model for products table.
php artisan make:migration create_products_tabledatabase/migrations
<?php

use Illuminate\Database\Migrations\Migration;
use Illuminate\Database\Schema\Blueprint;
use Illuminate\Support\Facades\Schema;

return new class extends Migration
{
    /**
     * Run the migrations.
     *
     * @return void
     */
    public function up()
    {
        Schema::create('products', function (Blueprint $table) {
            $table->id();
            $table->string('name');
            $table->text('detail');
            $table->timestamps();
        });
    }

    /**
     * Reverse the migrations.
     *
     * @return void
     */
    public function down()
    {
        Schema::dropIfExists('products');
    }
};
php artisan migrate
now we will create Product model by using following command:
php artisan make:model ProductApp/Models/Product.php
<?php

namespace App\Models;

use Illuminate\Database\Eloquent\Factories\HasFactory;
use Illuminate\Database\Eloquent\Model;

class Product extends Model
{
    use HasFactory;

    /**
     * Write code on Method
     *
     * @return response()
     */
    protected $fillable = [
        'name', 'detail'
    ];
}
Step 4 : Create Product Component
Now here we will create livewire component using their command. so run bellow command to create Product crud application component.
php artisan make:livewire products
Now they created fies on both path:
app/Http/Livewire/Products.php
resources/views/livewire/products.blade.php
Step 5 : Update Component File
Here, we will write render(), create(), openModal(), closeModal(), resetInputFields(), store(), edit() and delete() method for our crud app.
So, let, update following file.
app/Http/Livewire/Products.php
<?php

namespace App\Http\Livewire;

use Livewire\Component;
use App\Models\Product;

class Products extends Component
{
    public $products, $name, $detail, $product_id;
    public $isOpen = 0;

    /**
     * The attributes that are mass assignable.
     *
     * @var array
    */
    public function render()
    {
        $this->products = Product::all();
        return view('livewire.products');
    }

    /**
     * The attributes that are mass assignable.
     *
     * @var array
     */
    public function create()
    {
        $this->resetInputFields();
        $this->openModal();
    }

    /**
     * The attributes that are mass assignable.
     *
     * @var array
     */
    public function openModal()
    {
        $this->isOpen = true;
    }

    /**
     * The attributes that are mass assignable.
     *
     * @var array
     */
    public function closeModal()
    {
        $this->isOpen = false;
    }

    /**
     * The attributes that are mass assignable.
     *
     * @var array
     */
    private function resetInputFields(){
        $this->name = '';
        $this->detail = '';
        $this->product_id = '';
    }

    /**
     * The attributes that are mass assignable.
     *
     * @var array
     */
    public function store()
    {
        $this->validate([
            'name' => 'required',
            'detail' => 'required',
        ]);

        Product::updateOrCreate(['id' => $this->product_id], [
            'name' => $this->name,
            'detail' => $this->detail
        ]);

        session()->flash('message',
            $this->product_id ? 'Product Updated Successfully.' : 'Product Created Successfully.');

        $this->closeModal();
        $this->resetInputFields();
    }

    /**
     * The attributes that are mass assignable.
     *
     * @var array
     */
    public function edit($id)
    {
        $product = Product::findOrFail($id);
        $this->product_id = $id;
        $this->name = $product->name;
        $this->detail = $product->detail;

        $this->openModal();
    }

     /**
     * The attributes that are mass assignable.
     *
     * @var array
     */
    public function delete($id)
    {
        Product::find($id)->delete();
        session()->flash('message', 'Product Deleted Successfully.');
    }
}
Step 6 : Update Blade Files
Here, we will update following list of files for our listing page, create page.
So, let's update all the files as bellow:
resources/views/livewire/products.blade.php
<x-slot name="header">
    <h2 class="font-semibold text-xl text-gray-800 leading-tight text-center">
        Laravel 9 JetStream Livewire CRUD Operations Tutorial - Mywebtuts.com
    </h2>
</x-slot>
<div class="py-12">
    <div class="max-w-7xl mx-auto sm:px-6 lg:px-8">
        <div class="bg-white overflow-hidden shadow-xl sm:rounded-lg px-4 py-4">
            @if (session()->has('message'))
                <div class="bg-teal-100 border-t-4 border-teal-500 rounded-b text-teal-900 px-4 py-3 shadow-md my-3" role="alert">
                  <div class="flex">
                    <div>
                      <p class="text-sm">{{ session('message') }}</p>
                    </div>
                  </div>
                </div>
            @endif
            <button wire:click="create()" class="bg-blue-500 hover:bg-blue-700 text-white py-1 mb-6 px-3 rounded my-3 mt-1">Create New Product</button>
            @if($isOpen)
                @include('livewire.create')
            @endif
            <table class="table-fixed w-full">
                <thead>
                    <tr class="bg-gray-100">
                        <th class="px-4 py-2 w-20">No.</th>
                        <th class="px-4 py-2">Title</th>
                        <th class="px-4 py-2">Body</th>
                        <th class="px-4 py-2 w-60">Action</th>
                    </tr>
                </thead>
                <tbody>
                    @foreach($products as $product)
                    <tr>
                        <td class="border px-4 py-2">{{ $product->id }}</td>
                        <td class="border px-4 py-2">{{ $product->name }}</td>
                        <td class="border px-4 py-2">{{ $product->detail }}</td>
                        <td class="border px-4 py-2 text-center">
                        <button wire:click="edit({{ $product->id }})" class="bg-blue-500 hover:bg-blue-700 text-white py-1 px-3 rounded">Edit</button>
                            <button wire:click="delete({{ $product->id }})" class="bg-red-500 hover:bg-red-700 text-white py-1 px-3 rounded">Delete</button>
                        </td>
                    </tr>
                    @endforeach
                </tbody>
            </table>
        </div>
    </div>
</div>
resources/views/livewire/create.blade.php
<div class="fixed z-10 inset-0 overflow-y-auto ease-out duration-400">
<div class="flex items-end justify-center min-h-screen pt-4 px-4 pb-20 text-center sm:block sm:p-0">
<div class="fixed inset-0 transition-opacity">
<div class="absolute inset-0 bg-gray-500 opacity-75"></div>
</div>
<!-- This element is to trick the browser into centering the modal contents. -->
<span class="hidden sm:inline-block sm:align-middle sm:h-screen"></span>
<div class="inline-block align-bottom bg-white rounded-lg text-left overflow-hidden shadow-xl transform transition-all sm:my-8 sm:align-middle sm:max-w-lg sm:w-full" role="dialog" aria-modal="true" aria-labelledby="modal-headline">
<form>
<div class="bg-white px-4 pt-5 pb-4 sm:p-6 sm:pb-4">
<div class="">
<div class="mb-4">
<label for="exampleFormControlInput1" class="block text-gray-700 text-sm font-bold mb-2">Name:</label>
<input type="text" class="shadow appearance-none border rounded w-full py-2 px-3 text-gray-700 leading-tight focus:outline-none focus:shadow-outline" id="exampleFormControlInput1" placeholder="Enter Name" wire:model="name">
@error('name') <span class="text-red-500">{{ $message }}</span>@enderror
</div>
<div class="mb-4">
<label for="exampleFormControlInput2" class="block text-gray-700 text-sm font-bold mb-2">Detail:</label>
<textarea class="shadow appearance-none border rounded w-full py-2 px-3 text-gray-700 leading-tight focus:outline-none focus:shadow-outline" id="exampleFormControlInput2" wire:model="detail" placeholder="Enter Detail"></textarea>
@error('detail') <span class="text-red-500">{{ $message }}</span>@enderror
</div>
</div>
</div>
<div class="bg-gray-50 px-4 py-3 sm:px-6 sm:flex sm:flex-row-reverse">
<span class="flex w-full rounded-md shadow-sm sm:ml-3 sm:w-auto">
<button wire:click.prevent="store()" type="button" class="inline-flex justify-center w-full rounded-md border border-transparent px-4 py-2 bg-green-600 text-base leading-6 font-medium text-white shadow-sm hover:bg-green-500 focus:outline-none focus:border-green-700 focus:shadow-outline-green transition ease-in-out duration-150 sm:text-sm sm:leading-5">
Save
</button>
</span>
<span class="mt-3 flex w-full rounded-md shadow-sm sm:mt-0 sm:w-auto">
<button wire:click="closeModal()" type="button" class="inline-flex justify-center w-full rounded-md border border-gray-300 px-4 py-2 bg-white text-base leading-6 font-medium text-gray-700 shadow-sm hover:text-gray-500 focus:outline-none focus:border-blue-300 focus:shadow-outline-blue transition ease-in-out duration-150 sm:text-sm sm:leading-5">
Cancel
</button>
</span>
</form>
</div>
</div>
</div>
</div>
You also need to import tailwind css in your layouts.php, so let's update file:
resources/views/layouts/app.blade.php
<!DOCTYPE html>
<html lang="{{ str_replace('_', '-', app()->getLocale()) }}">
    <head>
        <meta charset="utf-8">
        <meta name="viewport" content="width=device-width, initial-scale=1">
        <meta name="csrf-token" content="{{ csrf_token() }}">

        <title>{{ config('app.name', 'Laravel') }}</title>

        <!-- Fonts -->
        <link rel="stylesheet" href="https://fonts.googleapis.com/css2?family=Nunito:wght@400;600;700&display=swap">

        <!-- Styles -->
        <link rel="stylesheet" href="{{ mix('css/app.css') }}">
        <script src="https://cdn.tailwindcss.com/?plugins=forms"></script>

        @livewireStyles

        <!-- Scripts -->
        <script src="{{ mix('js/app.js') }}" defer></script>
    </head>
    <body class="font-sans antialiased">
        <x-jet-banner />

        <div class="min-h-screen bg-gray-100">
            @livewire('navigation-menu')

            <!-- Page Heading -->
            @if (isset($header))
                <header class="bg-white shadow">
                    <div class="max-w-7xl mx-auto py-6 px-4 sm:px-6 lg:px-8">
                        {{ $header }}
                    </div>
                </header>
            @endif

            <!-- Page Content -->
            <main>
                {{ $slot }}
            </main>
        </div>

        @stack('modals')

        @livewireScripts
    </body>
</html>
Step 7 : Create Route
In third step, we will create routes for multiple file upload. so create two route with GET and POST route example.
routes/web.php
<?php

use Illuminate\Support\Facades\Route;

use App\Http\Livewire\Products;

/*
|--------------------------------------------------------------------------
| Web Routes
|--------------------------------------------------------------------------
|
| Here is where you can register web routes for your application. These
| routes are loaded by the RouteServiceProvider within a group which
| contains the "web" middleware group. Now create something great!
|
*/

Route::get('products', Products::class)->middleware('auth');
Run Laravel App:
All steps have been done, now you have to type the given command and hit enter to run the laravel app:
php artisan serve
Now, you have to open web browser, type the given URL and view the app output:
http://localhost:8000/products
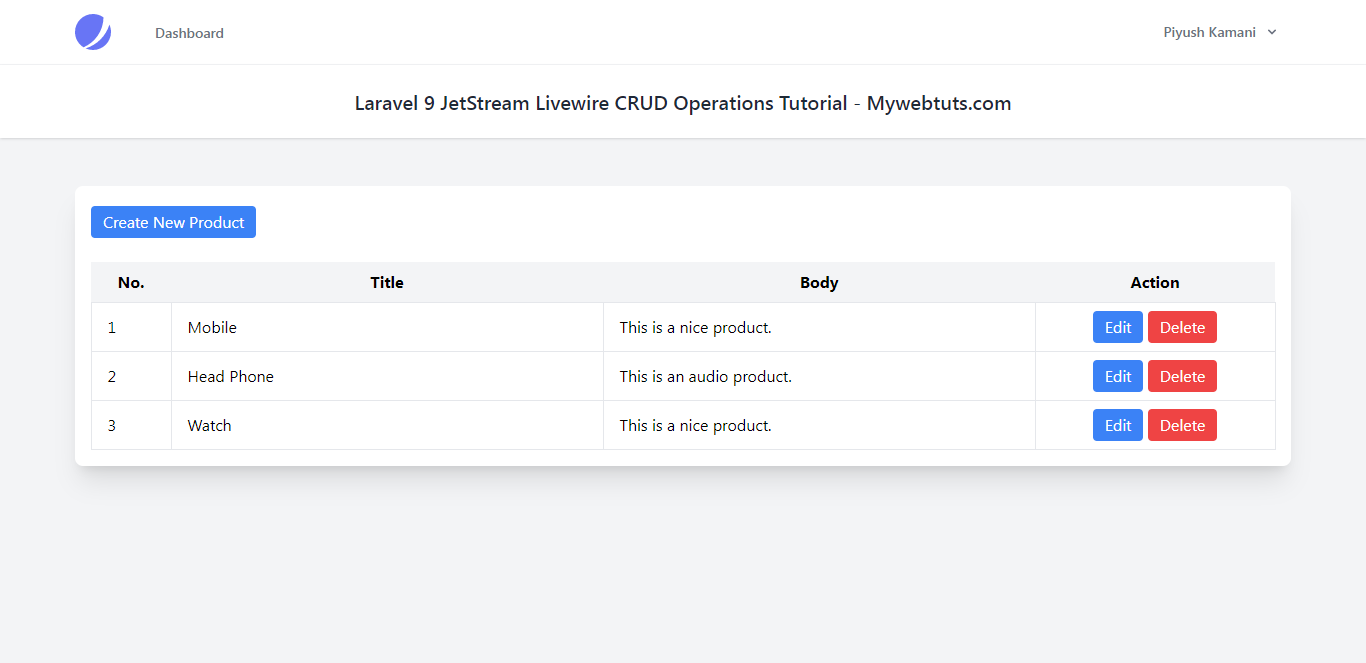
Output:
List View:
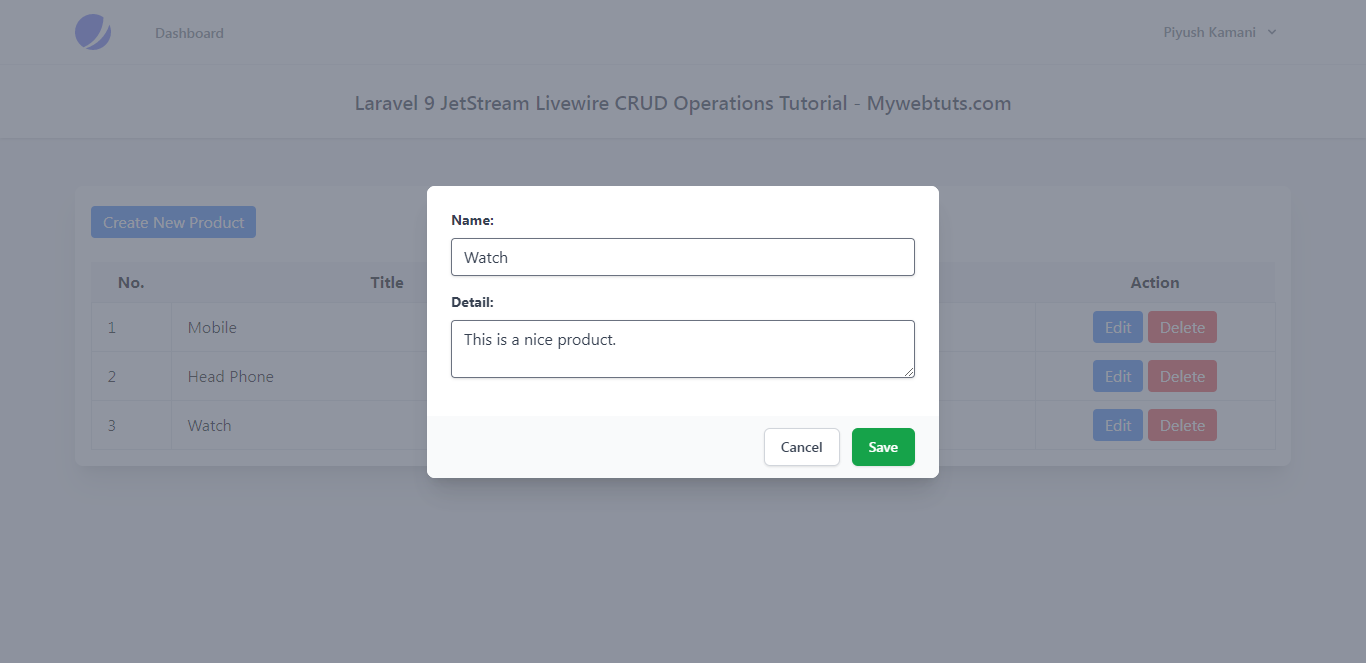
Create View:

Update View:
I hope it can help you...