Laravel 9 Vue Js Dependent DropDown Tutorial with Example
Jan 03, 2023 . Admin
Hello Friends,
Now, I'd want to explain how to create a dependant dropdown in Laravel using Vue.js. We'll examine an example of a laravel 9 tutorial with a vue js dependant dropdown. I made my explanation of the Laravel vue dependant dropdown example simple. You may comprehend the principle of how to create a dependent dropdown using Laravel and Vue.js..
using Laravel 9 and a dropdown dependent on Vue.js; This post will show us how to build dependent dropdowns in Laravel using Vue.js components.
Now let's start.
Step 1: Install Laravel ApplicationThis is optional; however, if you have not created the laravel app, then you may go ahead and execute the below command:
composer create-project laravel/laravel example-appStep 2: Database Configuration .env
DB_CONNECTION=mysql
DB_HOST=127.0.0.1
DB_PORT=3306
DB_DATABASE=here your database name(blog)
DB_USERNAME=here database username(root)
DB_PASSWORD=here database password(root)
Step 3: Create Migration
php artisan make:migration create_countries_states_tabledatabase/migrations/create_posts_table.php
<?php

use Illuminate\Support\Facades\Schema;
use Illuminate\Database\Schema\Blueprint;
use Illuminate\Database\Migrations\Migration;
class CreateCountriesStatesTable extends Migration
{
    /**
     * Run the migrations.
     *
     * @return void
     */
    public function up()
    {
        Schema::create('countries', function (Blueprint $table) {
            $table->bigIncrements('id');
            $table->string('name');
            $table->timestamps();
        });

        Schema::create('states', function (Blueprint $table) {
            $table->bigIncrements('id');
            $table->integer('country_id');
            $table->string('name');
            $table->timestamps();
        });
    }

    /**
     * Reverse the migrations.
     *
     * @return void
     */
    public function down()
    {
        Schema::dropIfExists('countries');
        Schema::dropIfExists('states');
    }
}
migrate the table using the below command:
php artisan migrateStep 4: Create Models
php artisan make:model Country
php artisan make:model State
Step 5: NPM Configuration
We need to setup Vue and install Vue dependencies using NPM. So run the following command on command prompt:
Install all Vue dependencies:
npm install
To calling Laravel API routes. we need to install vue-axios. So use run the following command on command prompt:
npm install vue-axios --save
After installing all dependencies run this command:
npm run watchStep 6: Add Routes routes/web.php
<?php

use Illuminate\Foundation\Application;
use Illuminate\Support\Facades\Route;
use Inertia\Inertia;
use App\Http\Controllers\CountryStateController;
/*
|--------------------------------------------------------------------------
| Web Routes
|--------------------------------------------------------------------------
|
| Here is where you can register web routes for your application. These
| routes are loaded by the RouteServiceProvider within a group which
| contains the "web" middleware group. Now create something great!
|
*/

Route::get('get_countries', [CountryStateController::class, 'getCountries']);
Route::post('get_states', [CountryStateController::class, 'getStates']);
Step 7: Create Controller By Command
Next step, open command prompt and run the following command to create a controller by an artisan:
php artisan make:controller CountryStateControllerapp/Http/Controllers/CountryStateController.php
<?php

namespace App\Http\Controllers;

use Illuminate\Http\Request;
use App\Models\Country;
use App\Models\State;

class CountryStateController extends Controller
{
    /**
     * Retrieve countries data
     *
     * @return void
     */
    public function getCountries()
    {
        $data = Country::get();
        return response()->json($data);
    }

    /**
     * Retrieve states data
     *
     */
    public function getStates(Request $request)
    {
        $data = State::where('country_id', $request->country_id)->get();
        return response()->json($data);
    }
}
Step 8: Create Vue Component
resources/assets/js/components/DropdownComponent.vue
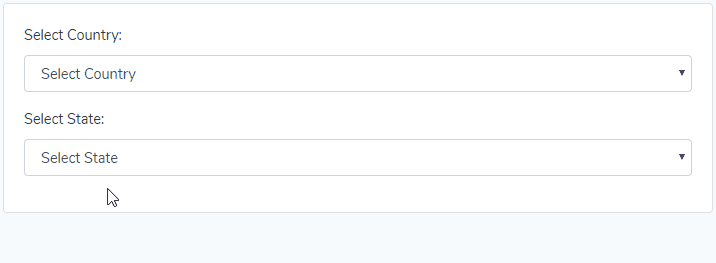
<template>
    <div class="container">
        <div class="text-center" style="margin: 20px 0px 20px 0px;">
            <span class="text-secondary">Laravel 9 Vue Js Dependent DropDown Tutorial with Example</span>
        </div>
        <div class="row justify-content-center" style="margin: 20px 0px 20px 0px;">
            <div class="col-md-8">
                <div class="card">
                    <div class="card-body">
                        <div class="form-group">
                            <label>Select Country:</label>
                            <select class='form-control' v-model='country' @change='getStates()'>
                                <option value='0' >Select Country</option>
                                <option v-for='data in countries' :value='data.id'>{{ data.name }}</option>
                            </select>
                        </div>
                        <div class="form-group">
                            <label>Select State:</label>
                            <select class='form-control' v-model='state'>
                                <option value='0' >Select State</option>
                                <option v-for='data in states' :value='data.id'>{{ data.name }}</option>
                            </select>
                        </div>
                    </div>
                </div>
            </div>
        </div>
    </div>
</template>
<script>
    export default {
        data(){
            return {
                country: 0,
                countries: [],
                state: 0,
                states: []
            }
        },
        methods:{
            getCountries: function(){
                axios.get('/get_countries')
                    .then(function (response) {
                        this.countries = response.data;
                    }.bind(this));
            },
            getStates: function() {
                axios.get('/get_states',{
                    params: {
                        country_id: this.country
                    }
                }).then(function(response){
                    this.states = response.data;
                }.bind(this));
            }
        },
        created: function(){
            this.getCountries()
        }
    }
</script>
Now open resources/assets/js/app.js and include the FileUpload.vue component like this:app.js
resources/assets/js/app.js
require('./bootstrap');

window.Vue = require('vue');

Vue.component('dropdown-component', require('./components/DropdownComponent.vue').default);

const app = new Vue({
    el: '#app',
});
Step 9: Initialize Vue Components
resources/views/layouts/app.blade.php
<!doctype html>
<html lang="{{ str_replace('_', '-', app()->getLocale()) }}">
<head>
    <meta charset="utf-8">
    <meta name="viewport" content="width=device-width, initial-scale=1">
    <meta name="csrf-token" value="{{ csrf_token() }}"/>
    <title>Laravel 9 Vue Js Dependent DropDown Tutorial with Example</title>
    <link href="https://fonts.googleapis.com/css?family=Nunito:200,600" rel="stylesheet" type="text/css">
    <link href="{{ mix('css/app.css') }}" type="text/css" rel="stylesheet"/>
</head>
<body>
    <div id="app">
        <dropdown-component></dropdown-component>
    </div>
<script src="{{ mix('js/app.js') }}" type="text/javascript"></script>
</body>
</html>
Step 10: Run Development Server
Run the following command to start development server:
npm run dev
or
npm run watch
Output
I hope it can help you...