How to Add Google 2FA in Laravel?
May 17, 2022 . Admin
Hi Dev,
Today, I would like to show you how to add google 2fa in laravel application. it's simple example of how to add google 2fa in laravel auth. This article goes in detailed on how to add google 2fa in laravel google authenticator. This post will give you simple example of laravel 9 google 2fa authentication tutorial.
Sometimes, the traditional email and password are becoming less secure due to many cyber attacks like SQL injections, phishing scams and data breaches.
Google2FA is a PHP implementation of the Google Two-Factor Authentication Module, supporting the HMAC-Based One-time Password (HOTP) algorithm specified in RFC 4226 and the Time-based One-time Password (TOTP) algorithm specified in RFC 6238.
Google Authentication Apps
To use the two-factor authentication, the user will have to install a Google Authenticator compatible app. Here are a few:
How Time based One-time Password works?
After the user logs in successfully, a prompt showing a QR code and alternatively a code(set of characters to manually input if the user may not be able to scan QR code).
How the TOTP works is that the server generates a secret key. This secret key is then passed to the user. The secret key is used in combination with the current Unix timestamp to generate a six digit number, using a keyed-hash message authentication code (HMAC) based algorithm. This six digit number is the OTP. It changes every 30 seconds.
Let's start the example follow my below step..
Step 1: Download LaravelLet us begin the tutorial by installing a new laravel application. if you have already created the project, then skip the following step.
composer create-project laravel/laravel example-app
So, After creating account you will get mail configuration as mail host, mail port, mail username, mail password. you can see bellow image:
Step 2: Install Laravel UIcomposer require laravel/ui
Next, You can use following commands for creating auth:
Using Bootstrap:php artisan ui bootstrap --authStep 3: Update Migration and Model
Here, In this third step, we require to add new column "google2fa_secret" in users table and model. than we need to run migration. so let's change that on both file.
database/migrations/2014_10_12_000000_create_users_table.php
<?php

use Illuminate\Database\Migrations\Migration;
use Illuminate\Database\Schema\Blueprint;
use Illuminate\Support\Facades\Schema;

return new class extends Migration
{
    /**
     * Run the migrations.
     *
     * @return void
     */
    public function up()
    {
        Schema::create('users', function (Blueprint $table) {
            $table->id();
            $table->string('name');
            $table->string('email')->unique();
            $table->timestamp('email_verified_at')->nullable();
            $table->string('password');
            $table->text('google2fa_secret');
            $table->rememberToken();
            $table->timestamps();
        });
    }

    /**
     * Reverse the migrations.
     *
     * @return void
     */
    public function down()
    {
        Schema::dropIfExists('users');
    }
};
app/Models/User.php
So in this step we require to make getter and setter for 'google2fa_secret' column for encrypt and decrypt column.
<?php

namespace App\Models;

use Illuminate\Contracts\Auth\MustVerifyEmail;
use Illuminate\Database\Eloquent\Factories\HasFactory;
use Illuminate\Foundation\Auth\User as Authenticatable;
use Illuminate\Notifications\Notifiable;
use Laravel\Sanctum\HasApiTokens;
use Illuminate\Database\Eloquent\Casts\Attribute;

class User extends Authenticatable
{
    use HasApiTokens, HasFactory, Notifiable;

    /**
     * The attributes that are mass assignable.
     *
     * @var array
     */
    protected $fillable = [
        'name',
        'email',
        'password',
        'google2fa_secret'
    ];

    /**
     * The attributes that should be hidden for serialization.
     *
     * @var array
     */
    protected $hidden = [
        'password',
        'remember_token',
        'google2fa_secret'
    ];

    /**
     * The attributes that should be cast.
     *
     * @var array
     */
    protected $casts = [
        'email_verified_at' => 'datetime',
    ];

    /**
     * Interact with the user's first name.
     *
     * @param  string  $value
     * @return \Illuminate\Database\Eloquent\Casts\Attribute
     */
    protected function google2faSecret(): Attribute
    {
        return new Attribute(
            get: fn ($value) =>  decrypt($value),
            set: fn ($value) =>  encrypt($value),
        );
    }
}
Now we need to run migration.
so let's run bellow command:
php artisan migrateStep 4: Install Two Packages
So, main section to the start The first one is Google Authenticator package for PHP and another is QrCode generate BaconQrCode.
composer require pragmarx/google2fa-laravel
composer require bacon/bacon-qr-code
....

'providers' => [
    ....
    PragmaRX\Google2FALaravel\ServiceProvider::class,
],

'aliases' => [
    ....
    'Google2FA' => PragmaRX\Google2FALaravel\Facade::class,
],

....
Publish the config file.
php artisan vendor:publish --provider="PragmaRX\Google2FALaravel\ServiceProvider"Step 5: Register 2fa Middleware in Kernel.php:
This package has a middleware which will help you code 2FA on your app. To use it, you just have to:
app/Http/Kernel.php
protected $routeMiddleware = [
    ...
    '2fa' => \PragmaRX\Google2FALaravel\Middleware::class,
];
Step 6: Update RegisterController
In this section we need to update the RegisterController and register() method and include the Request class outside the controller class.
app/Http/Controllers/Auth/RegisterController.phpOverride the default register() trait.
Instead of
use RegistersUsers;
use this:
use RegistersUsers {
   register as registration;
}
<?php

namespace App\Http\Controllers\Auth;

use App\Http\Controllers\Controller;
use App\Providers\RouteServiceProvider;
use App\Models\User;
use Illuminate\Foundation\Auth\RegistersUsers;
use Illuminate\Support\Facades\Hash;
use Illuminate\Support\Facades\Validator;
use Illuminate\Http\Request;

class RegisterController extends Controller
{
    /*
    |--------------------------------------------------------------------------
    | Register Controller
    |--------------------------------------------------------------------------
    |
    | This controller handles the registration of new users as well as their
    | validation and creation. By default this controller uses a trait to
    | provide this functionality without requiring any additional code.
    |
    */

    use RegistersUsers {
        register as registration;
    }

    /**
     * Where to redirect users after registration.
     *
     * @var string
     */
    protected $redirectTo = '/home';

    /**
     * Create a new controller instance.
     *
     * @return void
     */
    public function __construct()
    {
        $this->middleware('guest');
    }

    /**
     * Get a validator for an incoming registration request.
     *
     * @param  array  $data
     * @return \Illuminate\Contracts\Validation\Validator
     */
    protected function validator(array $data)
    {
        return Validator::make($data, [
            'name' => ['required', 'string', 'max:255'],
            'email' => ['required', 'string', 'email', 'max:255', 'unique:users'],
            'password' => ['required', 'string', 'min:6', 'confirmed'],
        ]);
    }

    /**
     * Create a new user instance after a valid registration.
     *
     * @param  array  $data
     * @return \App\Models\User
     */
    protected function create(array $data)
    {
        return User::create([
            'name' => $data['name'],
            'email' => $data['email'],
            'password' => Hash::make($data['password']),
            'google2fa_secret' => $data['google2fa_secret'],
        ]);
    }

    /**
     * Write code on Method
     *
     * @return response()
     */
    public function register(Request $request)
    {
        $this->validator($request->all())->validate();

        $google2fa = app('pragmarx.google2fa');

        $registration_data = $request->all();

        $registration_data["google2fa_secret"] = $google2fa->generateSecretKey();

        $request->session()->flash('registration_data', $registration_data);

        $QR_Image = $google2fa->getQRCodeInline(
            config('app.name'),
            $registration_data['email'],
            $registration_data['google2fa_secret']
        );

        return view('google2fa.register', ['QR_Image' => $QR_Image, 'secret' => $registration_data['google2fa_secret']]);
    }

    /**
     * Write code on Method
     *
     * @return response()
     */
    public function completeRegistration(Request $request)
    {
        $request->merge(session('registration_data'));

        return $this->registration($request);
    }
}
Step 7: Create the view to display the QR code
The QrCode page scan QrCode in your google authenticate app in your smart phone which is register.blade.php looks like this:
In this step register() method already redirects to google2fa/register.blade.php. This means we will create google2fa folder and a register.blade.php file.
resources/views/google2fa/register.blade.php
@extends('layouts.app')

@section('content')
<div class="container">
    <div class="row">
        <div class="col-md-12 mt-4">
            <div class="card card-default">
                <h4 class="card-heading text-center mt-4">Set up Google Authenticator</h4>

                <div class="card-body" style="text-align: center;">
                    <p>Set up your two factor authentication by scanning the barcode below. Alternatively, you can use the code <strong>{{ $secret }}</strong></p>
                    <div>
                        <img src="{{ $QR_Image }}">
                    </div>
                    <p>You must set up your Google Authenticator app before continuing. You will be unable to login otherwise</p>
                    <div>
                        <a href="{{ route('complete.registration') }}" class="btn btn-primary">Complete Registration</a>
                    </div>
                </div>
            </div>
        </div>
    </div>
</div>
@endsection
Step 8 : Create Route
In this step, we require to add a route for so open your "routes/web.php" file and add the following route.
routes/web.php
<?php

use Illuminate\Support\Facades\Route;
use App\Http\Controllers\Auth\RegisterController;
use App\Http\Controllers\HomeController;

/*
|--------------------------------------------------------------------------
| Web Routes
|--------------------------------------------------------------------------
|
| Here is where you can register web routes for your application. These
| routes are loaded by the RouteServiceProvider within a group which
| contains the "web" middleware group. Now create something great!
|
*/

Route::get('/', function () {
    return view('welcome');
});

Auth::routes();

// 2fa middleware
Route::middleware(['2fa'])->group(function () {

    // HomeController
    Route::get('/home', [HomeController::class, 'index'])->name('home');

    Route::post('/2fa', function () {
        return redirect(route('home'));
    })->name('2fa');

});

Route::get('/complete-registration', [RegisterController::class, 'completeRegistration'])->name('complete.registration');
Step 9 : Create Index View File
After the user logs in successfully, a prompt showing a QR code and alternatively a code(set of characters to manually input if the user may not be able to scan QR code)
So, After scanning the QR code or inputting Secret on the Google Authenticator app, it automatically generates an OTP on the Authenticator App.
The OTP page which is resources/views/google2fa/index.blade.php looks like this:
resources/views/google2fa/index.blade.php
@extends('layouts.app')

@section('content')
<div class="container">
    <div class="row justify-content-center align-items-center " style="height: 70vh;S">
        <div class="col-md-8 col-md-offset-2">
            <div class="panel panel-default">
                <div class="panel-heading font-weight-bold">Register</div>
                <hr>
                @if($errors->any())
                    <div class="col-md-12">
                        <div class="alert alert-danger">
                          <strong>{{$errors->first()}}</strong>
                        </div>
                    </div>
                @endif

                <div class="panel-body">
                    <form class="form-horizontal" method="POST" action="{{ route('2fa') }}">
                        {{ csrf_field() }}

                        <div class="form-group">
                            <p>Please enter the  <strong>OTP</strong> generated on your Authenticator App. <br> Ensure you submit the current one because it refreshes every 30 seconds.</p>
                            <label for="one_time_password" class="col-md-4 control-label">One Time Password</label>


                            <div class="col-md-6">
                                <input id="one_time_password" type="number" class="form-control" name="one_time_password" required autofocus>
                            </div>
                        </div>

                        <div class="form-group">
                            <div class="col-md-6 col-md-offset-4 mt-3">
                                <button type="submit" class="btn btn-primary">
                                    Login
                                </button>
                            </div>
                        </div>
                    </form>
                </div>
            </div>
        </div>
    </div>
</div>
@endsection
Step 10 : Run Laravel App:
All steps have been done, now you have to type the given command and hit enter to run the laravel app:
php artisan serve
Now, you have to open web browser, type the given URL and view the app output:
http://localhost:8000/register
In this below output shown as step by step explanation how to does work google two factor authentication.
Output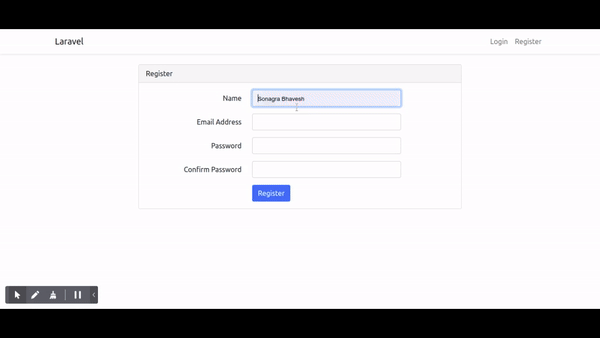
It will help you...