Laravel 9 Socialite Login with GitHub Tutorial
Mar 15, 2022 . Admin
Hi friends,
Today, I am a explain laravel 9 socialite login with GitHub tutorial. How can we implement GitHub social login in your Laravel based project using the laravel 9 socialite package. In this Laravel 9 Socialite Login with Github Example Tutorial I’ll show you how to integrate Github login in laravel 9 using socialite package. In this example, I will show you how to login with a GitHub account in the Laravel 9 Application. We will use Laravel 9 socialite package for login with the Github account in the Laravel 9 Application. In this tutorial, I am here to show you laravel 9 login system with Github.
Here we will learn how to add a GitHub social login in your Laravel 6 Application and how to simply authenticate users using the Github Login.
We know that the user feels so bored to give manually input their information, like name, email password, etc. So if we use the socialite login system, then no need to give their data.
Step 1: Download LaravelLet us begin the tutorial by installing a new laravel application. if you have already created the project, then skip following step.
composer create-project laravel/laravel example-appStep 2: Install JetStream
Now, in this step, we need to use the composer command to install jetstream, so let's run the bellow command and install the bellow library.
composer require laravel/jetstream
now, we need to create authentication using the bellow command. you can create basic login, register, and email verification. if you want to create team management then you have to pass the addition parameter. you can see bellow commands:
php artisan jetstream:install livewire
Now, let's node js package:
npm install
let's run package:
npm run dev
now, we need to run migration command to create database table:
php artisan migrateStep 3: Install Socialite
In first step we will install Socialite Package that provide api to connect with github account. So, first open your terminal and run bellow command:
composer require laravel/socialiteStep 4: Create Github App
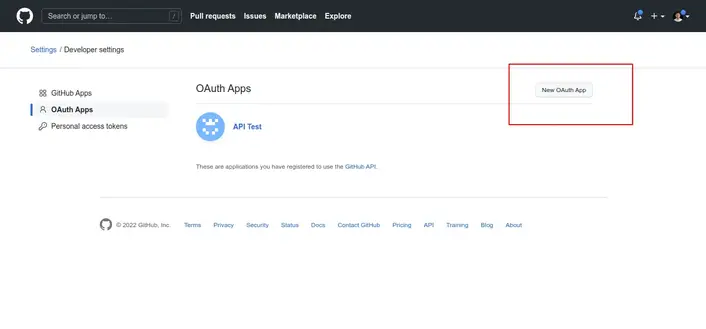
In this step we need github client id and secret that way we can get information of other user. so if you don't have github app account then you can create from here : Github Developers Console. you can find bellow screen, Then click on "New OAuth App" and create new app:

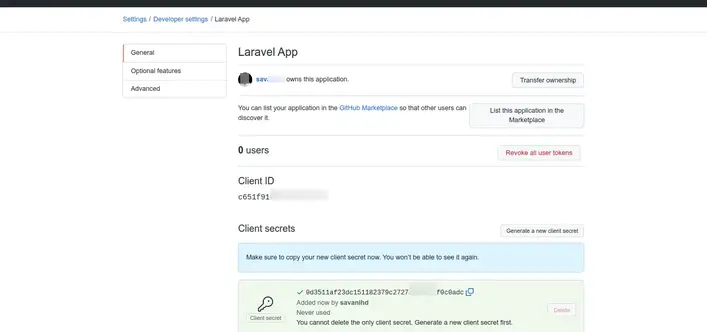
Now you have to set app id, secret and call back url in config file so open config/services.php and set id and secret this way:
config/services.php
return [
    ....
    'github' => [
        'client_id' => env('GITHUB_CLIENT_ID'),
        'client_secret' => env('GITHUB_CLIENT_SECRET'),
        'redirect' => 'http://localhost:8000/auth/github/callback',
    ],
]
Then you need to add github client id and client secret in .env file:
.envGITHUB_CLIENT_ID=xyz GITHUB_CLIENT_SECRET=123Step 5: Create Github App
In this step first we have to create migration for add github_id in your user table. So let's run bellow command:
php artisan make:migration add_github_id_columnMigration
<?php

use Illuminate\Database\Migrations\Migration;
use Illuminate\Database\Schema\Blueprint;
use Illuminate\Support\Facades\Schema;

return new class extends Migration
{
    /**
     * Run the migrations.
     *
     * @return void
     */
    public function up()
    {
        Schema::table('users', function ($table) {
            $table->string('github_id')->nullable();
        });
    }

    /**
     * Reverse the migrations.
     *
     * @return void
     */
    public function down()
    {

    }
};
Update mode like this way:
app/Models/User.php
<?php

namespace App\Models;

use Illuminate\Contracts\Auth\MustVerifyEmail;
use Illuminate\Database\Eloquent\Factories\HasFactory;
use Illuminate\Foundation\Auth\User as Authenticatable;
use Illuminate\Notifications\Notifiable;
use Laravel\Fortify\TwoFactorAuthenticatable;
use Laravel\Jetstream\HasProfilePhoto;
use Laravel\Sanctum\HasApiTokens;

class User extends Authenticatable
{
    use HasApiTokens;
    use HasFactory;
    use HasProfilePhoto;
    use Notifiable;
    use TwoFactorAuthenticatable;

    /**
     * The attributes that are mass assignable.
     *
     * @var string[]
     */
    protected $fillable = [
        'name',
        'email',
        'password',
        'github_id'
    ];

    /**
     * The attributes that should be hidden for serialization.
     *
     * @var array
     */
    protected $hidden = [
        'password',
        'remember_token',
        'two_factor_recovery_codes',
        'two_factor_secret',
    ];

    /**
     * The attributes that should be cast.
     *
     * @var array
     */
    protected $casts = [
        'email_verified_at' => 'datetime',
    ];

    /**
     * The accessors to append to the model's array form.
     *
     * @var array
     */
    protected $appends = [
        'profile_photo_url',
    ];
}
Step 6: Create Routes
After adding github_id column first we have to add new route for github login. so let's add bellow route in routes.php file.
<?php

use Illuminate\Support\Facades\Route;

use App\Http\Controllers\GithubController;

/*
|--------------------------------------------------------------------------
| Web Routes
|--------------------------------------------------------------------------
|
| Here is where you can register web routes for your application. These
| routes are loaded by the RouteServiceProvider within a group which
| contains the "web" middleware group. Now create something great!
|
*/

Route::get('/', function () {
    return view('welcome');
});

Route::middleware(['auth:sanctum', 'verified'])->get('/dashboard', function () {
    return view('dashboard');
})->name('dashboard');

Route::controller(GithubController::class)->group(function(){
    Route::get('auth/github', 'redirectToGithub')->name('auth.github');
    Route::get('auth/github/callback', 'handleGithubCallback');
});
Step 7: Create Controller
After add route, we need to add method of github auth that method will handle github callback url and etc, first put bellow code on your GithubController.php file.
app/Http/Controllers/GithubController.php
<?php

namespace App\Http\Controllers;

use Illuminate\Http\Request;
use Laravel\Socialite\Facades\Socialite;
use Exception;
use App\Models\User;
use Illuminate\Support\Facades\Auth;

class GithubController extends Controller
{
    /**
     * Create a new controller instance.
     *
     * @return void
     */
    public function redirectToGithub()
    {
        return Socialite::driver('github')->redirect();
    }

    /**
     * Create a new controller instance.
     *
     * @return void
     */
    public function handleGithubCallback()
    {
        try {

            $user = Socialite::driver('github')->user();

            $finduser = User::where('github_id', $user->id)->first();

            if($finduser){

                Auth::login($finduser);

                return redirect()->intended('dashboard');

            }else{
                $newUser = User::updateOrCreate(['email' => $user->email],[
                        'name' => $user->name,
                        'github_id'=> $user->id,
                        'password' => encrypt('123456dummy')
                    ]);

                Auth::login($newUser);

                return redirect()->intended('dashboard');
            }

        } catch (Exception $e) {
            dd($e->getMessage());
        }
    }
}
Step 8: Update Blade File
Ok, now at last we need to add blade view so first create new file login.blade.php file and put bellow code:
resources/views/auth/login.blade.php
<x-guest-layout>
    <x-jet-authentication-card>
        <x-slot name="logo">
            <x-jet-authentication-card-logo />
        </x-slot>

        <x-jet-validation-errors class="mb-4" />

        @if (session('status'))
            <div class="mb-4 font-medium text-sm text-green-600">
                {{ session('status') }}
            </div>
        @endif

        <form method="POST" action="{{ route('login') }}">
            @csrf

            <div>
                <x-jet-label for="email" value="{{ __('Email') }}" />
                <x-jet-input id="email" class="block mt-1 w-full" type="email" name="email" :value="old('email')" required autofocus />
            </div>

            <div class="mt-4">
                <x-jet-label for="password" value="{{ __('Password') }}" />
                <x-jet-input id="password" class="block mt-1 w-full" type="password" name="password" required autocomplete="current-password" />
            </div>

            <div class="block mt-4">
                <label for="remember_me" class="flex items-center">
                    <x-jet-checkbox id="remember_me" name="remember" />
                    <span class="ml-2 text-sm text-gray-600">{{ __('Remember me') }}</span>
                </label>
            </div>

            <div class="flex items-center justify-end mt-4">
                @if (Route::has('password.request'))
                    <a class="underline text-sm text-gray-600 hover:text-gray-900" href="{{ route('password.request') }}">
                        {{ __('Forgot your password?') }}
                    </a>
                @endif

                <x-jet-button class="ml-4">
                    {{ __('Log in') }}
                </x-jet-button>
            </div>
            <div class="flex items-center justify-end mt-4">
                <a class="btn" href="{{ route('auth.github') }}"
                    style="background: black; padding: 10px; width: 100%; text-align: center; display: block; border-radius:4px; color: #ffffff;">
                    Login with Github
                </a>
            </div>
        </form>
    </x-jet-authentication-card>
</x-guest-layout>
Run Laravel App:
All steps have been done, now you have to type the given command and hit enter to run the laravel app:
php artisan serve
Now, you have to open web browser, type the given URL and view the app output:
http://localhost:8000/loginOutput:
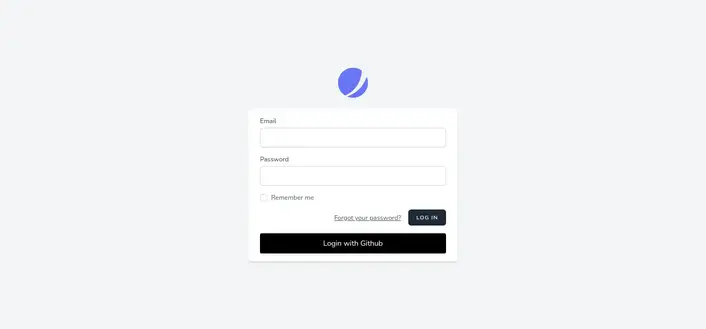
I hope it can help you...