Send Email in Laravel Using PHPMailer Tutorial
Jan 09, 2023 . Admin
Hello Friends,
I'll describe how to use PHPMailer in Laravel to send emails. When sending emails from scripts inside of web applications, the majority of developers have consistently suggested using an SMTP server. In a previous article, we discussed how to send emails using an SMTP server using PHPMailer.
Email delivery in Laravel is handled by the SwiftMailer library. SwiftMailer is a built-in library included with Laravel. The default mail() method of the PHP-based web application was mostly used to send emails. We'll put the Laravel package "PHPMailer" for email sending to the test here.
Now let's start.
Step 1: Install Laravel ApplicationThis is optional; however, if you have not created the laravel app, then you may go ahead and execute the below command:
composer create-project laravel/laravel example-appStep 2: Send Email using PHPMailer in Laravel
installing PHPMailer package in Laravel Application, I will be using the composer. You can use the Laravel installer too. Open the command prompt and hit the below command.
composer require phpmailer/phpmailerComposer.json
"require": {
    "php": "^7.3|^8.0",
    "fideloper/proxy": "^4.4",
    "fruitcake/laravel-cors": "^2.0",
    "guzzlehttp/guzzle": "^7.0.1",
    "laravel/freamwork": "^8.12",
    "laravel/tinker": "^2.5",
    "phpmailer/phpmailer": "^6.2"
},
Step 3: Create PHPMailerController.php File
php artisan make:controller PHPMailerControllerApp\Http\Controllers/PHPMailerController.php
<?php

namespace App\Http\Controllers;

use Illuminate\Http\Request;

use PHPMailer\PHPMailer\PHPMailer;
use PHPMailer\PHPMailer\Exception;

class MailerController extends Controller
{

    /**
    * Write code on Method
    *
    * @return response()
    */
    public function email() {
        return view("email");
    }

    /**
    * Write code on Method
    *
    * @return response()
    */
    public function composeEmail(Request $request) {
        require base_path("vendor/autoload.php");
        $mail = new PHPMailer(true);     // Passing `true` enables exceptions

        try {

            // Email server settings
            $mail->SMTPDebug = 0;
            $mail->isSMTP();
            $mail->Host = 'smtp.example.com';             //  smtp host
            $mail->SMTPAuth = true;
            $mail->Username = 'user@example.com';   //  sender username
            $mail->Password = '**********';       // sender password
            $mail->SMTPSecure = 'tls';                  // encryption - ssl/tls
            $mail->Port = 587;                          // port - 587/465

            $mail->setFrom('sender@example.com', 'SenderName');
            $mail->addAddress($request->emailRecipient);
            $mail->addCC($request->emailCc);
            $mail->addBCC($request->emailBcc);

            $mail->addReplyTo('sender@example.com', 'SenderReplyName');

            if(isset($_FILES['emailAttachments'])) {
                for ($i=0; $i < count($_FILES['emailAttachments']['tmp_name']); $i++) {
                    $mail->addAttachment($_FILES['emailAttachments']['tmp_name'][$i], $_FILES['emailAttachments']['name'][$i]);
                }
            }


            $mail->isHTML(true);                // Set email content format to HTML

            $mail->Subject = $request->emailSubject;
            $mail->Body    = $request->emailBody;

            // $mail->AltBody = plain text version of email body;

            if( !$mail->send() ) {
                return back()->with("failed", "Email not sent.")->withErrors($mail->ErrorInfo);
            }

            else {
                return back()->with("success", "Email has been sent.");
            }

        } catch (Exception $e) {
             return back()->with('error','Message could not be sent.');
        }
    }
}
Step 4: Create Routes For PHPMailer
routes/web.php
<?php

use App\Http\Controllers\PHPMailerController;
use Illuminate\Support\Facades\Route;

/*
|--------------------------------------------------------------------------
| Web Routes
|--------------------------------------------------------------------------
|
| Here is where you can register web routes for your application. These
| routes are loaded by the RouteServiceProvider within a group which
| contains the "web" middleware group. Now create something great!
|
*/

Route::get("email", [PHPMailerController::class, "email"])->name("email");

Route::post("send-email", [PHPMailerController::class, "composeEmail"])->name("send-email");
Step 5: Create a View For Sending Email Using PHPMailer
resources/views/email.blade.php
<!doctype html>
<html lang="en">
    <head>
        <title>Send Email in Laravel Using PHPMailer Tutorial</title>
        <meta charset="utf-8">
        <meta name="viewport" content="width=device-width, initial-scale=1, shrink-to-fit=no">
        <link rel="stylesheet" href="https://maxcdn.bootstrapcdn.com/bootstrap/4.5.2/css/bootstrap.min.css">
    </head>
    <body>
        <div class="container pt-5 pb-5">
            <div class="row">
                <div class="col-xl-6 col-lg-6 col-sm-12 col-12 m-auto">
                    <form action="{{route('send-email')}}" method="POST" enctype="multipart/form-data">
                        @csrf
                        <div class="card shadow">

                            @if(Session::has("success"))
                                <div class="alert alert-success alert-dismissible"><button type="button" class="close">×</button>{{Session::get('success')}}</div>
                            @elseif(Session::has("failed"))
                                <div class="alert alert-danger alert-dismissible"><button type="button" class="close">×</button>{{Session::get('failed')}}</div>
                            @endif

                            <div class="card-header">
                                <h4 class="card-title">Send Email Using PHPMailer</h4>
                            </div>

                            <div class="card-body">
                                <div class="form-group">
                                    <label for="emailRecipient">Email To </label>
                                    <input type="email" name="emailRecipient" id="emailRecipient" class="form-control" placeholder="Mail To">
                                </div>

                                <div class="form-group">
                                    <label for="emailCc">CC </label>
                                    <input type="email" name="emailCc" id="emailCc" class="form-control" placeholder="Mail CC">
                                </div>

                                <div class="form-group">
                                    <label for="emailBcc">BCC </label>
                                    <input type="email" name="emailBcc" id="emailBcc" class="form-control" placeholder="Mail BCC">
                                </div>

                                <div class="form-group">
                                    <label for="emailSubject">Subject </label>
                                    <input type="text" name="emailSubject" id="emailSubject" class="form-control" placeholder="Mail Subject">
                                </div>

                                <div class="form-group">
                                    <label for="emailBody">Message </label>
                                    <textarea name="emailBody" id="emailBody" class="form-control" placeholder="Mail Body"></textarea>
                                </div>

                                <div class="form-group">
                                    <label for="emailAttachments">Attachment(s) </label>
                                    <input type="file" name="emailAttachments[]" multiple="multiple" id="emailAttachments" class="form-control">
                                </div>
                            </div>

                            <div class="card-footer">
                                <button type="submit" class="btn btn-success">Send Email </button>
                            </div>
                        </div>
                    </form>
                </div>
            </div>
        </div>

    <script src="https://ajax.googleapis.com/ajax/libs/jquery/3.5.1/jquery.min.js"></script>
    <script src="https://cdnjs.cloudflare.com/ajax/libs/popper.js/1.16.0/umd/popper.min.js"></script>
    <script src="https://maxcdn.bootstrapcdn.com/bootstrap/4.5.2/js/bootstrap.min.js"></script>
    </body>
</html>
Step 6: Send Email Using Gmail SMTP Server in Laravel
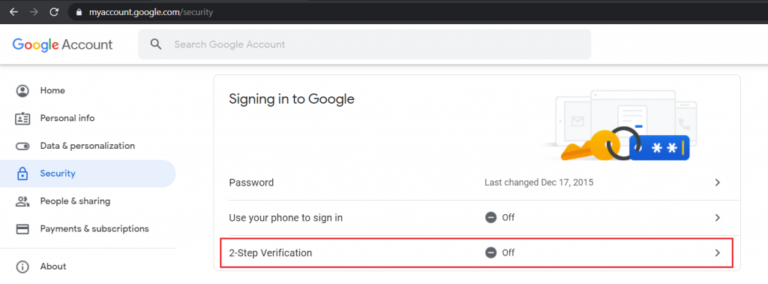
(1).Login to your Google account. Go to the My Account page
(2).Navigate to the Security page and scroll down to the Signing into Google section » Turn Off the Verification
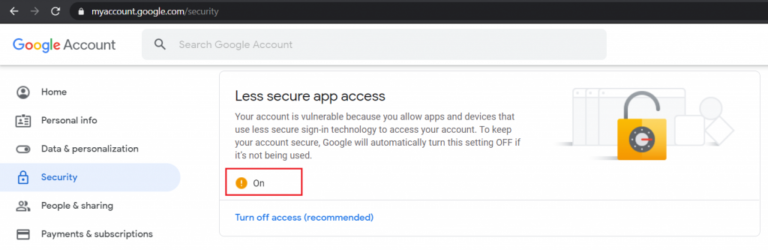
(3).Scroll down the Less secure app access section and turn On Less secure app access.
 Hey, You are done to use Gmail SMTP to send emails from the Laravel application.
Update your Gmail account credentials (email address and password) in the below code snippet
$mail->isSMTP();
$mail->Host     = 'smtp.gmail.com';
$mail->SMTPAuth = true;
$mail->Username = 'sender@gmail.com';
$mail->Password = '******';
$mail->SMTPSecure = 'tls';
$mail->Port     = 587;
I hope it can help you...