Laravel 8 Dropzone Image Upload Tutorial
May 14, 2021 . Admin
Hi Dev,
Today, i will show example of Laravel 8 image upload utilizing dropzone. you can lean multiple upload utilizing dropzone.js in Laravel 8. we can drag and drop file upload utilizing dropzone js in Laravel 8.
You can simply follow step by step dropzone multiple files upload with laravel 6 application example.
Dropzone.js is a jquery plugin, dropzone.js through we can select one image and additionally with preview. After select image from browse we can visually perceive preview of image. dropzone.js additionally provide filter like we can make validation for max upload, concrete image or file extension etc.
In this example i create two route, one for exhibit view and another for store image. i also engender two method on HomeController and one blade file with dropzone js plugin js and css that way we can exhibit layout. You can implement in your laravel application by following few step.
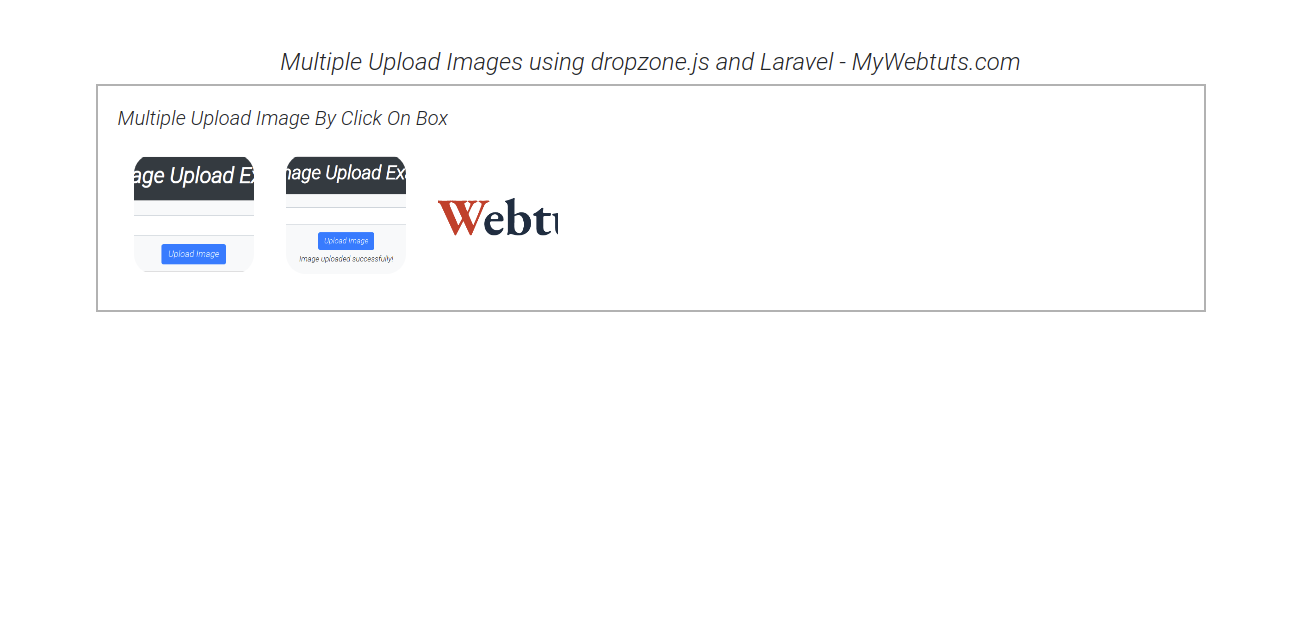
After run success this example you will find bellow preview in your application.
Here, I will give you full example for simply Laravel 8 image upload utilizing dropzone as bellow.
Step 1: Add RouteNow,Let's get started first step, we will add two new route one for display view and second one is store image in our routes.php file. So, open your route file and add bellow two new routes.
routes/web.php
Route::get('drop-zone', [DropzoneController::class,'dropzone']);
Route::post('drop-zone/store', [DropzoneController::class,'dropzoneStore'])->name('dropzone.store');
Step 2: Create Controller
Next, we will integrate two method on DropzoneController that way we can handle two route with image upload code. So, if you haven't engendered DropzoneController then engender new as bellow, or integrate two method.
You have to also create new images folder in your public folder for store image.
app/Http/Controllers/DropzoneController.php
<?php

namespace App\Http\Controllers;

use Illuminate\Http\Request;

class DropzoneController extends Controller
{


    public function dropzone()
    {
        return view('dropzone');
    }

    /**
     * Image Upload Code
     *
     * @return void
     */

    public function dropzoneStore(Request $request)
    {
        $image = $request->file('file');

        $imageName = time().'.'.$image->getClientOriginalName();
        $image->move(public_path('images'),$imageName);

        return response()->json(['success'=>$imageName]);
    }

}
Step 3: Add Blade File
At last step we have to engender dropzone.blade.php file in your resources directory. in this file i write code of image uploading utilizing dropzone.js, so let's create incipient blade file and put bellow code:
resources/views/dropzone.blade.php
<!DOCTYPE html>
<html>
<head>
    <title>Laravel 8 Dropzone Image Upload Tutorial - MyWebtuts.com</title>
    <script src="https://ajax.googleapis.com/ajax/libs/jquery/3.5.1/jquery.min.js"></script>
    <link rel="stylesheet" href="https://maxcdn.bootstrapcdn.com/bootstrap/4.5.2/css/bootstrap.min.css">
    <link href="https://cdnjs.cloudflare.com/ajax/libs/dropzone/4.0.1/min/dropzone.min.css" rel="stylesheet">
    <script src="https://cdnjs.cloudflare.com/ajax/libs/dropzone/4.2.0/min/dropzone.min.js"></script>
</head>
<body>


<div class="container">
    <div class="row">
        <div class="col-md-12">
            <h4 class="text-center">Laravel 8 Dropzone Image Upload Tutorial - MyWebtuts.com</h4>
            {!! Form::open([ 'route' => [ 'dropzone.store' ], 'files' => true, 'enctype' => 'multipart/form-data', 'class' => 'dropzone', 'id' => 'image-upload' ]) !!}
            <div>
                <h5>Upload Multiple Image By Click On Box</h5>
            </div>
            {!! Form::close() !!}
        </div>
    </div>
</div>


<script type="text/javascript">
        Dropzone.options.imageUpload = {
            maxFilesize         :       1,
            acceptedFiles: ".jpeg,.jpg,.png,.gif"
        };
</script>


</body>
</html>
Output
You can get more information about Dropzone.js from here : Click Here.
I Hope It will help you..