How to Create a custom CheckBox in React Native?
Oct 13, 2022 . Admin

Here, I will show you how to works react native custom checkbox example. Here you will learn custom checkbox in react native. step by step explain custom checkbox for both android and ios in react native. We will look at example of custom checkbox false or true after click.
In this tutorial, we are going to learn how to create a custom Checkbox component in React Native application for Android and iOS platforms. We will learn step by step how to get Multiple checkboxes values on button click using React Native APIs.
Step 1: Download ProjectIn the first step run the following command to create a project.
expo init ExampleAppStep 2: Install Library
you can install react-native-vector-icons in your project.
npm i react-native-vector-iconsStep 3: checkbox.js
In this step, You will open the checkbox.js file and put the code.
component/checkbox.js
import { Pressable, StyleSheet, Text, View } from "react-native";
import React from "react";
import { MaterialCommunityIcons } from "@expo/vector-icons";

const CheckBox = (props) => {
    const iconName = props.isChecked ?
        "checkbox-marked" : "checkbox-blank-outline";

    return (
        <View style={styles.container}>
            <Pressable onPress={props.onPress}>
                <MaterialCommunityIcons
                    name={iconName} size={30} color="#000" />
            </Pressable>
            <Text style={styles.title}>{props.title}</Text>
        </View>
    );
};

export default CheckBox;

const styles = StyleSheet.create({
    container: {
        justifyContent: "flex-start",
        alignItems: "center",
        flexDirection: "row",
        width: 150,
        marginTop: 5,
        marginHorizontal: 5,
    },
    title: {
        fontSize: 16,
        color: "#000",
        marginLeft: 5,
        fontWeight: "600",
    },
});
Step 4: App.js
In this step, You will open the App.js file and put the code.
App.js
import { StyleSheet, View } from "react-native";
import { useState } from "react";
import CheckBox from "./component/checkbox";

export default function App() {
    const [writing, setWriting] = useState(false);
      const [learning, setlearning] = useState(false);
      const [reading, setReading] = useState(false);

    return (
        <View style={styles.container}>
            <CheckBox
                onPress={() => setMusic(!writing)}
                title="Writing"
                isChecked={writing}
              />
              <CheckBox
                onPress={() => setDancing(!learning)}
                title="Learning"
                isChecked={learning}
              />
              <CheckBox
                onPress={() => setReading(!reading)}
                title="Reading"
                isChecked={reading}
              />
        </View>
      );
    }

const styles = StyleSheet.create({
    container: {
        flex: 1,
        backgroundColor: "#fff",
        justifyContent: "center",
        alignItems: "center",
      },
});
Step 5: Run Project
In the last step run your project using the below command.
expo start
You can QR code scan in Expo Go Application on mobile.
Output:
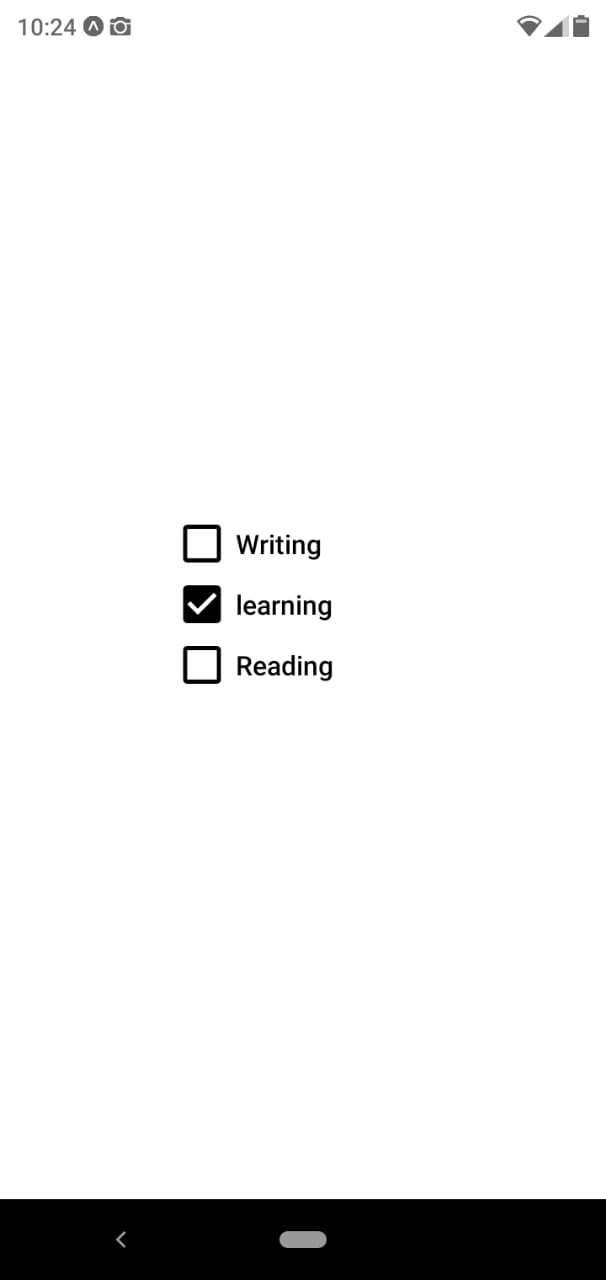
It will help you...