Laravel 9 Passport REST API Tutorial
Mar 05, 2022 . Admin
Hi dev,
Today, I am explain Laravel 9 Passport REST API Tutorial. This tutorial will show you step by step how to create rest APIs with laravel 9 passport authentication. And as well as how to install and configure passport auth in laravel 9 app. In this tutorial, you will learn how to build rest APIs with passport authentication in laravel 9 application. As well as will show you how to install passport and configure passport in laravel 9 app.
Laravel makes building such a resource easy with a predefined provision for you to secure it appropriately. This tutorial will teach you how to build and secure your Laravel back-end API using Laravel passport. When we are finished, you will have learned how to secure your new Laravel API or provide an extra layer of security to existing ones.
Step 1: Download LaravelLet us begin the tutorial by installing a new laravel application. if you have already created the project, then skip following step.
composer create-project laravel/laravel example-appStep 2: Install Passport
In this step we need to install passport via the Composer package manager, so one your terminal and fire bellow command:
composer require laravel/passport
After successfully install package, we require to get default migration for create new passport tables in our database. so let's run bellow command.
php artisan migrate
Next, we need to install a passport using a command, Using passport:install command, will create token keys for security. So let's run bellow command:
php artisan passport:installStep 3: Passport Configuration
In this step, we have to configuration on three place model, service provider, and auth config file. So you have to just follow changes on that file.
In model we added HasApiTokens class of Passport,
In auth.php, we added api auth configuration.
app/Models/User.php
<?php

namespace App\Models;

use Illuminate\Contracts\Auth\MustVerifyEmail;
use Illuminate\Database\Eloquent\Factories\HasFactory;
use Illuminate\Foundation\Auth\User as Authenticatable;
use Illuminate\Notifications\Notifiable;
use Laravel\Passport\HasApiTokens;

class User extends Authenticatable
{
    use HasApiTokens, HasFactory, Notifiable;

    /**
     * The attributes that are mass assignable.
     *
     * @var array

     */
    protected $fillable = [
        'name',
        'email',
        'password',
    ];

    /**
     * The attributes that should be hidden for serialization.
     *
     * @var array

     */
    protected $hidden = [
        'password',
        'remember_token',
    ];

    /**
     * The attributes that should be cast.
     *
     * @var array

     */
    protected $casts = [
        'email_verified_at' => 'datetime',
    ];
}
config/auth.php
<?php

return [
    .....
    'guards' => [
        'web' => [
            'driver' => 'session',
            'provider' => 'users',
        ],
        'api' => [
            'driver' => 'passport',
            'provider' => 'users',
        ],
    ],
    .....
]
Step 4: Add Posts Table and Model
next, we require to create migration for posts table using Laravel 9 php artisan command, so first fire bellow command:
php artisan make:migration create_posts_table
After this command you will find one file in following path database/migrations and you have to put bellow code in your migration file for create posts table.
<?php

use Illuminate\Database\Migrations\Migration;
use Illuminate\Database\Schema\Blueprint;
use Illuminate\Support\Facades\Schema;

return new class extends Migration
{
    /**
     * Run the migrations.
     *
     * @return void
     */
    public function up()
    {
        Schema::create('posts', function (Blueprint $table) {
            $table->id();
            $table->string('title');
            $table->text('body');
            $table->timestamps();
        });
    }

    /**
     * Reverse the migrations.
     *
     * @return void
     */
    public function down()
    {
        Schema::dropIfExists('posts');
    }
};
After create migration we need to run above migration by following command:
php artisan migrate
After create "posts" table you should create Post model for posts, so first create file in this path app/Models/Post.php and put bellow content in item.php file:
app/Models/Post.php
<?php

namespace App\Models;

use Illuminate\Database\Eloquent\Factories\HasFactory;
use Illuminate\Database\Eloquent\Model;

class Post extends Model
{
    use HasFactory;

    /**
     * The attributes that are mass assignable.
     *
     * @var array
     */
    protected $fillable = [
        'title', 'body'
    ];
}
Step 5: Create API Routes
In this step, we will create api routes. Laravel provide api.php file for write web services route. So, let's add new route on that file.
routes/api.php
<?php

use Illuminate\Http\Request;
use Illuminate\Support\Facades\Route;

use App\Http\Controllers\API\RegisterController;
use App\Http\Controllers\API\PostController;

/*
|--------------------------------------------------------------------------
| API Routes
|--------------------------------------------------------------------------
|
| Here is where you can register API routes for your application. These
| routes are loaded by the RouteServiceProvider within a group which
| is assigned the "api" middleware group. Enjoy building your API!
|
*/

Route::post('register', [RegisterController::class, 'register']);
Route::post('login', [RegisterController::class, 'login']);

Route::middleware('auth:api')->group( function () {
    Route::resource('posts', PostController::class);
});
Step 6: Create Controller Files
in next step, now we have create new controller as BaseController, PostController and RegisterController, i created new folder "API" in Controllers folder because we will make alone APIs controller, So let's create both controller:
app/Http/Controllers/API/BaseController.php
<?php

namespace App\Http\Controllers\API;

use Illuminate\Http\Request;
use App\Http\Controllers\Controller as Controller;

class BaseController extends Controller
{
    /**
     * success response method.
     *
     * @return \Illuminate\Http\Response
     */
    public function sendResponse($result, $message)
    {
        $response = [
            'success' => true,
            'data'    => $result,
            'message' => $message,
        ];

        return response()->json($response, 200);
    }

    /**
     * return error response.
     *
     * @return \Illuminate\Http\Response
     */
    public function sendError($error, $errorMessages = [], $code = 404)
    {
        $response = [
            'success' => false,
            'message' => $error,
        ];

        if(!empty($errorMessages)){
            $response['data'] = $errorMessages;
        }

        return response()->json($response, $code);
    }
}
app/Http/Controllers/API/RegisterController.php
<?php

namespace App\Http\Controllers\API;

use Illuminate\Http\Request;
use App\Http\Controllers\API\BaseController as BaseController;
use App\Models\User;
use Illuminate\Support\Facades\Auth;
use Validator;

class RegisterController extends BaseController
{
    /**
     * Register api
     *
     * @return \Illuminate\Http\Response
     */
    public function register(Request $request)
    {
        $validator = Validator::make($request->all(), [
            'name' => 'required',
            'email' => 'required|email',
            'password' => 'required',
        ]);

        if($validator->fails()){
            return $this->sendError('Validation Error.', $validator->errors());
        }

        $input = $request->all();
        $input['password'] = bcrypt($input['password']);
        $user = User::create($input);
        $success['token'] =  $user->createToken('MyApp')->accessToken;
        $success['name'] =  $user->name;

        return $this->sendResponse($success, 'User register successfully.');
    }

    /**
     * Login api
     *
     * @return \Illuminate\Http\Response
     */
    public function login(Request $request)
    {
        if(Auth::attempt(['email' => $request->email, 'password' => $request->password])){
            $user = Auth::user();
            $success['token'] =  $user->createToken('MyApp')->accessToken;
            $success['name'] =  $user->name;

            return $this->sendResponse($success, 'User login successfully.');
        }
        else{
            return $this->sendError('Unauthorised.', ['error'=>'Unauthorised']);
        }
    }
}
app/Http/Controllers/API/PostController.php
<?php

namespace App\Http\Controllers\API;

use Illuminate\Http\Request;
use App\Http\Controllers\API\BaseController as BaseController;
use App\Http\Resources\PostResource;
use App\Models\Post;
use Validator;

class PostController extends BaseController
{
    /**
     * Display a listing of the resource.
     *
     * @return \Illuminate\Http\Response
     */
    public function index()
    {
        $posts = Post::all();

        return $this->sendResponse(PostResource::collection($posts), 'Post retrieved successfully.');
    }

    /**
     * Store a newly created resource in storage.
     *
     * @param  \Illuminate\Http\Request  $request
     * @return \Illuminate\Http\Response
     */
    public function store(Request $request)
    {
        $input = $request->all();

        $validator = Validator::make($input, [
            'title' => 'required',
            'body' => 'required'
        ]);

        if($validator->fails()){
            return $this->sendError('Validation Error.', $validator->errors());
        }

        $post = Post::create($input);

        return $this->sendResponse(new PostResource($post), 'Post created successfully.');
    }

    /**
     * Display the specified resource.
     *
     * @param  int  $id
     * @return \Illuminate\Http\Response
     */
    public function show($id)
    {
        $post = Post::find($id);

        if (is_null($post)) {
            return $this->sendError('Post not found.');
        }

        return $this->sendResponse(new PostResource($post), 'Post retrieved successfully.');
    }

    /**
     * Update the specified resource in storage.
     *
     * @param  \Illuminate\Http\Request  $request
     * @param  int  $id
     * @return \Illuminate\Http\Response
     */
    public function update(Request $request, Post $post)
    {
        $input = $request->all();

        $validator = Validator::make($input, [
            'title' => 'required',
            'body' => 'required'
        ]);

        if($validator->fails()){
            return $this->sendError('Validation Error.', $validator->errors());
        }

        $post->title = $input['title'];
        $post->body = $input['body'];
        $post->save();

        return $this->sendResponse(new PostResource($post), 'Post updated successfully.');
    }

    /**
     * Remove the specified resource from storage.
     *
     * @param  int  $id
     * @return \Illuminate\Http\Response
     */
    public function destroy(Post $post)
    {
        $post->delete();

        return $this->sendResponse([], 'Post deleted successfully.');
    }
}
Step 7: Create Eloquent API Resources
This is a very important step of creating rest api in laravel 9. you can use eloquent api resources with api. it will helps you to make same response layout of your model object. we used in PostController file. now we have to create it using following command:
php artisan make:resource PostResource
Now there created new file with new folder on following path:
app/Http/Resources/PostResource.php
<?php

namespace App\Http\Resources;

use Illuminate\Http\Resources\Json\JsonResource;

class PostResource extends JsonResource
{
    /**
     * Transform the resource into an array.
     *
     * @param  \Illuminate\Http\Request  $request
     * @return array
     */
    public function toArray($request)
    {
        return [
            'id' => $this->id,
            'title' => $this->title,
            'body' => $this->body,
            'created_at' => $this->created_at->format('d/m/Y'),
            'updated_at' => $this->updated_at->format('d/m/Y'),
        ];
    }
}
Run Laravel App:
All steps have been done, now you have to type the given command and hit enter to run the laravel app:
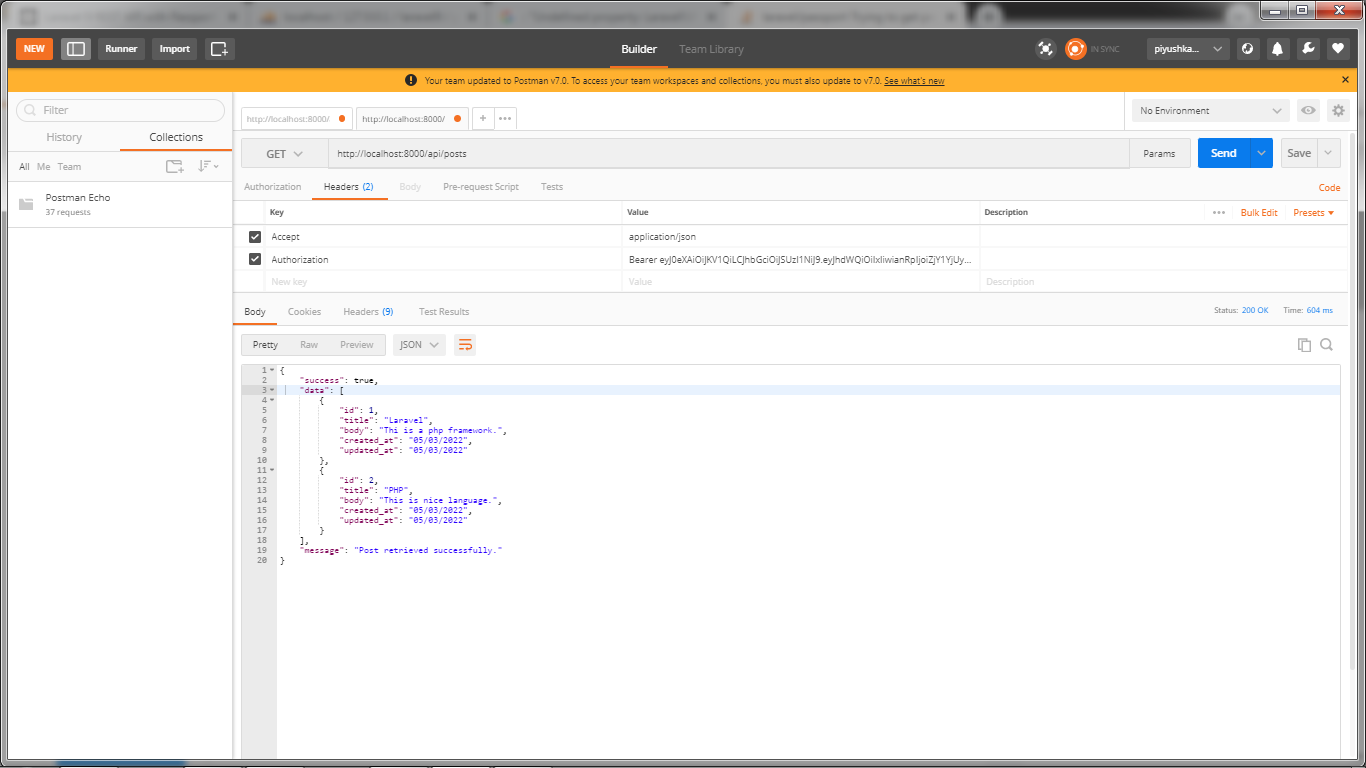
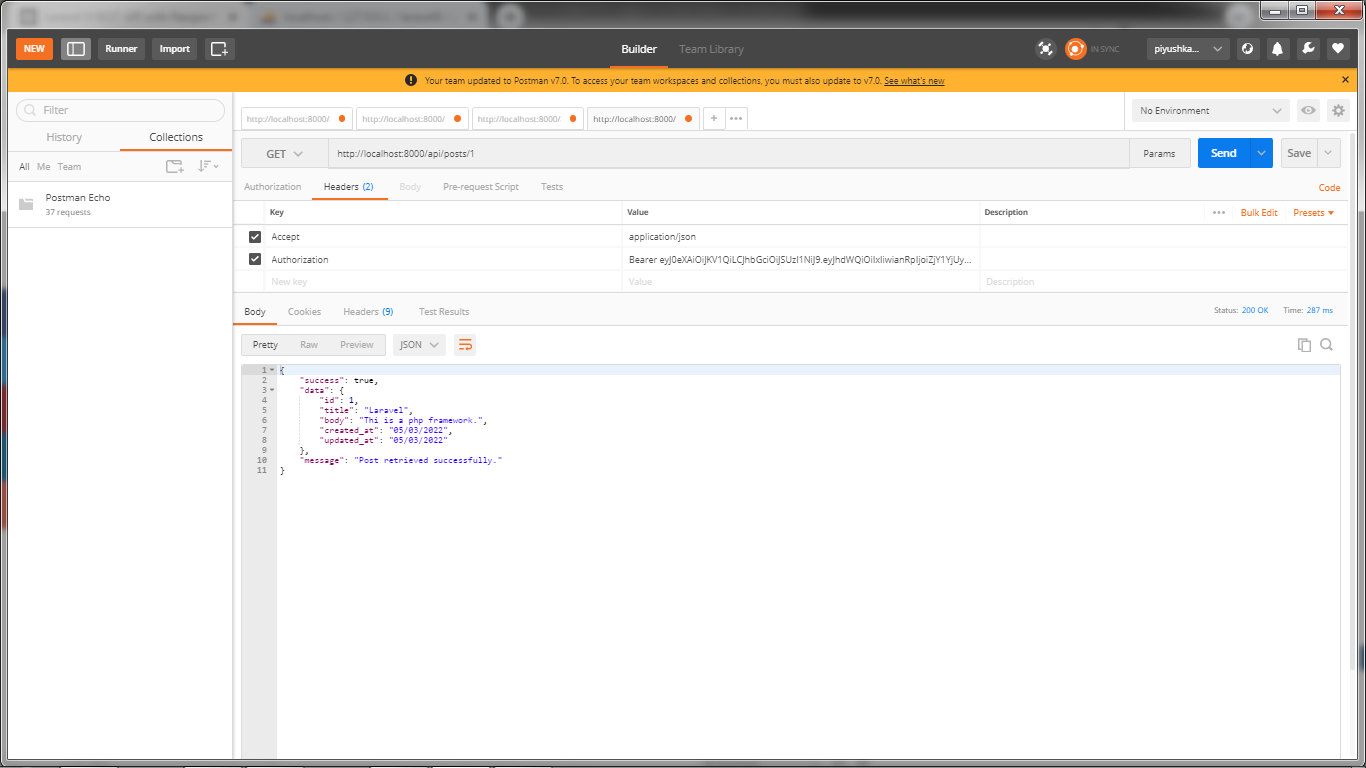
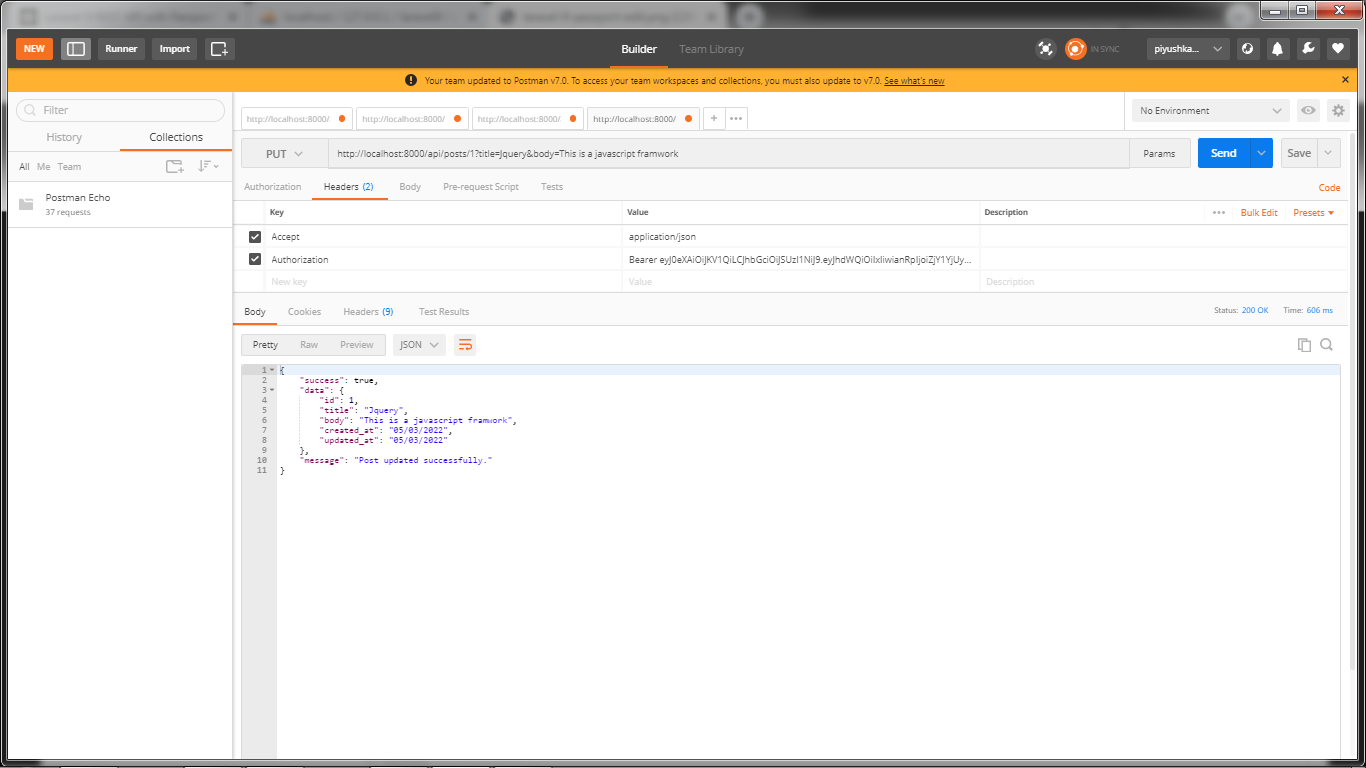
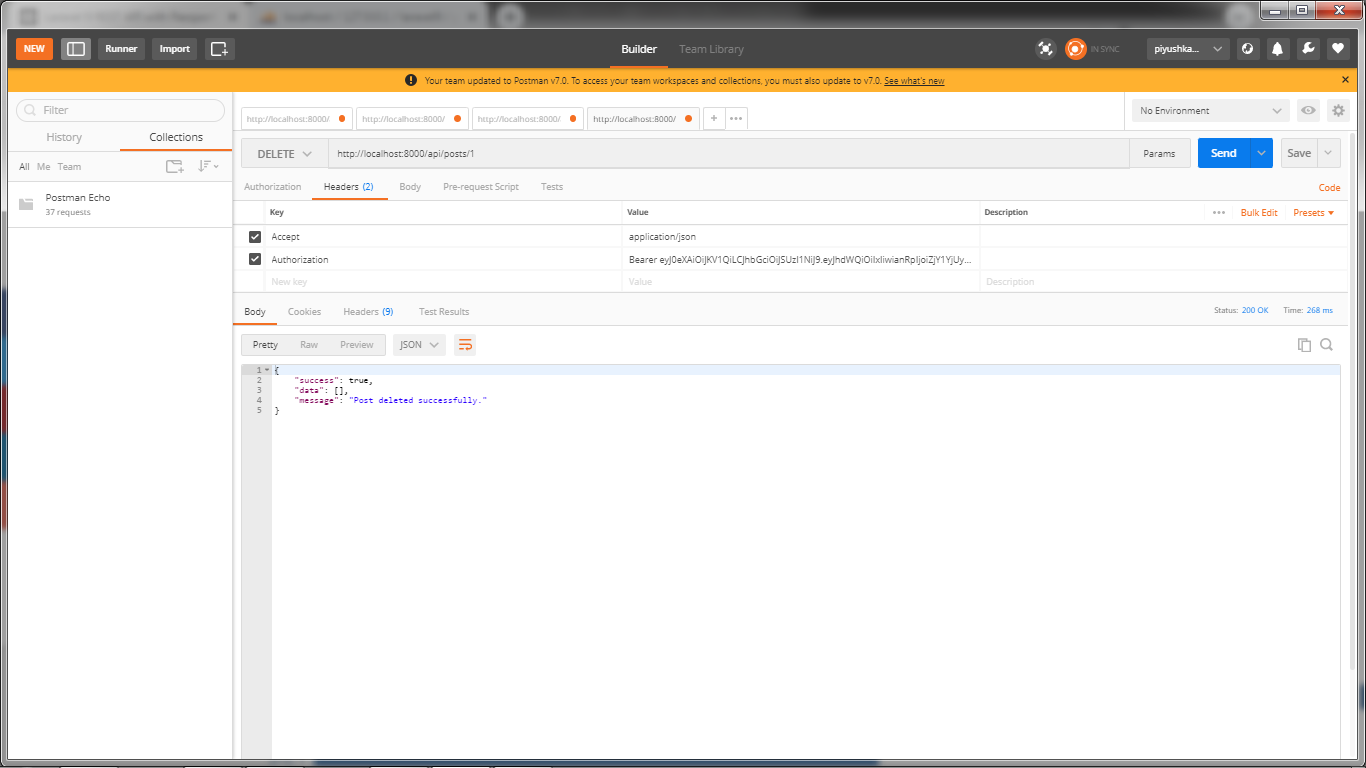
php artisan servemake sure in details api we will use following headers as listed bellow:
'headers' => [
    'Accept' => 'application/json',
    'Authorization' => 'Bearer '.$accessToken,
]
Here is Routes URL with Verb:
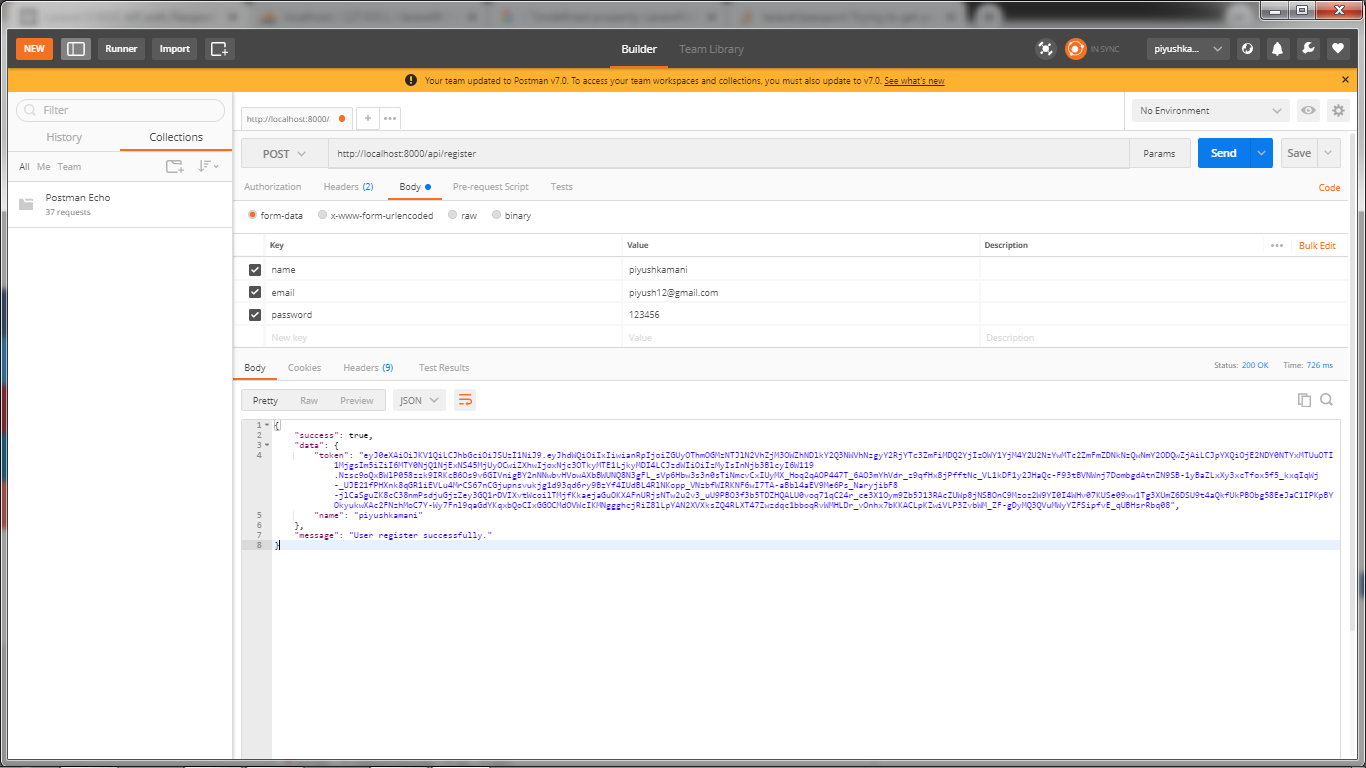
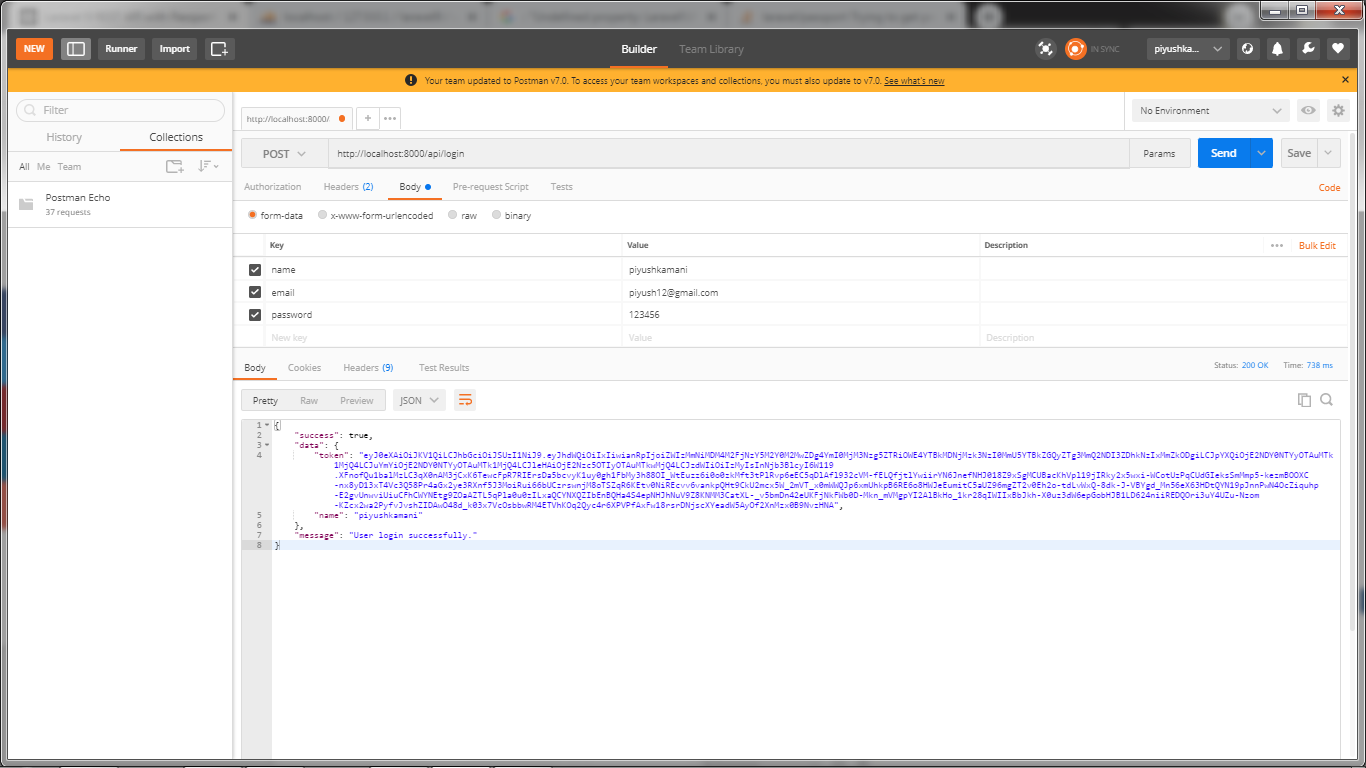
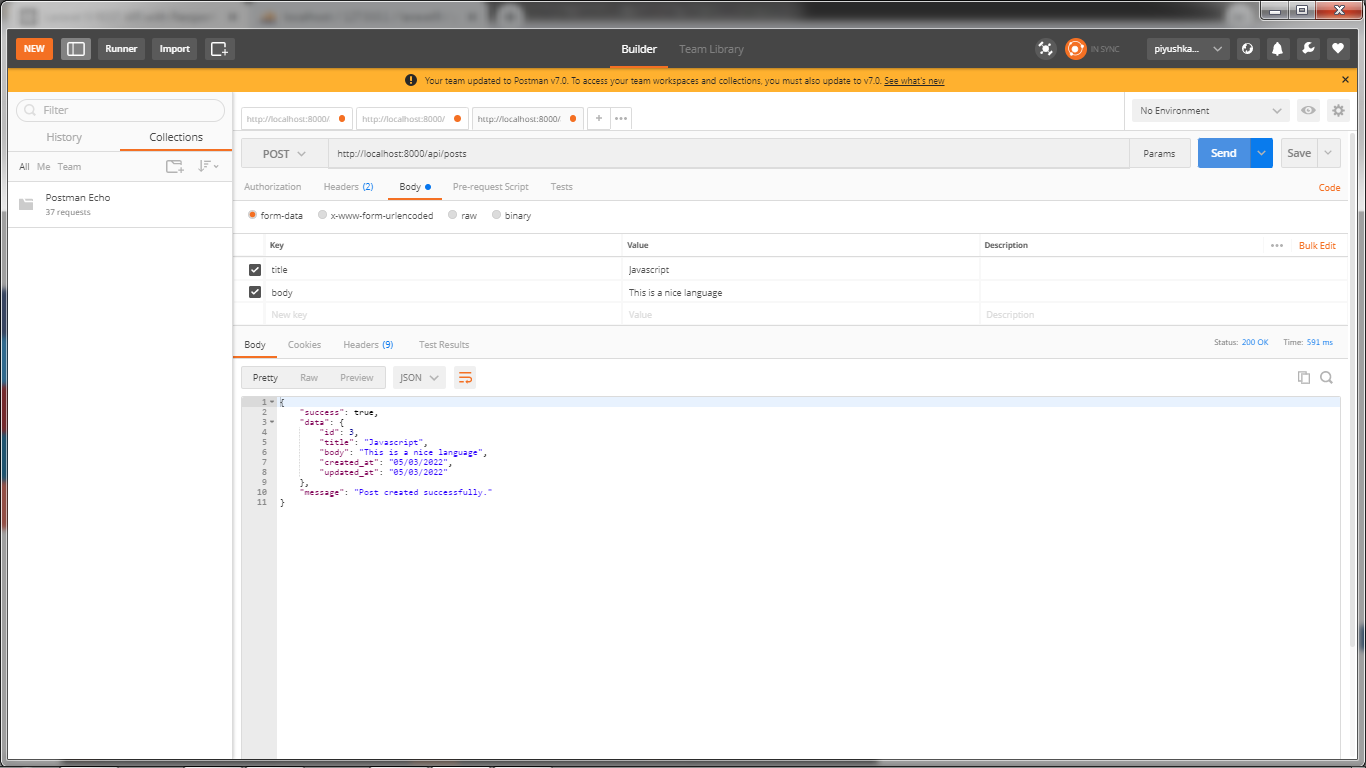
Now simply you can run above listed url like as bellow screen shot:
1) Register API: Verb:GET, URL:http://localhost:8000/api/register
2) Login API: Verb:GET, URL:http://localhost:8000/api/login
I hope it can help you...
