React Native Haptic Feedback Example
Jul 03, 2021 . Admin
Hi Guys,
In this blog,I will learn you how to use haptic feedback in react native. We will show example of haptic feedback in react native. You can easliy create react native haptic feedback. First i will import Haptics namespace from expo-haptics, after I will make haptic feedback example using in react native.
Haptic touch feedback is an engineered feedback from applying touch on a game, console or a smartphone. You know those vibrations from your favorite video games when your character dies or when the ball strikes the bar in FIFA.
we use haptics feedback in all of our React Native apps, in order to make the user experience snappy and engaging. Take a look at big apps, such as Facebook, Instagram or Twitter and notice how nice the haptic feedback feels in your hand when you are taking important actions such as likes or follows.
Step 1 - Create projectIn the first step Run the following command for create project.
expo init MyWebtutsStep 2 - Installation of Dependency
In the step, Run the following command for installation of dependency.
To use Haptics you need to install expo-haptics package.
To install this open the terminal and jump into your project
cd paper MyWebtutsRun the following command
yarn add expo-hapticsStep 3 - App.js
In this step, You will open App.js file and put the code.
import * as React from 'react';
import { StyleSheet, View, Text, Button } from 'react-native';
import * as Haptics from 'expo-haptics';
export default function App() {
return (
<View style={styles.container}>
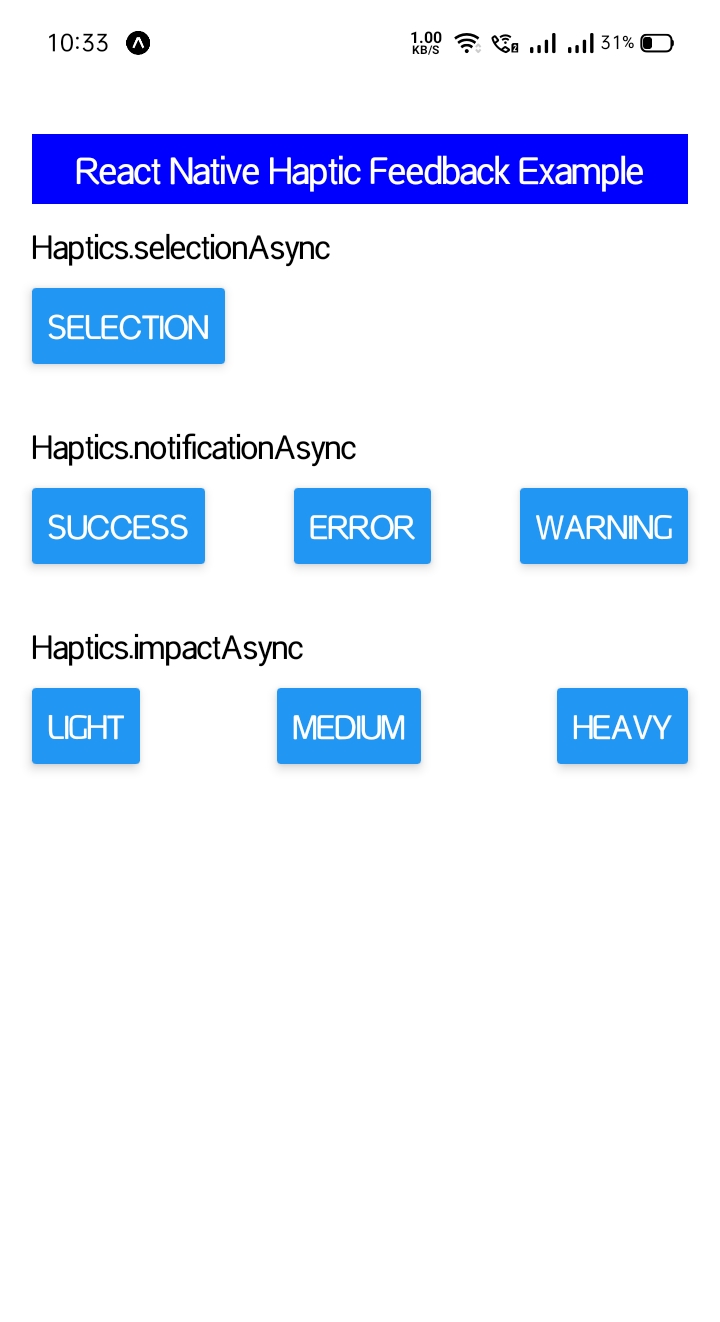
<Text style={styles.textMain}>React Native Haptic Feedback Example</Text>
<Text style={styles.text}>Haptics.selectionAsync</Text>
<View style={styles.buttonContainer}>
<Button title='Selection' onPress={() => Haptics.selectionAsync() } />
</View>
<Text style={styles.text}>Haptics.notificationAsync</Text>
<View style={styles.buttonContainer}>
<Button title='Success' onPress={() => Haptics.notificationAsync(Haptics.NotificationFeedbackType.Success) } />
<Button title='Error' onPress={() => Haptics.notificationAsync(Haptics.NotificationFeedbackType.Error) } />
<Button title='Warning' onPress={() => Haptics.notificationAsync(Haptics.NotificationFeedbackType.Warning) } />
</View>
<Text style={styles.text}>Haptics.impactAsync</Text>
<View style={styles.buttonContainer}>
<Button title='Light' onPress={() => Haptics.impactAsync(Haptics.ImpactFeedbackStyle.Light) } />
<Button title='Medium' onPress={() => Haptics.impactAsync(Haptics.ImpactFeedbackStyle.Medium) } />
<Button title='Heavy' onPress={() => Haptics.impactAsync(Haptics.ImpactFeedbackStyle.Heavy) } />
</View>
</View>
);
}
const styles = StyleSheet.create({
container: {
flex: 0.6,
justifyContent: 'center',
paddingHorizontal: 16,
},
buttonContainer: {
flexDirection: 'row',
alignItems: 'stretch',
marginTop: 10,
marginBottom: 30,
justifyContent: 'space-between'
},
textMain:{
fontSize:16,
marginBottom:10,
backgroundColor:'#0000FF',
color:'#ffffff',
padding:5,
textAlign:'center',
},
});
Step 3 - Run project
In the last step run your project using bellow command.
expo startOutput
It will help you...