React Native Multiple Select Dropdown Example Tutorial
Jun 16, 2022 . Admin

Hi Guys,
Now, let's see article of react native multiple select dropdown example. if you want to see example of multiple select dropdown example in react native then you are a right place. you will learn how to create multiple select dropdown in react native. step by step explain how to implement multiple select dropdown in react native. Here, Creating a basic example of how to use multiple select dropdown in react native.
In this example I will create a multiple select dropdown. I will first create an object to render data in the dropdown. Then I will use the MultiSelect component. This component will store the object in data props. after then MultiSelect component listing a data and select multiple items.
Let's start following example:
Step 1: Download ProjectIn the first step run the following command to create a project.
expo init ExampleAppStep 2: Installation and Setup
First, you need to install them in your project:
npm install react-native-element-dropdown --save
You install vector icons to set the icon in the Dropdown:
npm i react-native-vector-icons
you have use any bundled Icon:
import this:import AntDesign from 'react-native-vector-icons/AntDesign';Step 3: App.js
In this step, You will open the App.js file and put the code.
import React from 'react';
import { StatusBar, StyleSheet, Text, View, TouchableOpacity } from 'react-native';
import { MultiSelect } from 'react-native-element-dropdown';
import AntDesign from 'react-native-vector-icons/AntDesign';

const DATA = [
    { label: 'React Naive', value: '1' },
    { label: 'Javascript', value: '2' },
    { label: 'Laravel', value: '3' },
    { label: 'PHP', value: '4' },
    { label: 'jQuery', value: '5' },
    { label: 'Bootstrap', value: '6' },
    { label: 'HTML', value: '7' },
    { label: 'CSS', value: '8' },
];

const App = () => {
    const [selected, setSelected] = React.useState([]);

    const renderDataItem = (item) => {
        return (
            <View style={styles.item}>
                <Text style={styles.selectedTextStyle}>{item.label}</Text>
                <AntDesign style={styles.icon} color="black" name="Safety" size={20} />
            </View>
        );
    };

    return (
        <View style={styles.container}>
            <MultiSelect
                style={styles.dropdown}
                placeholderStyle={styles.placeholderStyle}
                selectedTextStyle={styles.selectedTextStyle}
                inputSearchStyle={styles.inputSearchStyle}
                iconStyle={styles.iconStyle}
                data={DATA}
                labelField="label"
                valueField="value"
                placeholder="Multi Select item"
                value={selected}
                search
                searchPlaceholder="Search..."
                onChange={item => {
                    setSelected(item);
                }}
                renderLeftIcon={() => (
                    <AntDesign
                        style={styles.icon}
                        color="black"
                        name="Safety"
                        size={20}
                    />
                )}
                renderItem={renderDataItem}
                renderSelectedItem={(item, unSelect) => (
                    <TouchableOpacity onPress={() => unSelect && unSelect(item)}>
                        <View style={styles.selectedStyle}>
                            <Text style={styles.textSelectedStyle}>{item.label}</Text>
                            <AntDesign color="black" name="delete" size={17} />
                        </View>
                    </TouchableOpacity>
                )}
            />
            <StatusBar />
        </View>
    );
}

const styles = StyleSheet.create({
    container: {
        backgroundColor: '#37d5d2a2',
        paddingTop: 30,
        flex:1
    },
    dropdown: {
        height: 50,
        backgroundColor: 'white',
        borderRadius: 12,
        padding: 12,
        shadowColor: '#000',
        shadowOffset: {
            width: 0,
            height: 1,
        },
        shadowOpacity: 0.2,
        shadowRadius: 1.41,

        elevation: 2,
    },
    placeholderStyle: {
        fontSize: 16,
    },
    selectedTextStyle: {
        fontSize: 14,
    },
    iconStyle: {
        width: 20,
        height: 20,
    },
    inputSearchStyle: {
        height: 40,
        fontSize: 16,
    },
    icon: {
        marginRight: 5,
    },
    item: {
        padding: 17,
        flexDirection: 'row',
        justifyContent: 'space-between',
        alignItems: 'center',
    },
    selectedStyle: {
        flexDirection: 'row',
        justifyContent: 'center',
        alignItems: 'center',
        borderRadius: 14,
        backgroundColor: 'white',
        shadowColor: '#000',
        marginTop: 8,
        marginRight: 12,
        paddingHorizontal: 12,
        paddingVertical: 8,
        shadowOffset: {
            width: 0,
            height: 1,
        },
        shadowOpacity: 0.2,
        shadowRadius: 1.41,

        elevation: 2,
    },
    textSelectedStyle: {
        marginRight: 5,
        fontSize: 16,
    },
});

export default App;
Run Project
In the last step run your project using the below command.
expo start
You can QR code scan in Expo Go Application on mobile.
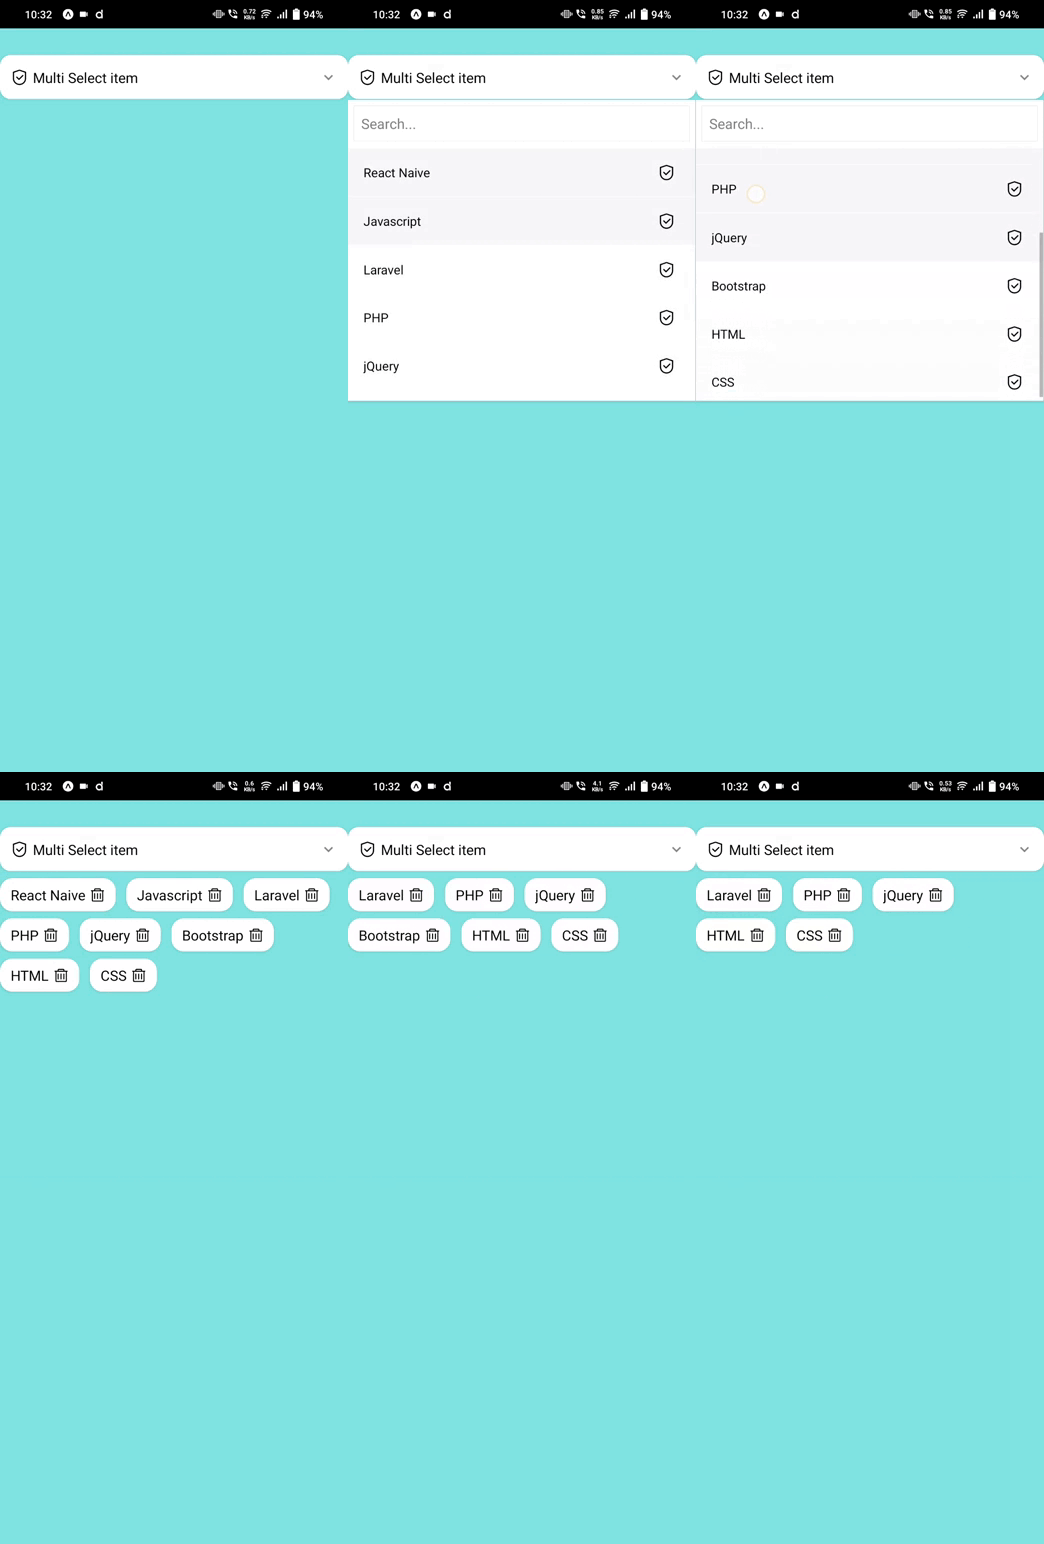
Output :
It will help you...
